Percussive guitar: a guide to modern acoustic fingerstyle technique
Whatever style of music you play on the acoustic guitar, you can incorporate slaps, knocks, raps and other hands-on-wood effects into your playing that can enliven and add greater sonic interest to your performance
Percussive acoustic playing has been around forever, and it’s easy to see why.
The guitar is essentially a drum with strings stretched over it. (Its cousin, the banjo, uses a drumhead to cover the body.)
As demonstrated by Andy McKee, Jon Gomm and Daryl Kellie, there has been a resurgence of interest in the percussive-heavy, alternate-tuned style of progressive acoustic guitar playing pioneered in the Eighties by guitarists like Michael Hedges.
Whatever style of music you play on the acoustic guitar, you can incorporate slaps, knocks, raps and other hands-on-wood effects into your playing that can enliven and add greater sonic interest to your performance.
In this lesson, I’ll show you how to harness some of the percussive possibilities that the acoustic guitar offers through a pick-free playing approach that I’ve adopted over the years. I’ll demonstrate how to integrate tapping and thumping techniques into vamps and grooves that also incorporate fretted and open-string notes and chords played using conventional techniques.
My own discovery of this technique was prompted by two things. First, my parents discouraged me from being a drummer because the instrument makes too much racket (you could say I’m a frustrated drummer at heart).
Second, when I started out pursuing a career in music as a guitarist, I couldn’t afford to hire a band and was dissatisfied with the amount of music that came out of the acoustic guitar played in the conventional way. So I set out to create a kind of workaround—a “pocket band,” if you will—by incorporating various techniques of rapping on my guitar’s body with my bare hands, as if it were a drum, in order to emulate the feel of a rhythm section.
All the latest guitar news, interviews, lessons, reviews, deals and more, direct to your inbox!
If I’m writing a song and it seems to need a more rhythmically detailed pulse, I’ll start drumming on the instrument using my fingers and then try to get the strings to conform to my musical vision, typically by using an altered tuning.
Of course, not every song is served by this approach, and it’s never been my intention to take any technique to the heroic level of a guitar god. My mission is simply to approximate the feel of a band and convey the sounds I’m hearing to facilitate the writing process. While the sound of drumming on an acoustic guitar is no replacement for a real drummer, the techniques that I’ll show you can communicate a rich rhythmic groove in a way that conventional guitar-playing techniques often can’t.
We’ll begin with a look at the main pieces of a basic drum kit—bass drum, snare and hi-hat—as they relate to this technique. We’ll then move on to a discussion of tunings that can facilitate your use of the percussive-style playing, and conclude with some musical examples.
The Kick Drum
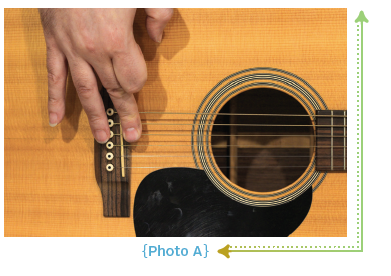
The kick sound that is most satisfying to me is found by striking the bottom three strings with my pick hand’s outstretched middle finger just in front of the bridge (see PHOTO A). If you’re using this technique in a live performance, make sure the sound technician understands what you’re going to do and provides a little more bottom end in the EQ to give your tone a satisfying thump.
If you’re recording, it often helps to mix in the direct signal from your guitar’s pickup with that of a microphone, as the pickup will capture more of the low-frequency energy of the thumping. In my recording endeavors, I’ll sometimes use tight kick-drum samples to help bolster the groove. (I told you I wanted to be a drummer!)
As an added benefit, if you have a bass line going on the bottom strings, you can perfectly synchronize them with your kick pattern by attacking the notes with this same pick-hand finger. This guarantees that your virtual bassist and drummer will always be perfectly locked in together.
The Snare
There are several ways to achieve a snare drum–like effect on an acoustic guitar, and they all involve striking the instrument’s body anywhere that produces a pitch that is higher than that of the kick sound, which is pretty much anywhere.
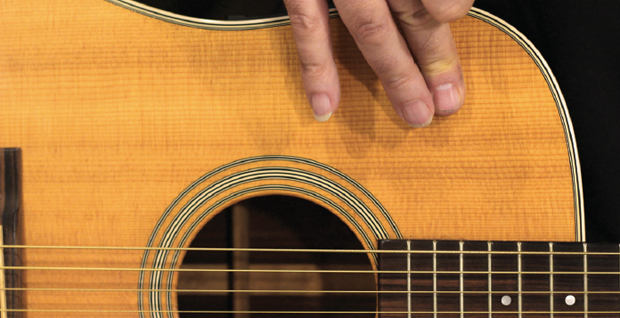
My rule is that the snare is wherever I can reach it, based on whatever other duties either hand is performing. My go-to snare drum is at the top corner area of the body, which I likewise strike with my pick-hand middle finger (see PHOTO B).
Other fingers can be used, and you should use whichever one you prefer.
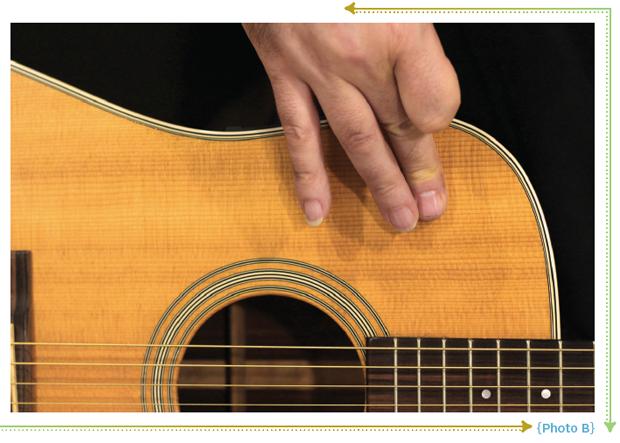
This snare “cracks” pretty nicely, and its attack can be tempered by the way you strike the wood with your finger. For example, you can use the inner side of your first knuckle for that bone-on-wood sound, or the softer pad, or “paw,” between the knuckle and fingertip to smooth out the transient spikes that can be a bit shrill sounding and problematical for amplification or recording.
When recording, I’ll sometimes use various makeshift damping devices. These include taping a cocktail napkin to that part of the body, much as a drummer will put a towel over his snare to dampen it or a lead guitarist will tie a sock around the neck in front of the nut to suppress sympathetic string vibration when recording a solo. (If you cringe at the idea of taping anything to a valuable or favorite guitar, you might want to consider using a less-precious instrument for this purpose.
If your instrument isn’t a cutaway, the opposite corner area of the body will work well as a snare drum and can be easily reached with the fret hand from below the neck if your pick hand is busy picking or tapping a harmonic.
This way of playing the guitar is similar to playing a conga drum and requires a bit of resourcefulness and creative problem solving, as any given groove can pose different physical challenges and restrictions and call for a certain pitch produced by striking the body at just the right place. Tapping on the side of the body (with either hand) produces a higher-pitched snare sound (akin to hitting a conga drum near the rim) that I like to use to achieve a cross-stick kind of effect.
Another effective and convenient snare-like sound can be produced by tapping your fret-hand fingers on the back of the neck to create a grace-note flam effect or snare-drum “chatter,” akin to the way a drummer lets the stick bounce off the snare (PHOTO C).
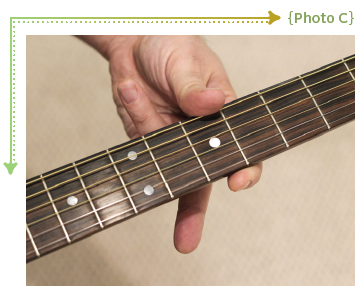
It’s a subtle sound, but it can be very effective at enhancing a groove. You can also kill two musical birds with one stone by tapping a natural harmonic on one or more strings at the moment you’d expect to hear a snare hit, which is typically on beats two and four in 4/4 meter. In this way, you’re conveying harmonic and rhythmic information simultaneously. Efficiency is key when you’re trying to do the work of several instruments.
Hi-hat
By sweeping either hand along the wound strings, you can approximate the sound of closed or open hi-hats. Depending on your musical proclivities, you can conjure up a little old-school vinyl scratching by sweeping your hand over the strings in a way that visually resembles a DJ manipulating a record turntable (think Tom Morello).
Tunings
Now that we understand the rhythmic part of the equation, let’s look at how to make your strings conform in a way that facilities the technique.
Since you’re already doing as much as you can to wring sound out of the instrument, it makes sense to get as many of the strings involved at once. To do this, I’ll employ alternate tunings, my favorite being DADGAD.
Occasionally, I’ll drop the sixth string to C (low to high, C A D G A D), or drop the G string to F#, which gives you a luscious open-D chord if you strum across the strings (open D tuning: low to high, D A D F# A D).
Obviously, the strings provide the harmonic information, but they can also serve as drone notes to fill out your arrangement and provide an ambient environment for percussive playing. When playing this way, I’ll sometimes lay the guitar flat across on my lap, like a dobro.
This obviously affects what you can do with your fret hand, as you now have to fret notes from above the top side of the neck, like a piano.
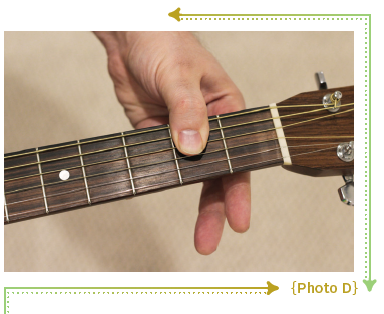
When the guitar is on my lap, I’ll use droning open strings, typically the higher ones, and my fret-hand thumb to barre power-chord shapes across the bottom two or three strings (see PHOTO D). I also sometimes use my fret-hand middle finger to produce the previously mentioned snare-drum grace notes that provide some of the rhythmic finesse and chatter that a real drummer would.
But that’s not where all of the harmonic information comes from. Many guitarists overlook that critical extra sound source—your voice. You can think of it as a seventh string, if you like, and it has the advantage of operating completely outside the confines of the instrument.
Whereas open strings drone and remain static, sung melodies are able to move freely, and the voice can carry a lyric to the listener. With that, you’ve moved beyond percussive guitar and into songwriting, which, as I said in the beginning, is the whole reason I play.
Many guitarists are less sure of their voices than they are of their playing. If you’re too inhibited or self-conscious to sing, consider whistling, an old-timey practice that has made a comeback thanks to artists like Andrew Bird. Also try humming or playing a harmonica with a hands-free brace, Bob Dylan–style. Anything that helps you achieve what you hear in your mind is fair game.
PUTTING IT ALL TOGETHER
Now let’s see how these techniques can be put to use.
FIGURE 1a shows the basic two-bar vamp from my song “1,000 Miles” and is performed in the previously mentioned CADGAD tuning, which is one of my favorite tunings because of the wide pitch range between the low and high strings.
The figure is a laid-back R&B-style groove performed at a fairly slow tempo and serves as a good introduction to percussive fingerstyle acoustic playing.
The slow tempo is ideal for our purpose here because it buys you valuable time to work on integrating percussive tapping/thumping with picking notes on the strings. The bass notes and kick drum are one and the same in this case and are picked with the thumb (a couple of quick hammer-ons are employed too). The Xs in the tablature indicate the virtual snare-drum hits, which fall on beats two and four as the bass notes are allowed to ring.
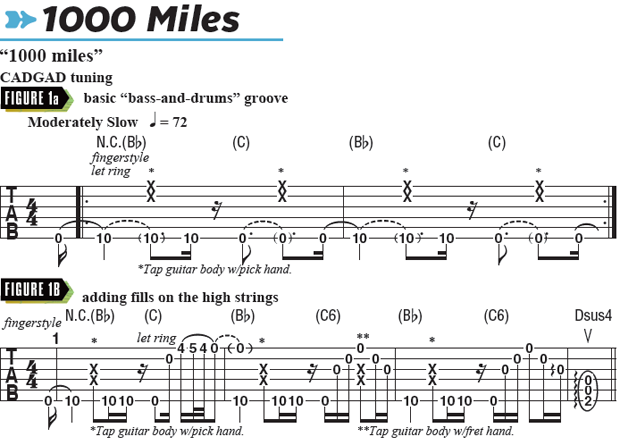
FIGURE 1b builds upon the basic bass-and-drums groove pattern and introduces melodic licks played in the upper register on the higher strings. Here, snare-drum duty is shared by both hands, specifically on beat three of bar 2, where I use my momentarily available fret hand to do a snare tap (again, indicated in the tablature by Xs) as my pick hand simultaneously plucks the open first string.
Note the use of a hammer-on and double pull-off combination on the first string at the end of bar 1, which I use to create a noodle-y, exotic-sounding trill, Jimmy Page style (à la “Dancing Days”).
By exploring this playing approach, you’ll discover little tricks like this and learn how to sneak in bits of melody while keeping the rhythmic groove going. A vamp such as this one can be used as an accompaniment to a singer or another instrument and form the basis for an entire section of a song, such as a verse.
FIGURE 2 is a passage from my song “Springtime.” It’s played in DADGAD tuning with a capo at the second fret and the guitar laid flat across the lap. In this example, I’m using the kick-drum string-tapping technique described earlier to sound the first two power chords on the bottom three strings. I then strum the remaining chords by brushing my pick-hand fingernails across the strings but continue to use the kick-drum technique to get a pitchless thump while the chords ring out.
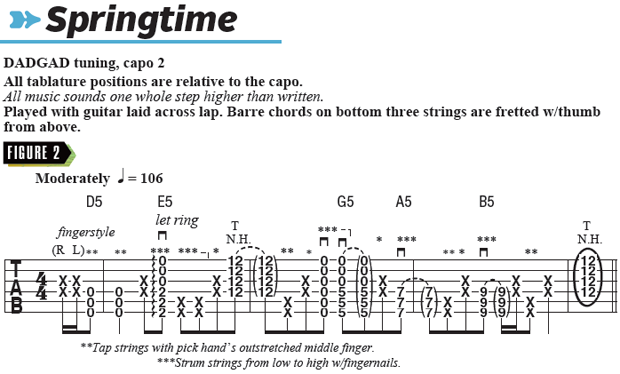
Other techniques employed here include snare hits (indicated by Xs on the higher tab lines) and slapped natural harmonics (N.H.) at the 12th fret (actually the 14th fret because of the capo usage), which I perform by quickly bouncing my outstretched pick-hand middle finger against the strings directly over and parallel to the fret wire.
This kind of playing is obviously a challenge to convey on paper, so be sure to check out the accompanying video below. Once you get the hang of this pattern, you’ll see that it’s pretty intuitive and not difficult to play. The critical thing is to get it to groove and create a tight pocket, so that you have a rhythm section to sing or play harmonica over. (In this song, I happen to do both.)
Once you’ve addressed the internal tools available for playing the guitar like a percussion instrument, it’s a short leap to the external. Tambourines and stomp boards for your feet or the use of a digital looper pedal can greatly expand upon this technique and help you fully realize the musical ideas you’re hearing. When these tools serve a song, I find they transcend gimmickry.
My goal here has been to make my techniques as simple as possible so that others can incorporate them into their songwriting.
To hear and see more demonstrations of how I employ and combine the techniques covered in this lesson, check out the companion instructional video at guitarworld.com as well as numerous videos of me performing songs I’ve written live, which can be viewed at my web site, errico.com, and on YouTube.
PART ONE
PART TWO
PART THREE
