How to play slide guitar: 5 essential techniques every aspiring slide player needs to learn
Slide guitar can be tricky at first. Here are five technical tips to get you started

Slide guitar is a fun and expansive technique that can unlock fresh, expressive and previously untapped aspects of your playing. It is used in many styles including blues and folk, but can also be heard throughout rock and beyond. It’s fluid, expressive and novel, and adds another string to your bow.
At the start, slide guitar can seem tricky and daunting, esepcially as there a few different variables to consider. This is mostly because there are certain basic things you have to do differently to when playing guitar normally – and if you don’t do these things right, it’s just not going to work.
Here’s a list of the five main essentials of slide guitar technique. Notice how they make slide playing different to standard playing.
1. Which finger to wear the slide on?
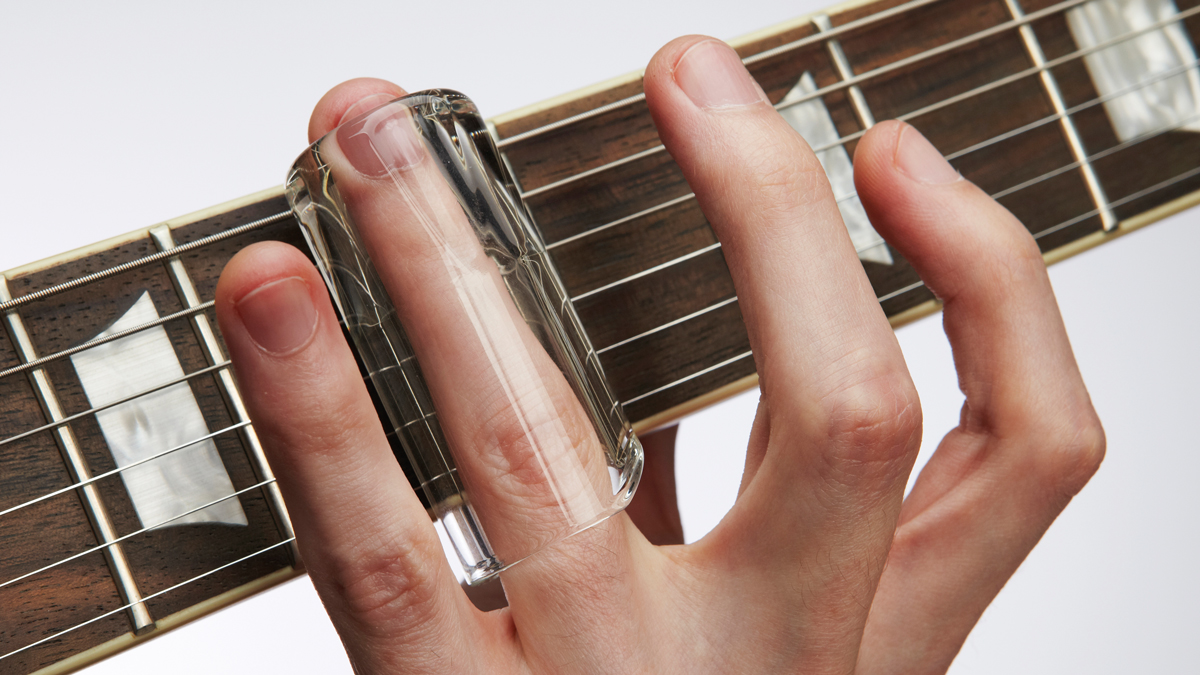
The short answer to this is, wear it on your 3rd finger (ring finger).
Essentially, wearing it on your 2nd finger (middle finger) will provide great control over the slide, and wearing it on your 4th finger (pinky) will mean you can reach a long way up the neck (especially with an acoustic or non-cutaway guitar) and have many spare fingers behind the slide for interspersing normal playing with slide playing.
Wearing it on your 3rd finger is a great compromise between these two options. It’s still strong and in control, leaves fingers 1 and 2 for normal playing, can reach up the neck and can be held steady and straight between fingers 2 and 4.
Everyone has their preferences, and if you find that you’re just inexorably drawn to using another finger, that’s okay. But start on finger 3 and see how it goes.
All the latest guitar news, interviews, lessons, reviews, deals and more, direct to your inbox!
2. Fretting hand finger position
This is probably the most common misconception about slide guitar playing.
The slide should not be in the middle of the fret, but at the front end of the fret. So, for the note of ‘E’ at the 5th fret on the B (2nd) string, for example, the slide should not be positioned right in the middle of that 5th fret, but on the actual fret itself, directly above that bar that divides fret 5 and fret 6.
If you play with the slide in the middle of the fret, the note will be flat (lower than the correct pitch), meaning you’ll sound out of tune. It’ll only come up to correct pitch if you hold the slide further forward, right at the divide between the target fret and the next. This may not be clear if you’re just playing unaccompanied, but as soon as you’re playing over something you’ll hear it right away. This has to be applied to your slide technique from the very beginning.

3. How much pressure to apply
There’s a short answer here, too: it’s about the same pressure as a natural harmonic.
The right amount of pressure is when the slide is in contact with the string, but the string is not being pressed down onto the fretboard. If the string makes contact with the fretboard, you’ll get unwanted buzzing. The right technique almost imagines the fretboard isn’t there at all - you’re just moving the slide along a string suspended in mid-air, with no fretboard.
There’s a small window between not touching the string at all and pressing the string down onto the fretboard, where good slide playing happens. For this reason, many slide guitarists use guitars with a deliberately higher action (ie, the gap between the fretboard and the strings is bigger) to maximize this window. Ideally, you’ll have a battered old cheap acoustic somewhere which you can then give a permanently high action and use it for slide playing without interfering with your main guitar and primary setup.
4. Which tuning to use
There are many options here. Slide guitarists most commonly use ‘open tunings’ – this means that the strings are tuned so that the open strings form a chord (and therefore so does a single barre at any given fret). The reason for this is that chords can then be played with the slide itself, and licks tumble out a little easier just by moving between strings at the same fret. Open E, A, D and G tunings are common. A nice one to begin with is open E (low to high E B E G# B E).
As with the previous point on applying pressure and getting a high action, if you do have a battered old acoustic that you can donate exclusively to your slide playing, keep it in open E tuning as well as getting that high action sorted, and you’ll be ready to go at any time.
Although standard tuning isn’t the best tuning for slide, you should practice plenty of it. Maybe you’ll want to add a slide solo to a song in normal tuning and so will need to do the slide solo in standard tuning too. It’ll help you find new licks and make you play differently, as it’s more linear than open tunings. Plus, if you can nail playing with the right amount of pressure on a normal-tuned, normal action Strat, you’re going to find it easy when playing a guitar that's truly set up for slide.
5. Open-string muting
This is kind of the final stage in the process. Your guitar’s in open E, the slide’s on finger 3, you know all about where to position it over the fret, and you’ve found that sweet spot where you’re touching the string but not touching the fretboard. If it still doesn’t sound good, it’s probably because you need to sort your muting out.
Make sure that when your 3rd finger is moving around the neck with the slide on, your 1st and 2nd fingers are sitting directly behind it, parallel, damping the strings as a basis from which the sliding finger can play. This means that then the note the slide is playing is the only note you’ll hear. If you don’t do this, the other strings may ring out, surrounding the slide note, losing clarity and making things sound messy.
Apply these five things to your slide technique from the very beginning and you’ll be sliding all over the fretboard in no time. Good luck, and enjoy it!
Slide guitar tips for advancing players

Once you have got to grips with the above techniques, you can start branching out and begin to add slide guitar into your six-string trick book. Erja Lyytinen's above lesson takes you through six essential and readily available slide licks that you can integrate seamlessly into your vocabulary.
And, when it comes to seeking inspiration from the players who have mastered the art of slide guitar, Derek Trucks, Duane Allman, Erja Lyytinen and Rory Gallagher are good places to start. Increasing your exposure to slide guitar music is a sure-fire way to quickly internalize slide music, and a great approach to take in order to subconsciously absorb melodies that – when the above tips have been taken on board – can come through in your playing.
Ben Martin is CEO of online guitar lesson site GuitarTricks.com, home to over 11,000 video guitar lessons, scale and chord charts.
You must confirm your public display name before commenting
Please logout and then login again, you will then be prompted to enter your display name.


