Joe Satriani Master Class: Satch Shows You How to Express Yourself on Guitar
Learn anything you've ever wanted to know from Satch in this hour-plus GW masterclass.
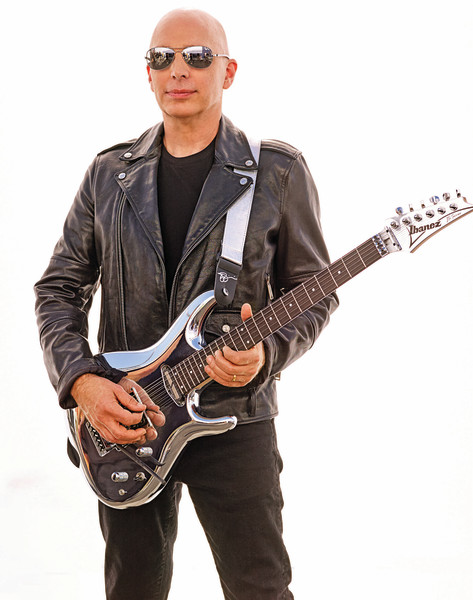
A cool thing about the guitar is that it’s different from a lot of other instruments in terms of what you can do with it and how you experience it. For me, it was so different from playing the drums, which is the instrument I started on. The drums were loud—everything you did was so completely “public.” Growing up in a house with seven people, they reminded me of that every time I sat down to play.
For three years I tried to be a drummer, but with the electric guitar, of course, I could bash it and it was still quiet—until I turned it up! But you could still get the same intensity with the guitar, even without it being plugged in. The drums are really not like that. They are totally dynamic, acoustically.
FIRST CHORDS
The important thing about that was the guitar allowed me to quietly play and develop ideas, such as this song (FIGURE 1). That was one of the first things I discovered on the guitar, which is something that I would normally have been embarrassed to write as my first song. It was called “Lady in Pink” because there was a drawing of a woman in pink that one of my sisters had done and taped to her closet door. I was hanging out in her room one day, playing her guitar, and I started to write a song about that little drawing.
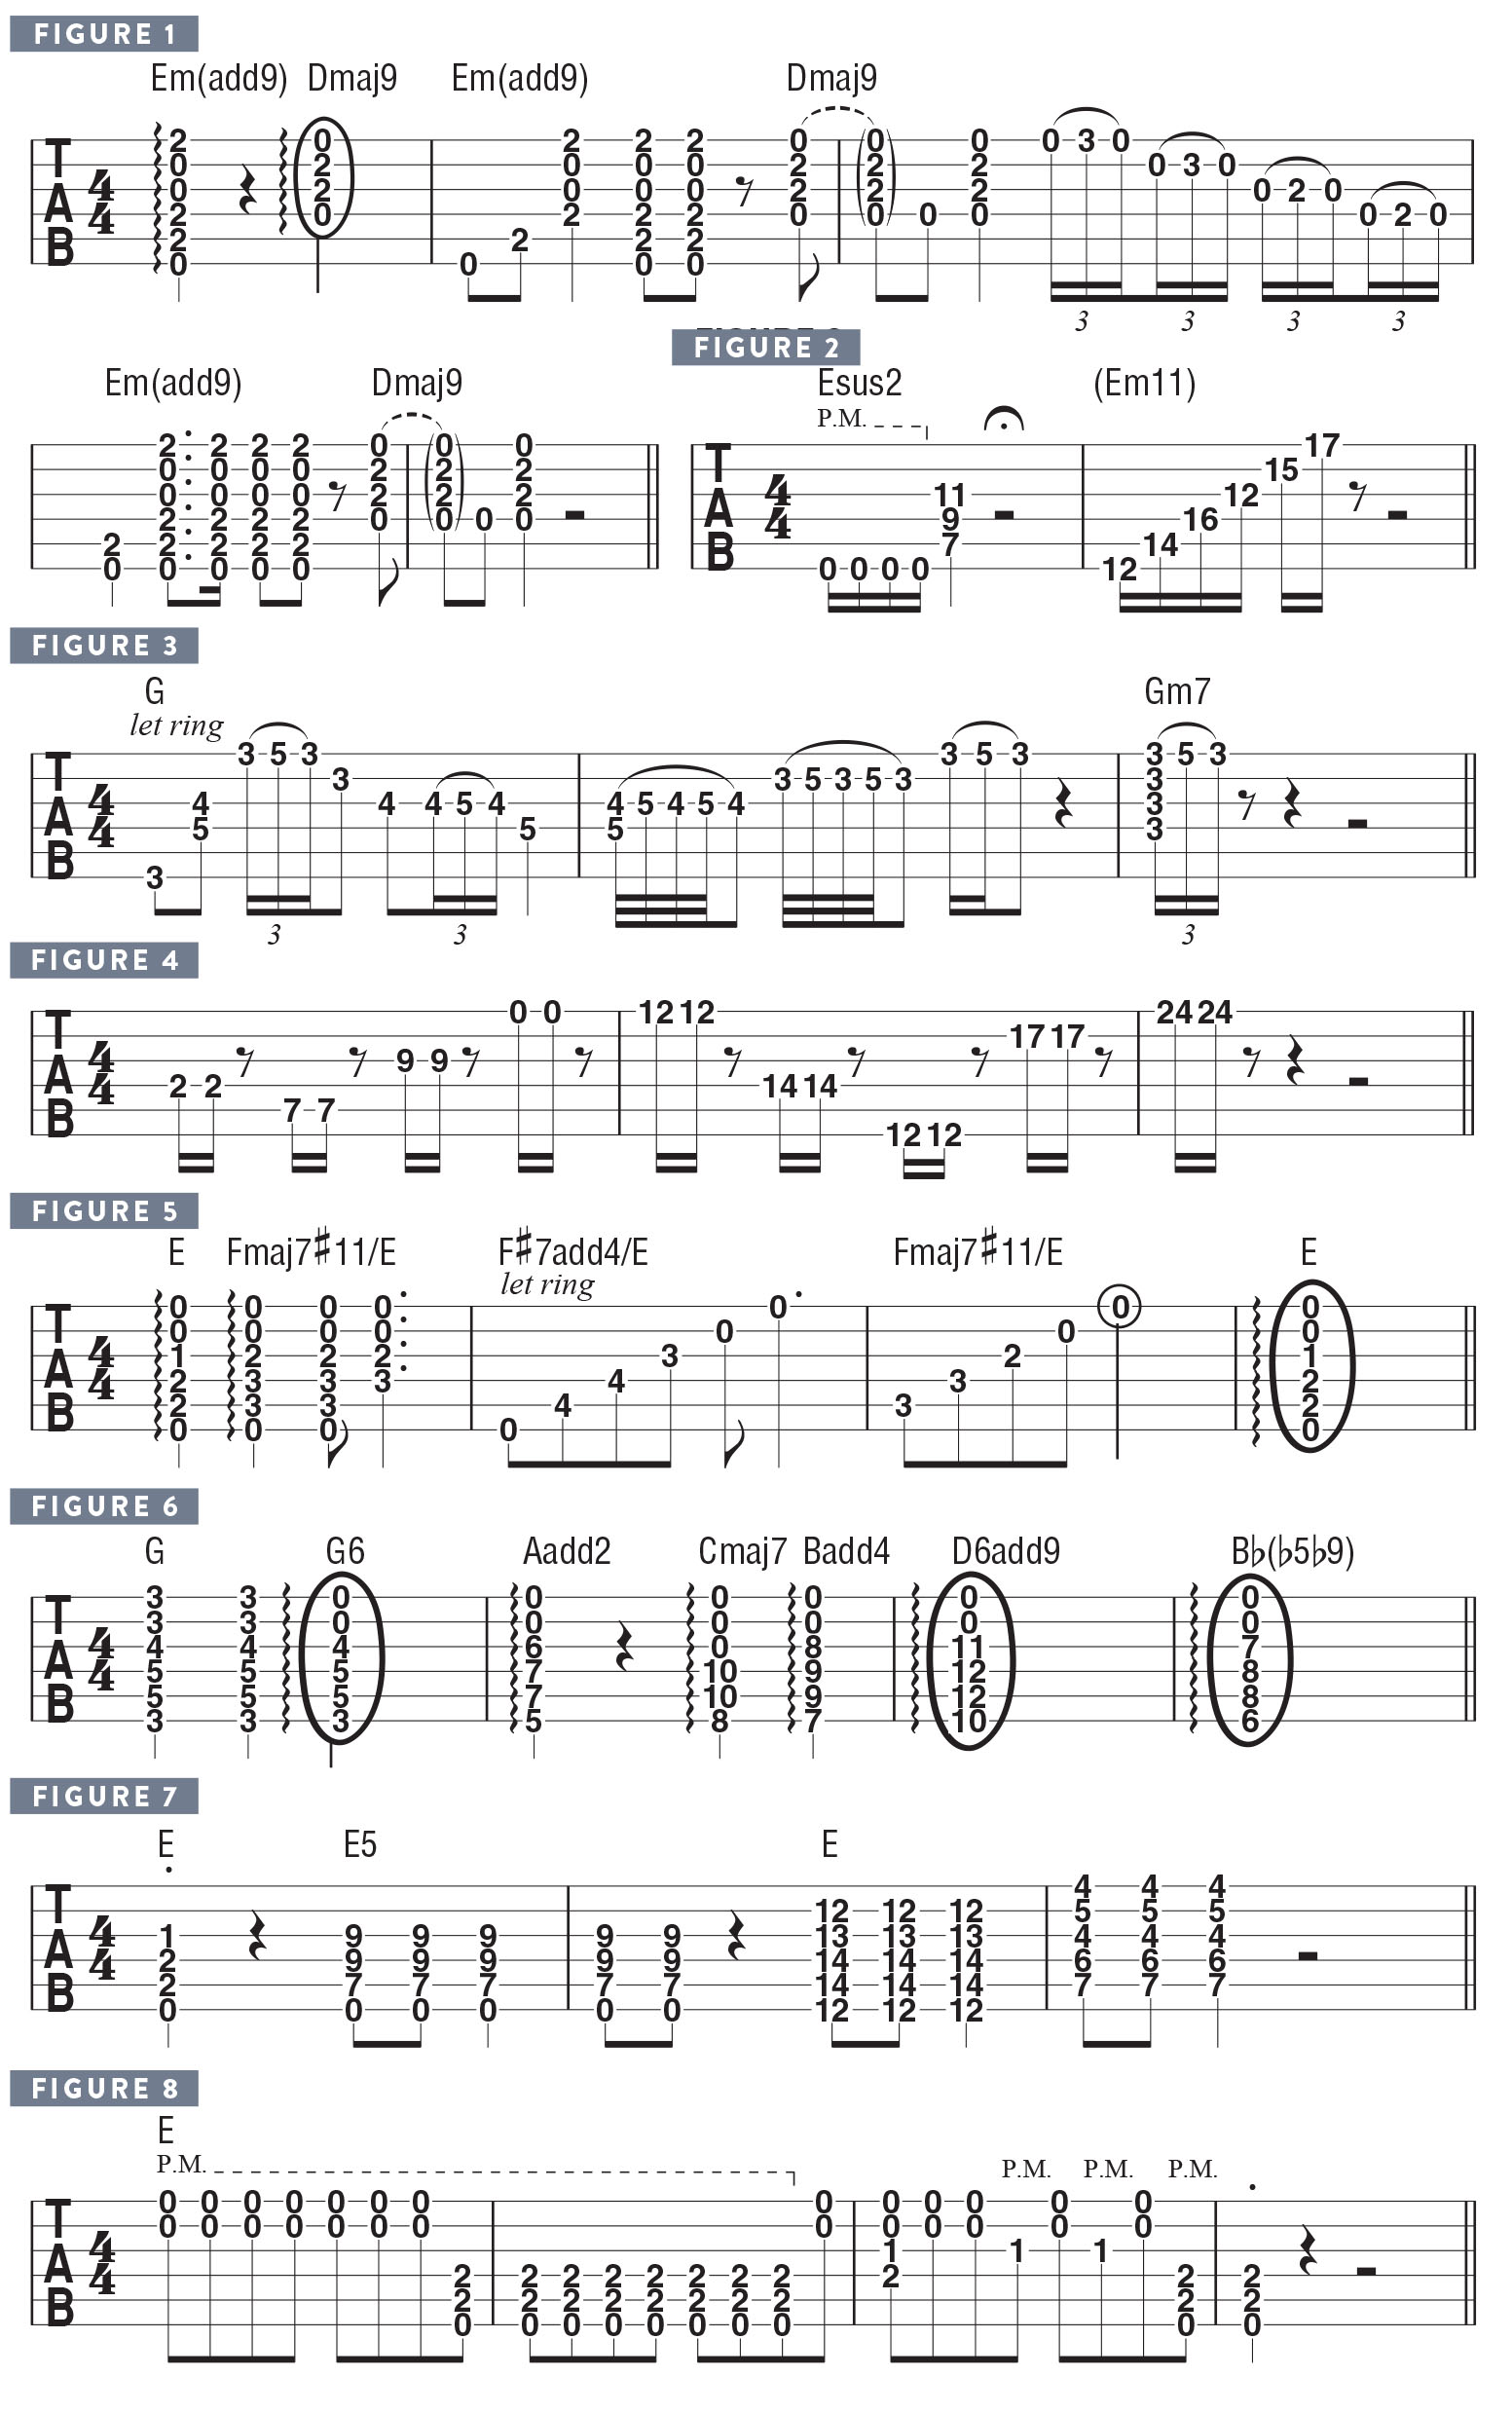
I wouldn’t have been caught dead playing those chords, Em(add9) and Dmaj9, really loud when jamming with my friends, but because the guitar is so intimate, I could do it privately and get enjoyment out of it. I think, for me, having the time to spend exploring what was so intimate about these chords was important, and then figuring out the few different ways I could use them became the next step.
It took years to figure out that this first chord, the Em(add9) with the added second, or ninth (F#), could eventually be interpreted this way (FIGURE 2), or played as an arpeggio, or “broken chord.” But it all came from understanding the mood of the chord. I didn’t know the name of it, but I knew it was an Em with a little extra something. I figured that my little finger wasn’t doing anything, so why not drop it down on the high E string? There’s a certain design and geometry to the guitar that allows for these explorations and discoveries, such as this type of embellishment on a G chord (FIGURE 3). I’m thinking, what am I going to do with my pinkie? It’s just hanging out, so I might as well flutter it around!
That was the beginning of me feeling very comfortable, even playing in the first position, and that each one of these first-position chords—whether it was a G or a D—that I could do something with it by simply lifting a finger off one of the strings, and then investigating what that was. It was part of my nature to write down these kinds of things, so I created a little pictogram of these chords, such as the Dmaj9 shape, and told myself, “Find out what that is!” I scoured chord books in the guitar stores to try to find the particular fingerings I was discovering on my own, until I saw that it could be written as a “Dmaj9” or D “triangle” 9. Those names sounded very important! The truth is, the chord just happened because that’s where I stuck my fingers.
All the latest guitar news, interviews, lessons, reviews, deals and more, direct to your inbox!
Nowadays, I can use a single fingertip to fret two strings at the same fret, whereas I needed two fingers to do that in the beginning. Your fingers do get “smarter,” but back then I didn’t know any short cuts, so everything had to be painfully explored and sometimes executed in the most difficult way at first, until I gained experience.
Another aspect of being quiet and private over it and I could start to find those notes I was singing, which was my first attempt at understanding that there were scales, a melody or a set of notes that went well with a set of chords. I don’t know why I started to think about this so early in my playing, but I thought that each of the notes had an alphabetical letter, and if you arranged them alphabetically, eventually that would be your scale. But it took quite a long time before I knew how to categorize scales or judge the intervals. I was just thinking about the alphabet, and I related everything to the piano in my family living room. If I had a question, I’d go back down to the piano and I’d just look at the keyboard and realize, okay, it is linear and it does work in that fashion.
The first few months of playing guitar were just about frets 1–3, and everything further up the neck was mysterious. It was like a fog had rolled over the whole thing! So I tried to get rid of the fog by gradually moving up higher and higher, to try and find the same notes in as many different places as possible (FIGURE 4).
Those first few steps are very important, because if they turn you off, you will never bother with the next steps. For me, the guitar always felt much friendlier than the drums. Besides the fact that the drums were loud, they were more complicated! The guitar is a two-limb endeavor, whereas the drums involve the use of four limbs. I didn’t have to worry so much about the coordination of all four limbs until I started performing, at which point you really do have to get your whole body into it. Those first few chords were fascinating to me, and then I discovered a chord that you could move around by taking an open E shape and moving it up a fret or two (FIGURE 5). That really fascinated me because the sound and feeling of those new chords was so different. I didn’t know that playing an F triad over an E pedal was applying a Lydian mode or Phrygian or Phrygian-dominant. I had no idea about any of that.
When I started with barre chords, it was the same kind of thing (FIGURE 6). I’d press my fingers down in a certain spot, and when holding down the index-finger barre became painful, I’d lift the barre, exposing the open B and high E strings. I’d shift the fretted notes all over the place while keeping the open top two strings, and I absolutely loved most of the sounds. And then, of course, you discover that some positions, such as Bb major, don’t sound as good as some of the other positions. I’d think, “why isn’t that working?” which led to the discovery that notes do matter, and there are good notes and bad notes, at least in a basic sense. These aren’t necessarily “rules.” You get a certain kind of response from your audience when you play something discordant, and you learn that there will be a spot for that one day.
So I started to catalog these chords in my mind, and each time I played with my friends, I had to remember that this first E chord was chunky (FIGURE 7), and this second one had a lot of power and kind of sounded like Jimmy Page, and the high one was cool but it was kind of out of tune and had a lot of angst to it. And the one based on the “C” shape didn’t work so well for rock, so I avoided it.
I started to think that you could take these chords and only hit a couple of strings at a time (FIGURE 8). Once I realized that, I thought that it could be the beginning of a song; it just needs the right lyric. I realized that it really is quite simple and doesn’t have to be so complicated. I remember those first couple of jams with friends where I’d do something like this and I’d get a rise out of the bass player or the singer, and it registered with me as “this is working!” I wasn’t really doing anything special with my fretting hand—it was the picking hand that was creating the energy and suspense. The whole design of the electric guitar turned out to be not only a generator of chords and melodies but also a way to reflect the sounds around you. I didn’t know what musique concrète was back then, but that is kind of what it is. It was just a question of remembering these many ways to make a variety of sounds and developing a strong opinion about these sounds and techniques and having them fresh in your mind so that you can bring them out when you think it’s going to work. And you avoid some of these things when that inner arbiter of taste tells you, “whatever you do, don’t do a giant aggressive pick slide right here! Not in this song!”
Without a doubt, once I became a teacher, I would sit down with each of my first-time students and say, “you’ve got to learn the first-position chords.” I had a piece of paper with the 17 magical first chords on it. You can jump-start the process by getting a small chord book—not the one with 12,000 chords, but the one that has only a couple of pages of them. You really do want to memorize E, Em, F, C, D, and just get used to those first. If you acquaint yourself with those 15 to 20 chords, the chords themselves will suggest to you where to go from there. You don’t have to sit there thinking, How do I do an E7sus4? It could take weeks to figure that out, but it would only take 30 seconds to look at it on a chord sheet.
Let’s go through some basic chords. You have to learn E, Em, E7, B7, C, G, G7, D, Dm and D7 (FIGURE 9). Have I gone too far? I don’t think so! A, Am, A7, Asus4, the dreaded F, and the even more dreaded Bb. If you freak out, just go back to E! It’s important to run through these chords every day as a finger exercise. You have to practice the thing where the brain says, “fingers, go here!” and they obey.
Soon, you develop opinions about these chords, often based upon the music that you like. If you’re really into metal, you might find every one of these first-position chords not useful at all, but if you’re into folk music, you might say, “these 17 chords are all I’ll ever need!” It’s important to compare chord types (FIGURE 10), like D7sus4 versus D, or Dsus4, and notice how they are different from one another.
COMBINING CHORDS & LICKS
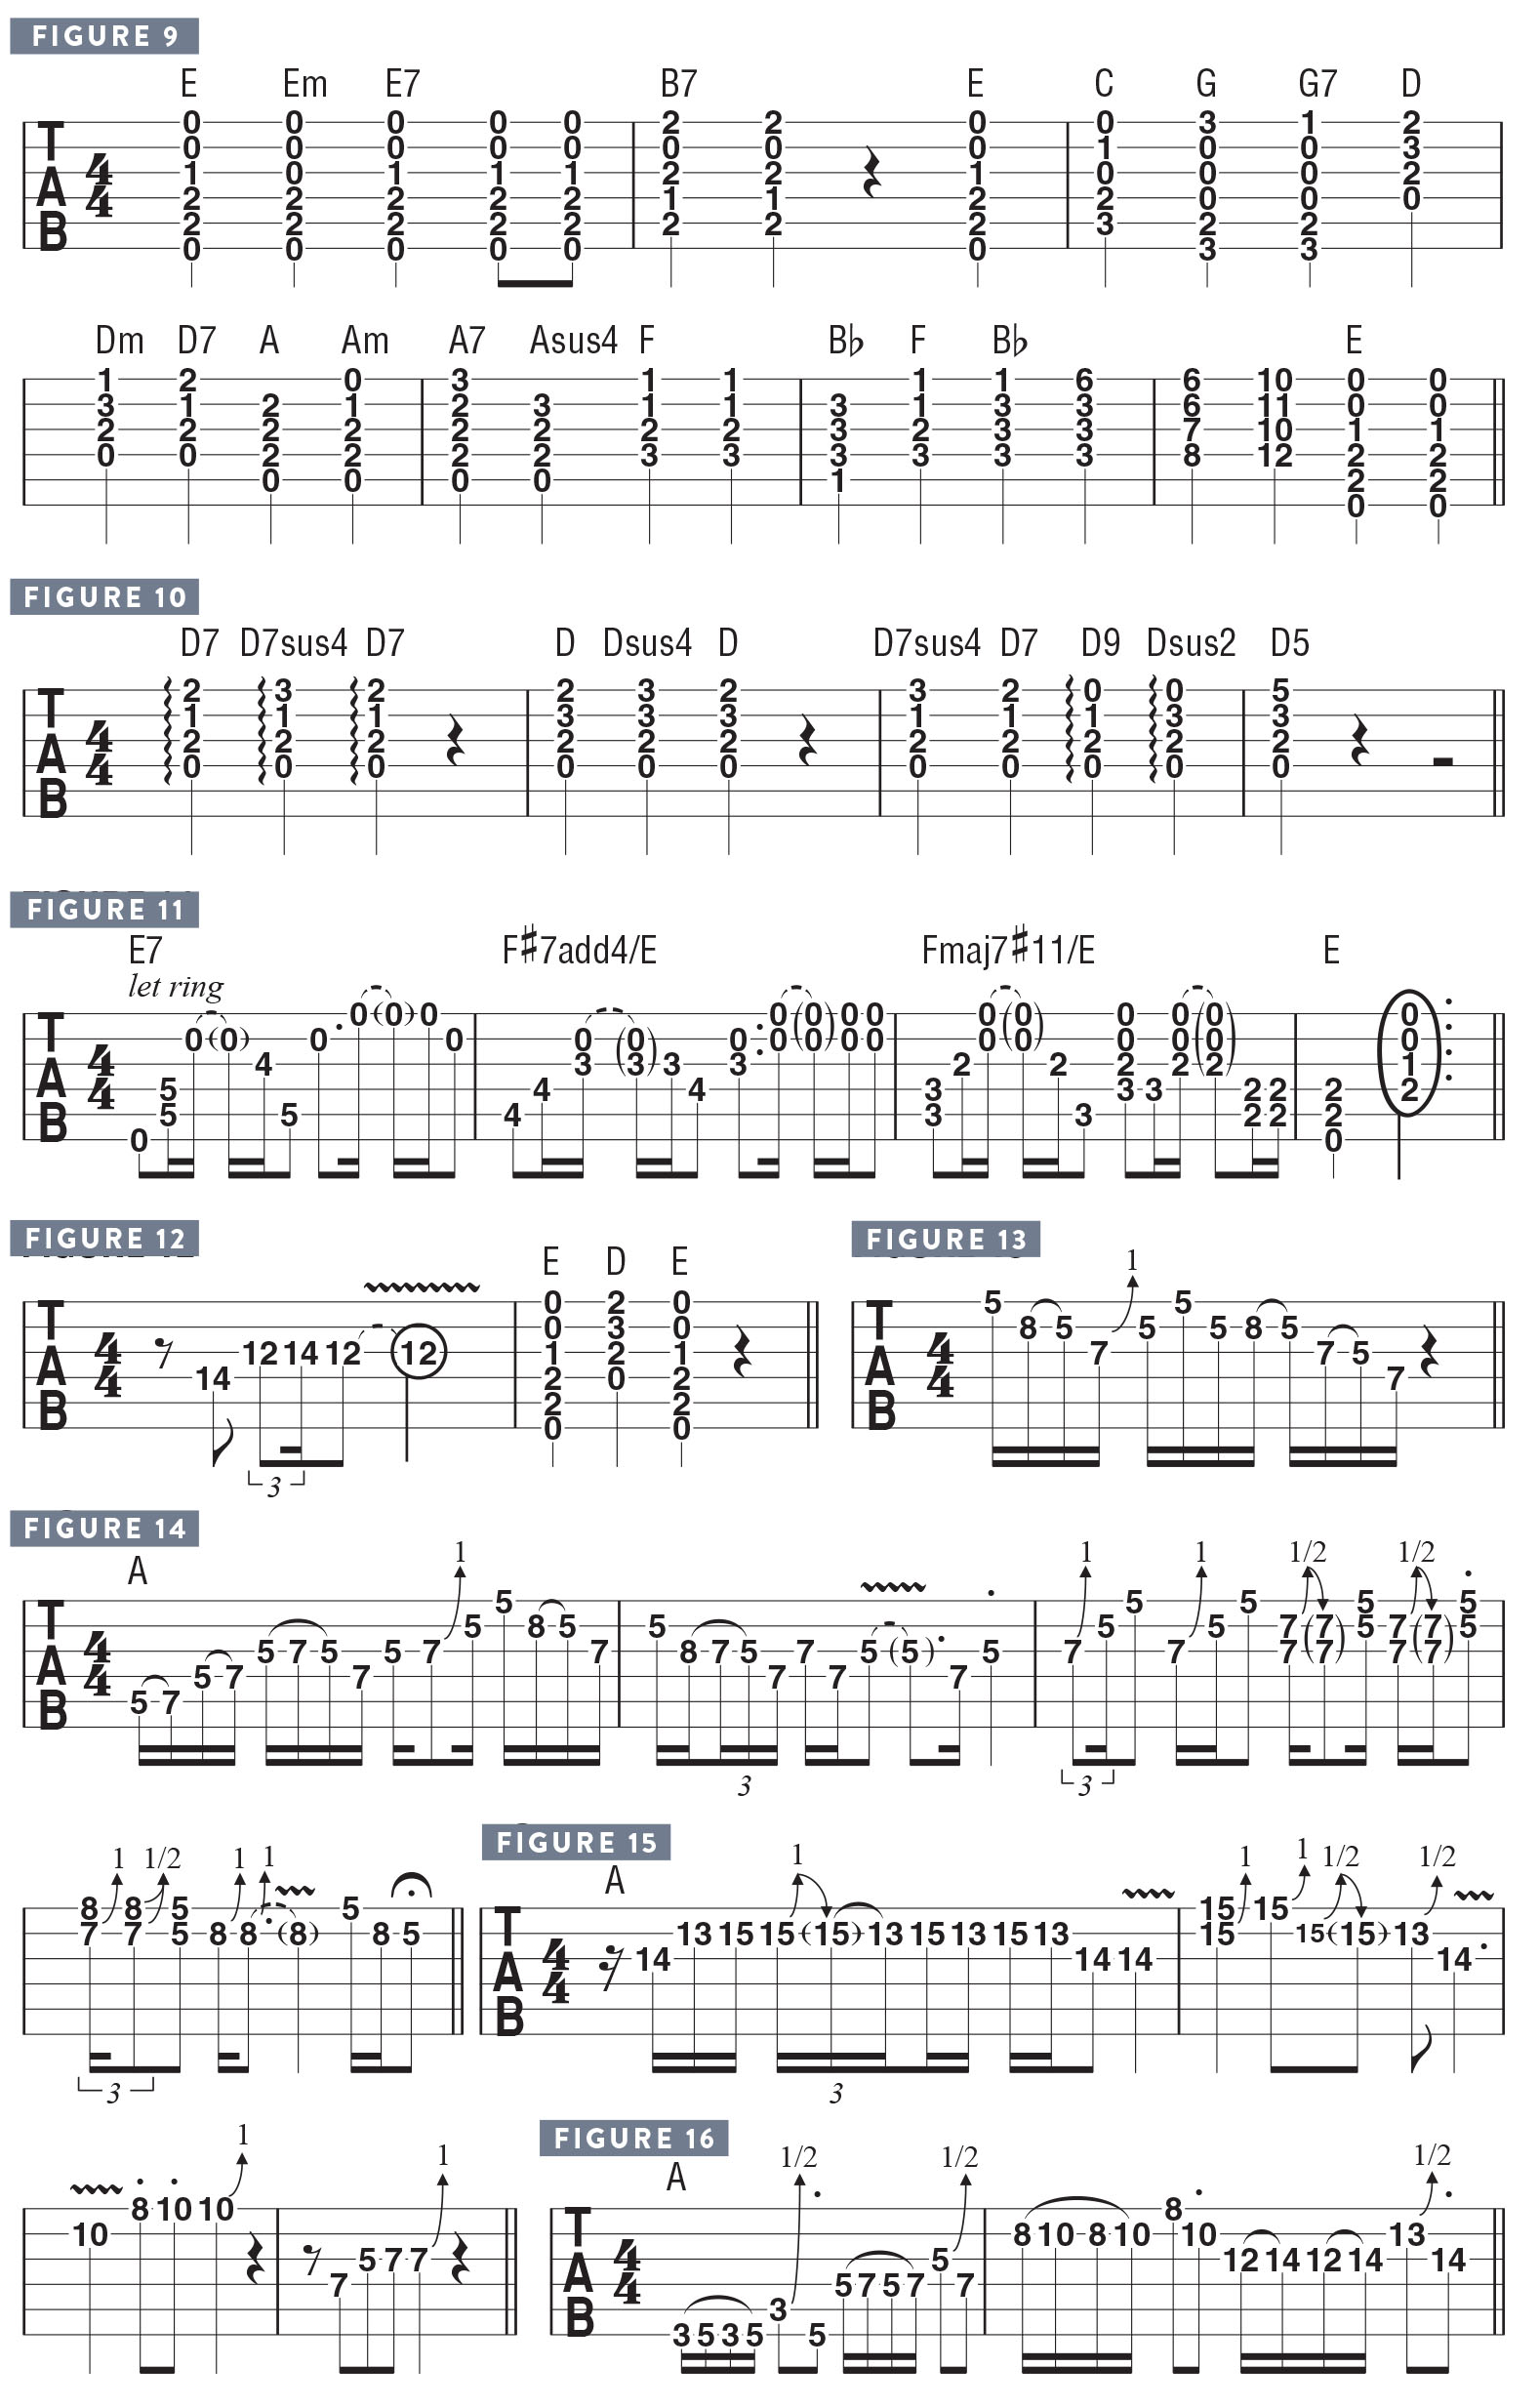
We’ve started with this first-position E chord, and I remember in the early days my band did a version of Cream’s “I’m So Glad,” which I tried to approximate like this (FIGURE 11). I just played it in my own way. To this day I don’t know the exact chord shapes and pick-hand technique that Eric Clapton used on their version of that song. It was just E to D, so how did they get so much music out of it? It was amazing! When we first started to try and play that song at high school dances, we realized that there was this magic that had to be created by the four of us as a group. We knew instantly that, once you start performing in front of people, you become aware of the tools at your disposal—not just the instruments and the amps, but your music. You come to grips with whether it’s good enough. You have a song with just a few chords, and you have nothing else with which to wow the audience. So it becomes about playing those two chords really well, and communicating with everyone else in the band and creating some sort of magic in the room on that particular night.
This is what got me thinking that I really needed to practice not just memorizing the chords and where they can be played on the guitar, but also what went with the chords, and not just what you’d learn out of a music theory book. You’d never find what Eric Clapton was doing in those books, and he sounded completely free and perfectly timely with what he played. When you have such a great reference like Clapton and Cream to point you in a direction, you will hopefully realize, Okay, I’m in a major key, but I can play blues on this because I heard Eric Clapton do that, and he’s God, so it must be okay for me to try to emulate that!
Just knowing that a lick like this (FIGURE 12) can somehow work perfectly with the E-to-D progression is a big deal because it will expand your musical universe. You have to be exposed to 1) what’s acceptable, 2) what is possible in a particular chord progression, and 3) how far is too far? When you make that journey from a beginning player to an advanced player, you find that there are no rules and that anything is possible, although you will incur the wrath of the audience when you go too far. Some people will say, “I love all the feedback and weird notes!” while others might say, “I hate that stuff; why can’t he just stick to the good notes?” That’s your lot as a performing musician—you can’t please everybody, but you can use the song as a form of exploration for yourself. In your younger years, I think everyone should explore these things, not just within the scope of the band, but in front of an audience, to see what will and can happen in a live performance situation when you try different things.
SOLOING
I started listening to the players at the time that I thought were really great—and Jimi Hendrix was my Number One—but that whole group of rock guitar pioneers from the mid/late Sixties were the perfect mix for me, and I was the perfect age at the time for that. I was listening to Jeff Beck, Eric Clapton, Jimmy Page, Johnny Winter, Jimi Hendrix and about 100 other amazing guitarists, and all of their heroes that were a little bit older, the blues players like B.B. and Albert King. I’d pick out a little lick here and there.
There was a very important position that I didn’t know at all, the one where all of the cool Albert King and Chuck Berry licks were residing. I did start to pick a few things out, and at some point, I saw a young guitar player do this (FIGURE 13) and the heavens opened up! I thought, He’s not moving his hand up and down, and just that one lick sounds like a combination of all of those guitar players. Where did they all learn this? They must have all traveled to some distant mountain and paid 20 sacks of gold so that they could be given the secret of the position (FIGURE 14)! All of that stuff suddenly made sense to me. Now I had this position, and that was a big deal.
Here in an “A” position, I’m using A minor pentatonic (A C D E G) and throwing in the sixth, Fs, now and then, and Ds, the augmented fourth, and two-string bends for a bluesy effect. But it started out so innocently; I must have played in that “A” position for hours and hours every day until my hand would not work anymore.
I soon realized what the “anchor” notes—the root notes—were, so I could move these licks wherever, and I realized that it was the relationship between the top three strings that made that little “box” pattern sound so cool. It’s the same with this position (FIGURE 15), which is slightly different, in terms of the relationship between the G and the B strings. All of these licks happen this way because of the way the strings are tuned.
I began to look at the relationship between just pairs of adjacent strings, like this (FIGURE 16), and then it’s different for the last phrase because the B and G strings are tuned differently from the other strings, relative to each another.
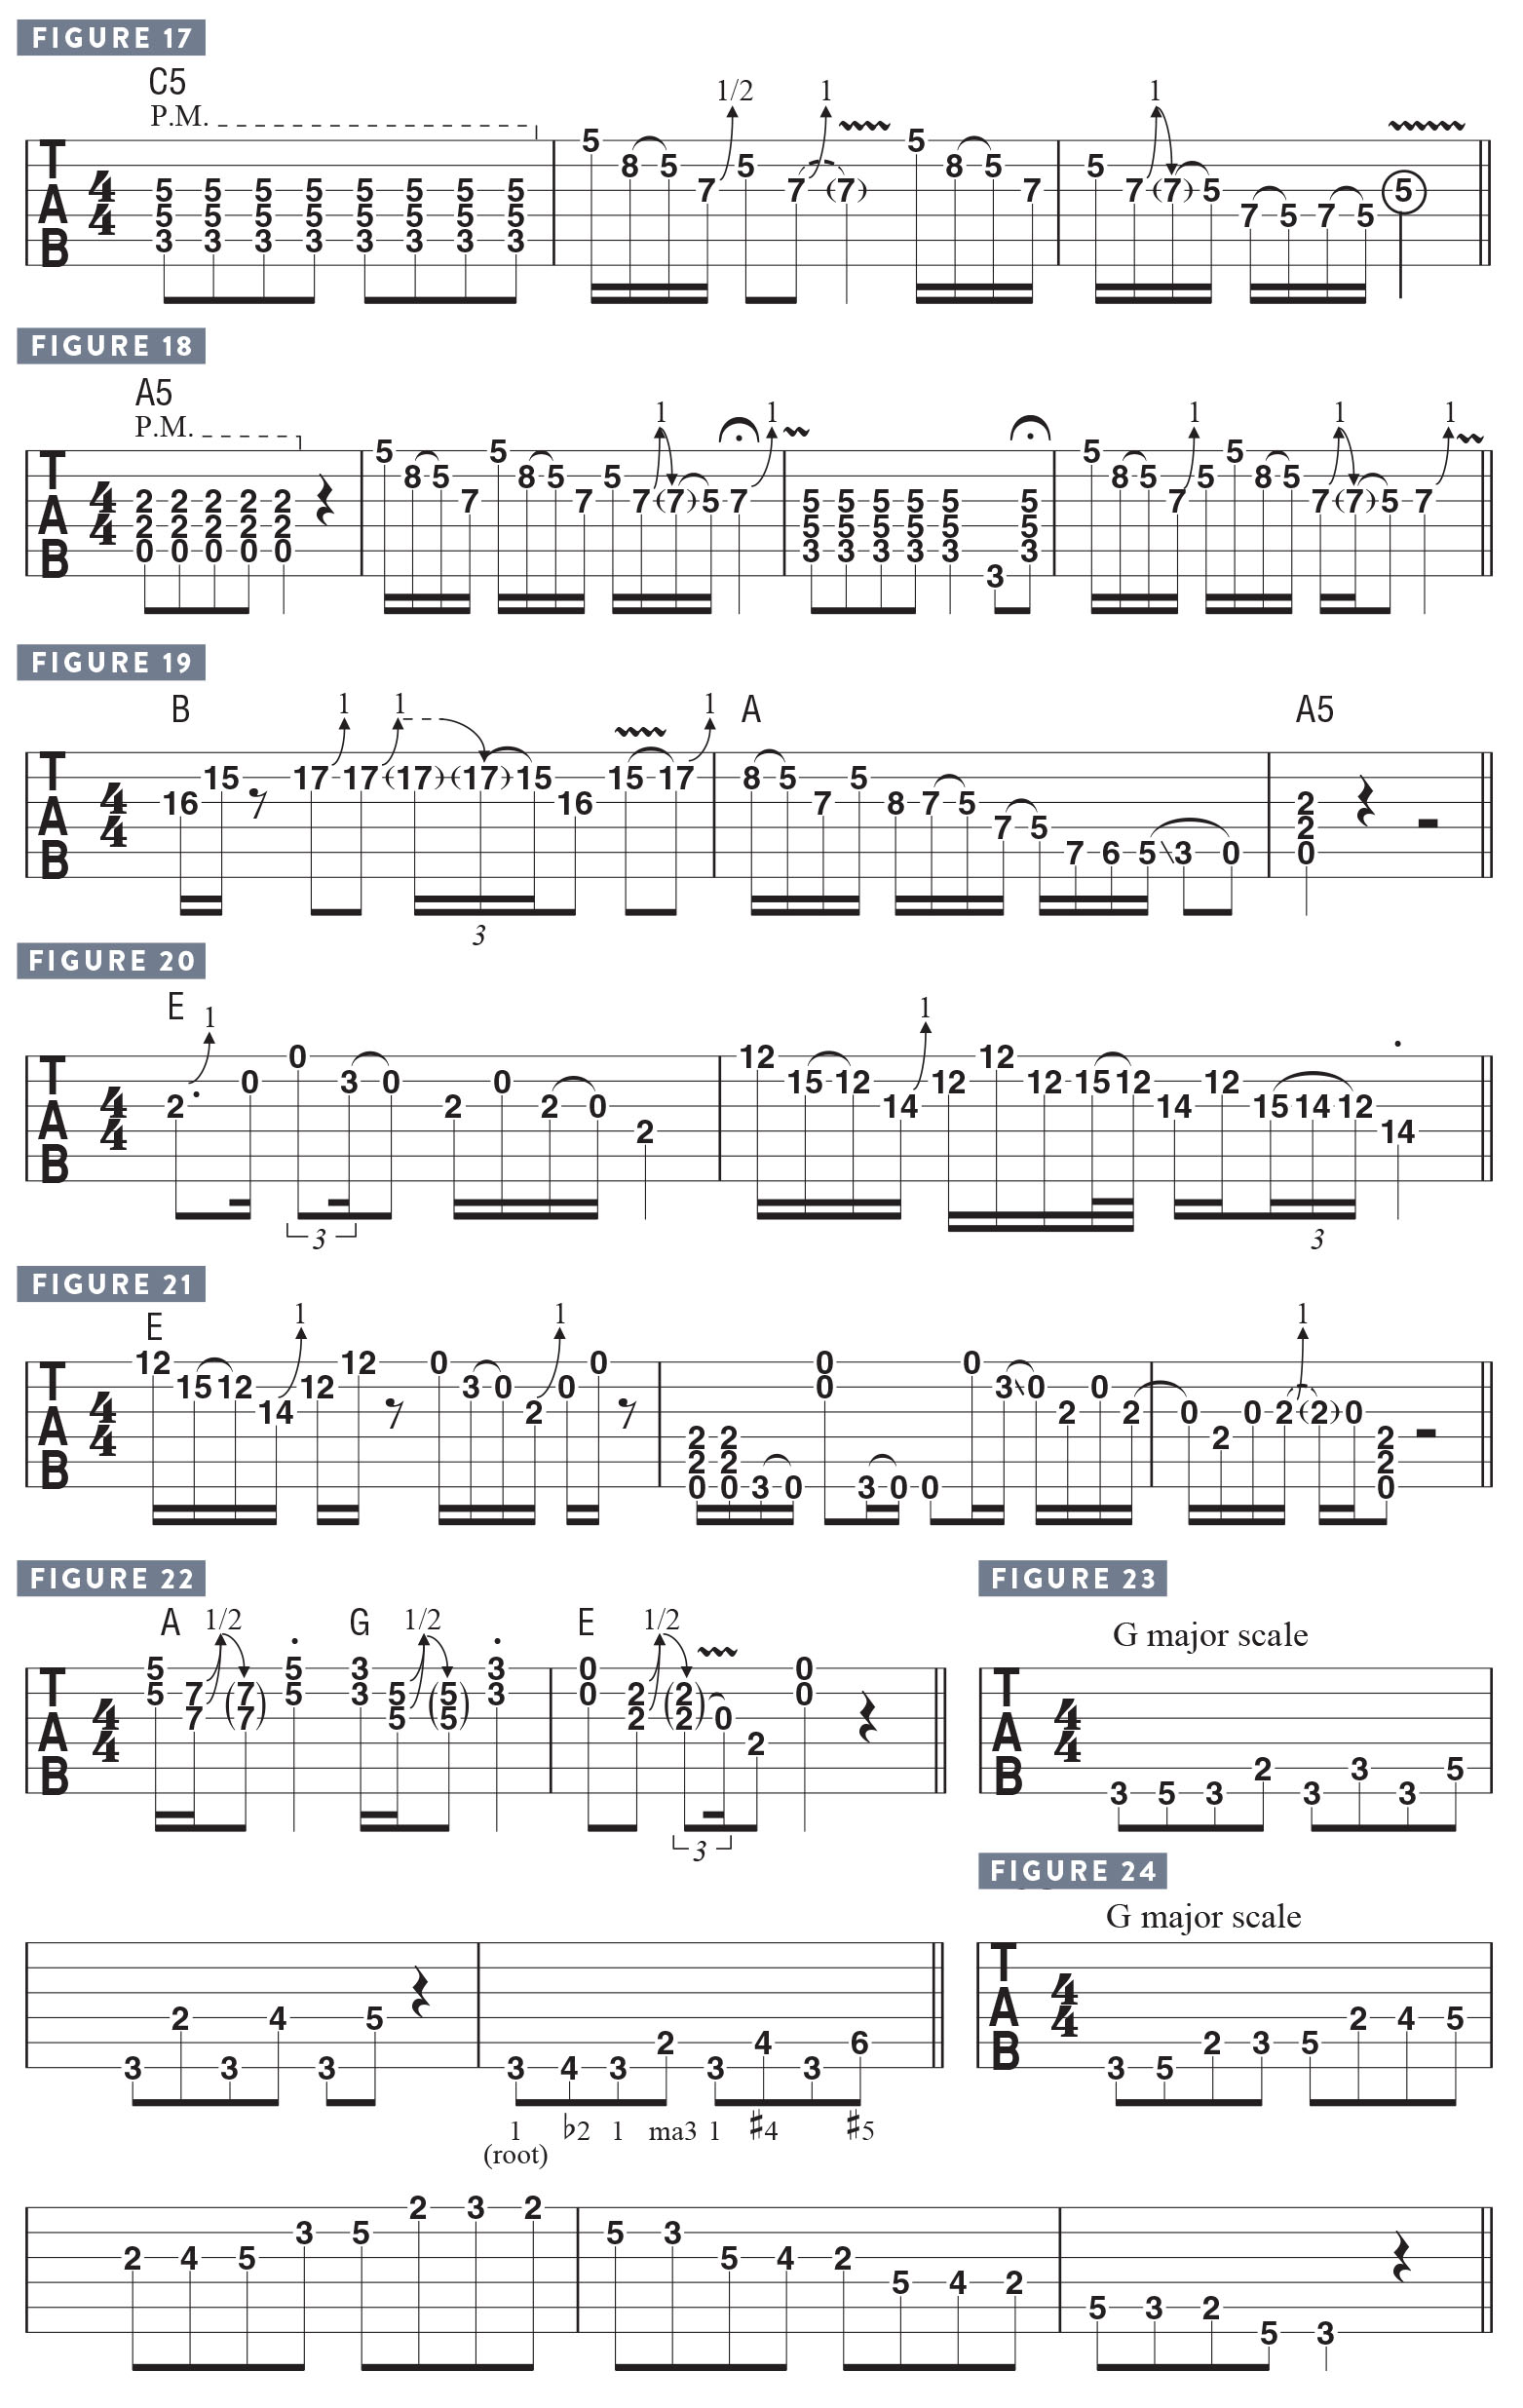
Then, something else happened: I heard a song that was in C, but A minor pentatonic worked over it (FIGURE 17), which led to the discovery of relative major and minor keys, and that A minor pentatonic was the same scale as C major pentatonic. I thought, These are the same licks, but they end in a different spot! And I thought, Well, there must be a relationship here. I had already learned minor pentatonic all over the place, so I just needed to change my perception of what the “one” is, which was a big deal. In other words, rockin’ out in A minor was pretty much the same as rockin’ out in C major.
In this example (FIGURE 18), I’m comparing what the same lick sounds like when played over an A root, versus over a C root. Each context has a completely different feel: when you bend D up to E, over A, it’s the fourth to the fifth, but over C, it’s the second to the major third, which has a “happier” sound. I started to notice, that’s kind of what I heard on that Zeppelin record, or that Hendrix thing here, and I definitely hear Clapton doing it. Some guitar players were sneakier with it. Leslie West would do it up here (FIGURE 19) with more economy of notes. Leslie told me that he was instructed by [Mountain bassist] Felix Pappalardi to play a number of solos over quite a few of those songs, like “Mississippi Queen,” and Felix arranged a “comp” track that combined different licks, and he gave it to Leslie and said, “Now learn to play this.” That little shift in perception for beginning players is so important. What it often reveals is, you already know that! Your fingers have already been here, so it’s just how you end it, or how you start it.
Learning how to play is like building the ultimate Lego tower; every little thing you do in the beginning creates this great foundation, and you don’t have to re-build every time. It provides a mountain of experience that you can always draw upon. Everything you learn is going to be important.
For soloing over E (FIGURE 20), it felt odd because you don’t barre with your index finger, but you can play it that way in 12th position, too. You soon learn that every position has its pluses and minuses—the intonation, the size of the note, the envelope of the note. And because of the structure of a certain guitar, some positions will feel good and some won’t. On an SG, 22nd position feels tight, but on a 24-fret guitar, it feels great. Think of the “Stairway to Heaven” solo Jimmy Page played on a Tele; that’s uncomfortable, but he went right to the very top of the fretboard, which is just crazy. But it adds to the emotion and angst of the solo.
I was playing a Hagstrom II in the beginning, and I learned that even if I learned a lick in 12th position, it might actually sound better in first position (FIGURE 21), especially if you move between rhythm and lead. You learn that some positions are better for the middle of the song, or for the end of the song when frenzy is called for. I tried to figure out that little box position everywhere (FIGURE 22).
LEARNING SCALES

For me, the whole idea behind learning scales was revolutionized by my high school music teacher, Bill Westcott. He told me that, just in case I didn’t become the kind of guitar player I wanted to be, I shouldn’t let any physical shortcomings hold me back; the most important aspect of musical development was going to take place in my mind, which was limitless, so just keep feeding it and developing it.
One of the things he instructed me to do was to sing scales, to learn the intervals, to know what it was on paper, and to be able to generate it with my voice in any key that my vocal chords could allow. Then I was to translate that to the guitar, not for performance purposes, but to learn what the spaces between the notes felt like. So I did start with something like a G major scale, playing and singing each scale degree in pairs and in relationship to the G root note (FIGURE 23). If any of the scale degrees were altered, I’d sing and say what those other intervals were. I had flash cards with 15 different scales on them, and I learned how to play those scales in two octaves (FIGURE 24), which may have come from these books I bought from Billy Bauer, a great jazz guitarist that was another teacher of mine. It gave me a great way to organize studying scales and arpeggios, especially for the singing exercises. I’d sing the different intervals and I became aware of the difference of feeling in my body and voice, and hear it, and look at it on the board to. My goal was, if I hear these two notes on the radio, I want my brain to say, I know what that is.
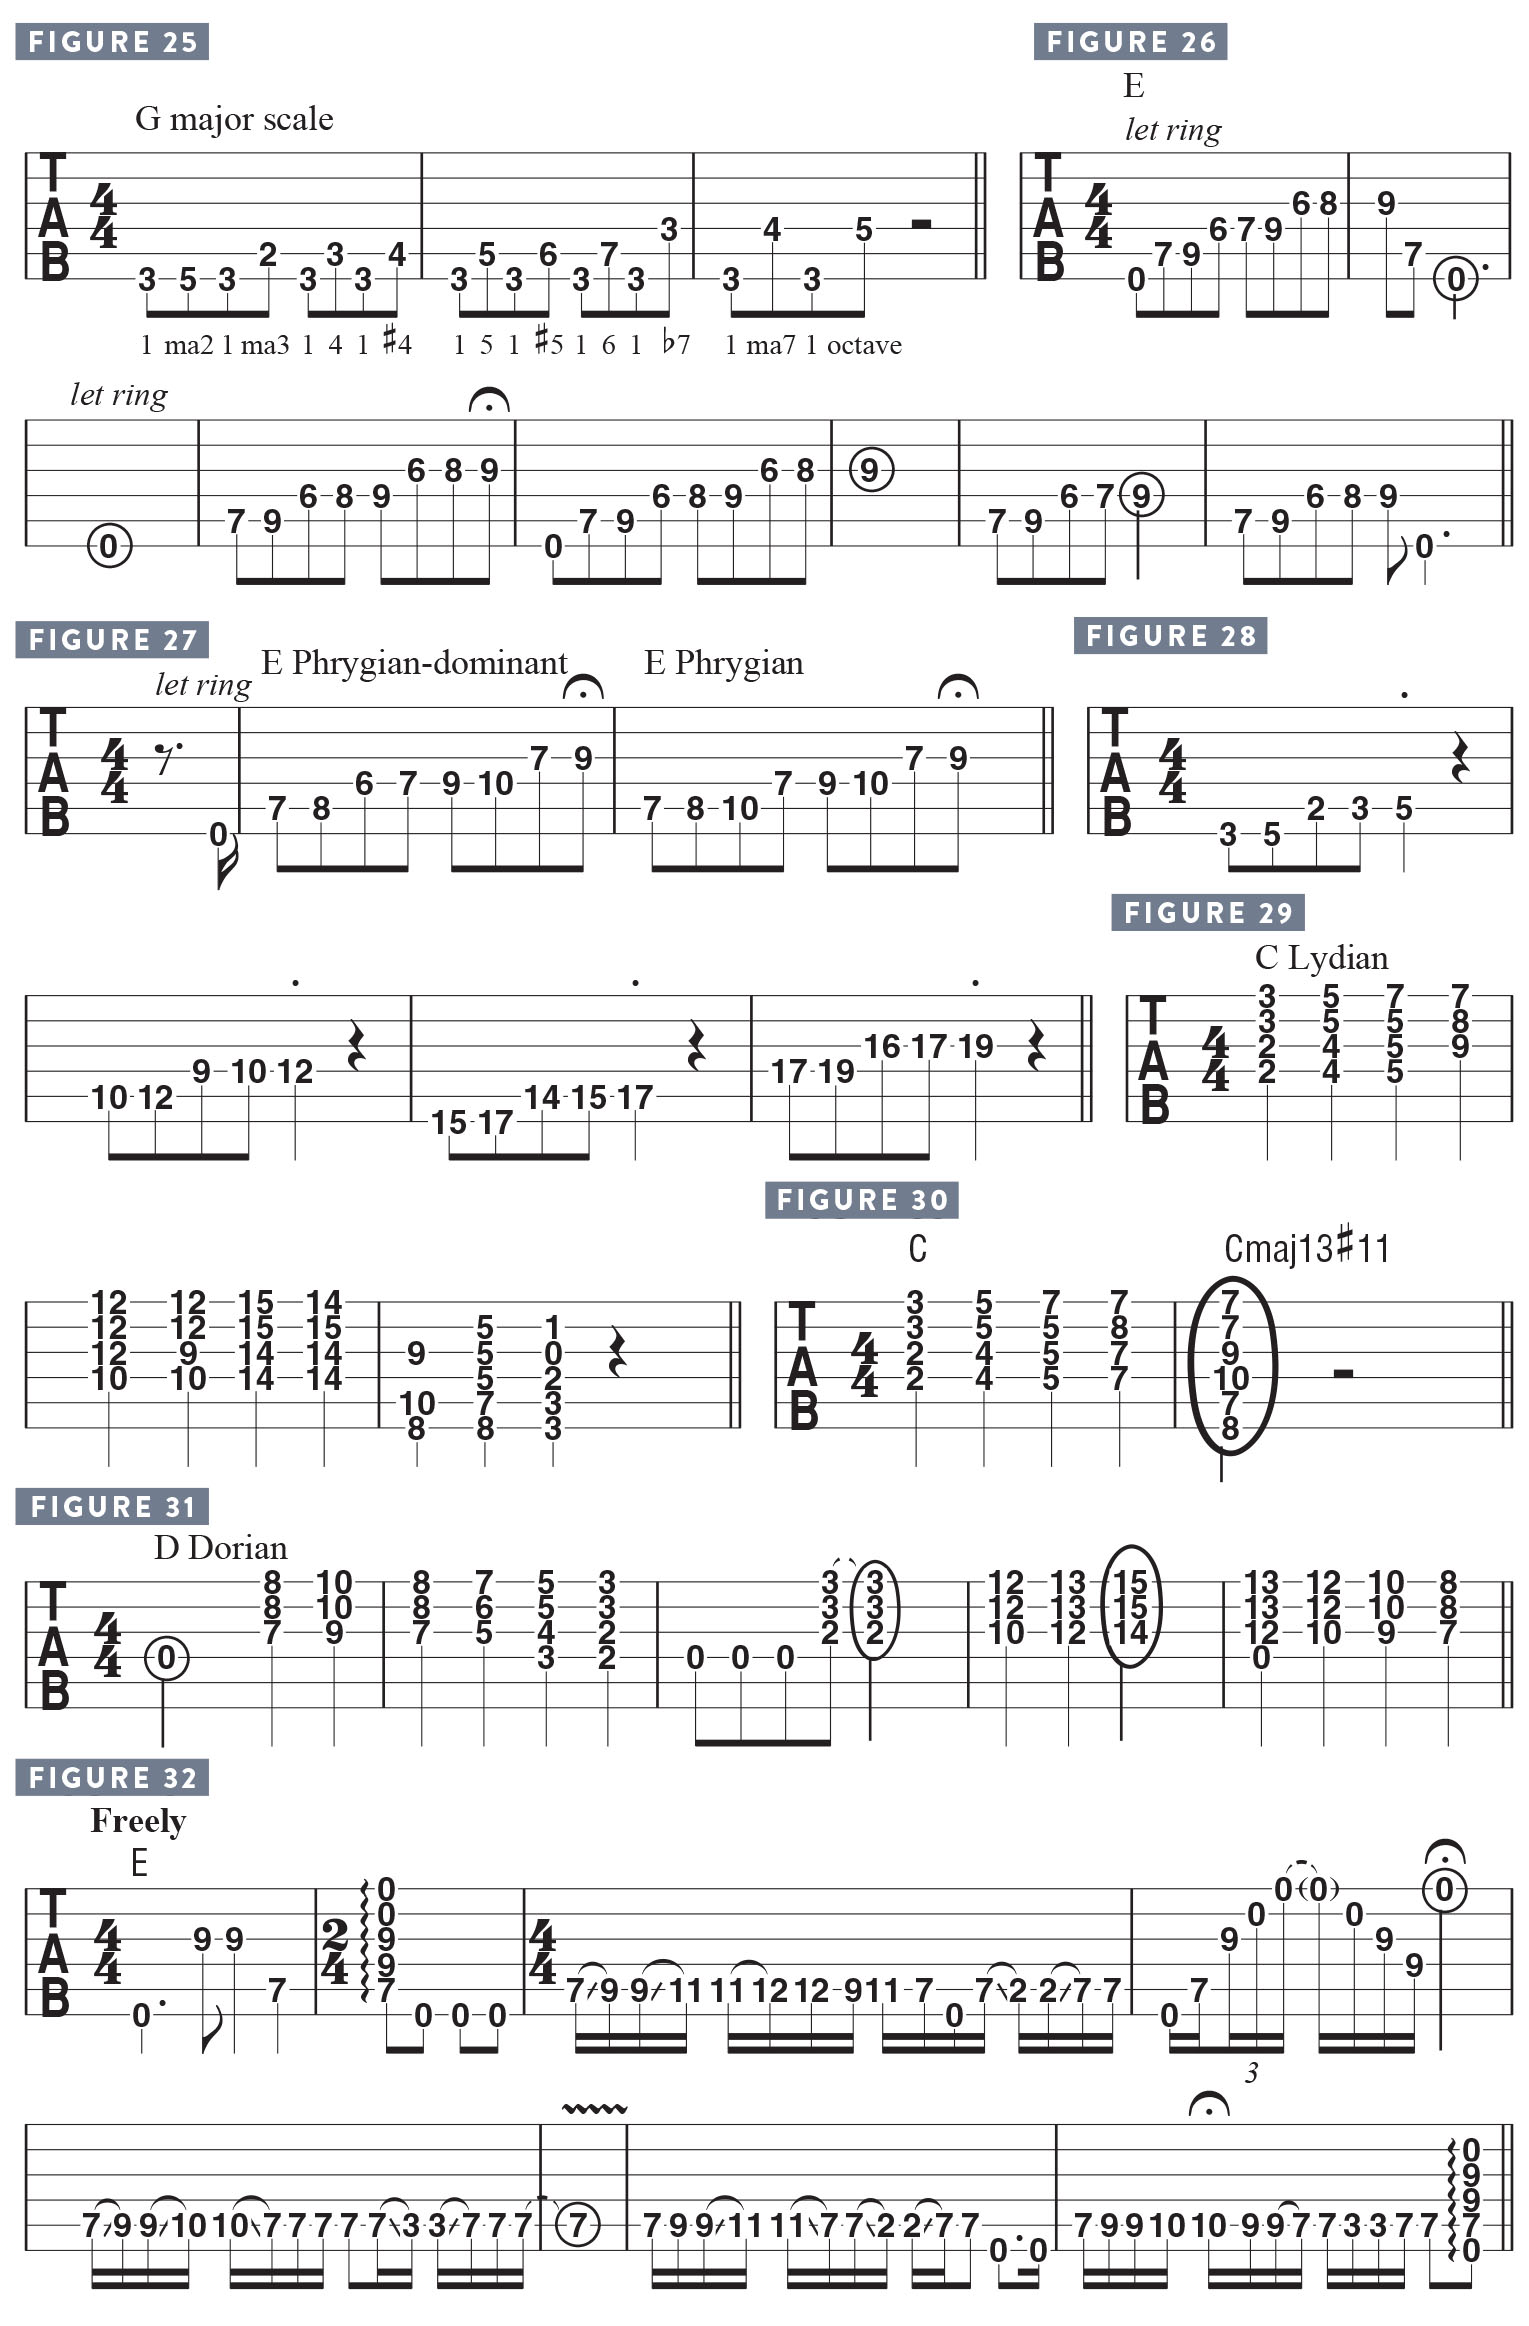
And this is what Bill Westcott was getting at (FIGURE 25), singing and comparing each of the 12 tones to the root note in order to learn exactly what that was about. I would go through the major scale, the Dorian mode, Phrygian mode, Lydian mode, Mixolydian, natural minor (a.k.a. the Aeolian mode), Locrian, Phrygian-dominant, harmonic minor and melodic minor. I didn’t bother with anything other than the seven-note scales; I don’t think I was working on diminished scales and arpeggios yet, either. But working with all of those scales was enough, and I think I stayed in the key of G because I could sing everything there. Then I translated this approach to the piano so that I could hear it in different keys more easily.
On guitar, it’s easy to use an E drone and play different scales and simply soak in the sound (FIGURE 26). Then I’d move on to other more unusual scales (FIGURE 27), hearing the big difference between Phrygian-dominant, which has a major third, and regular Phrygian, which has a minor third. And I’d work out the fingerings as I went along.
Soon, I was figuring out different fingerings for one-, two- and three-octave modes, all over the fretboard, playing scales on only one string, and learning the names of every note on every string. I still had school to go to and trouble to get in, but I somehow found the time to get it all in. I developed a manner to get through all of the many things I wanted to cover in each practice session, such as moving pieces of a scale to different positions (FIGURE 28).
PRACTICE REGIMEN
In regard to practicing, I started to realize, in two- to three-week intervals, that if I was really getting into finger exercises, I’d end up with a cold, empty feeling at the end of the practice session! No music was attempted, and no joy was experienced. I began to wonder, Why am I trying to get good at these, and who would want to listen to me performing this stuff? The answer was, no audience in the world! In the back of my mind, I knew it was about coordination and teaching my body to get used to the guitar.
I had a long list of things to work on: I don’t know what all the notes are; I don’t know where all of the scales are; I don’t know all of the chords; I don’t even know what all of the scales are called and how they relate to each other. I realized, I’ve got to start somewhere, and the chord thing seemed like the easiest thing to do, because I had some small, great chord books. The thing was that they were finite, so my field of study was focused in a clear way.
I had a great Joe Pass guitar book that had the chords arranged in groups, like a couple of pages under “C major” with no chord names. I gave myself a couple of weeks and thought, I will simply play every chord in this book every day before I do my homework. I opened to page 1 and played through them all, like this (FIGURE 29). Each chord was a C but it was C with something, with a sprinkle of this and a dash of that. Then there were a few pages of dominant seven chords, diminished seven chords and half-diminished seven chords. This gave me great options for other sounds that I was learning for the first time.
Where I “connected the dots” was, as I played through the chord shapes (FIGURE 30), I found chords that had almost the entire scale represented in them. These chords were so beautiful to my ear, even though I knew I’d probably not use most of them with my band. A few weeks later at a jam session, I played some of these chords and the guys all looked at me, like, “what happened to you?!” “What is that? It’s magic!” And I thought, You like that?! I said, “it’s this chord book that’s really twisting my brain,” in terms of what a chord name was suggesting to me. I still knew power chords were extremely important; it was just a matter of what the music called for. I heard some fragments of this in Hendrix’s music, and then I heard those chords moving around.
Soon, I addressed the “C” shape chords as D Dorian chords (FIGURE 31), which took me down yet another very important road.
INTERVALS/MODES
As I was putting practice time into each of these different things—scales, chords, intervals, riffs—they all started to connect with one another. A favorite exercise of mine is to just meander around the fretboard and listen to the sound that is coming out (FIGURE 32). I’d change a few notes, moving from major to minor, and I’d acknowledge the different feeling in the musical sounds and references. Then I’d try pushing it a little further (FIGURE 33), using Aeolian, then dominant, or Mixolydian. I started to notice that when I switched from one mode to another, that “hand off” was an effect in and of itself. Some required more attention to the chord that was represented by the notes (FIGURE 34), like playing the four chord, A, over the “one,” E, alluding to chord progressions.
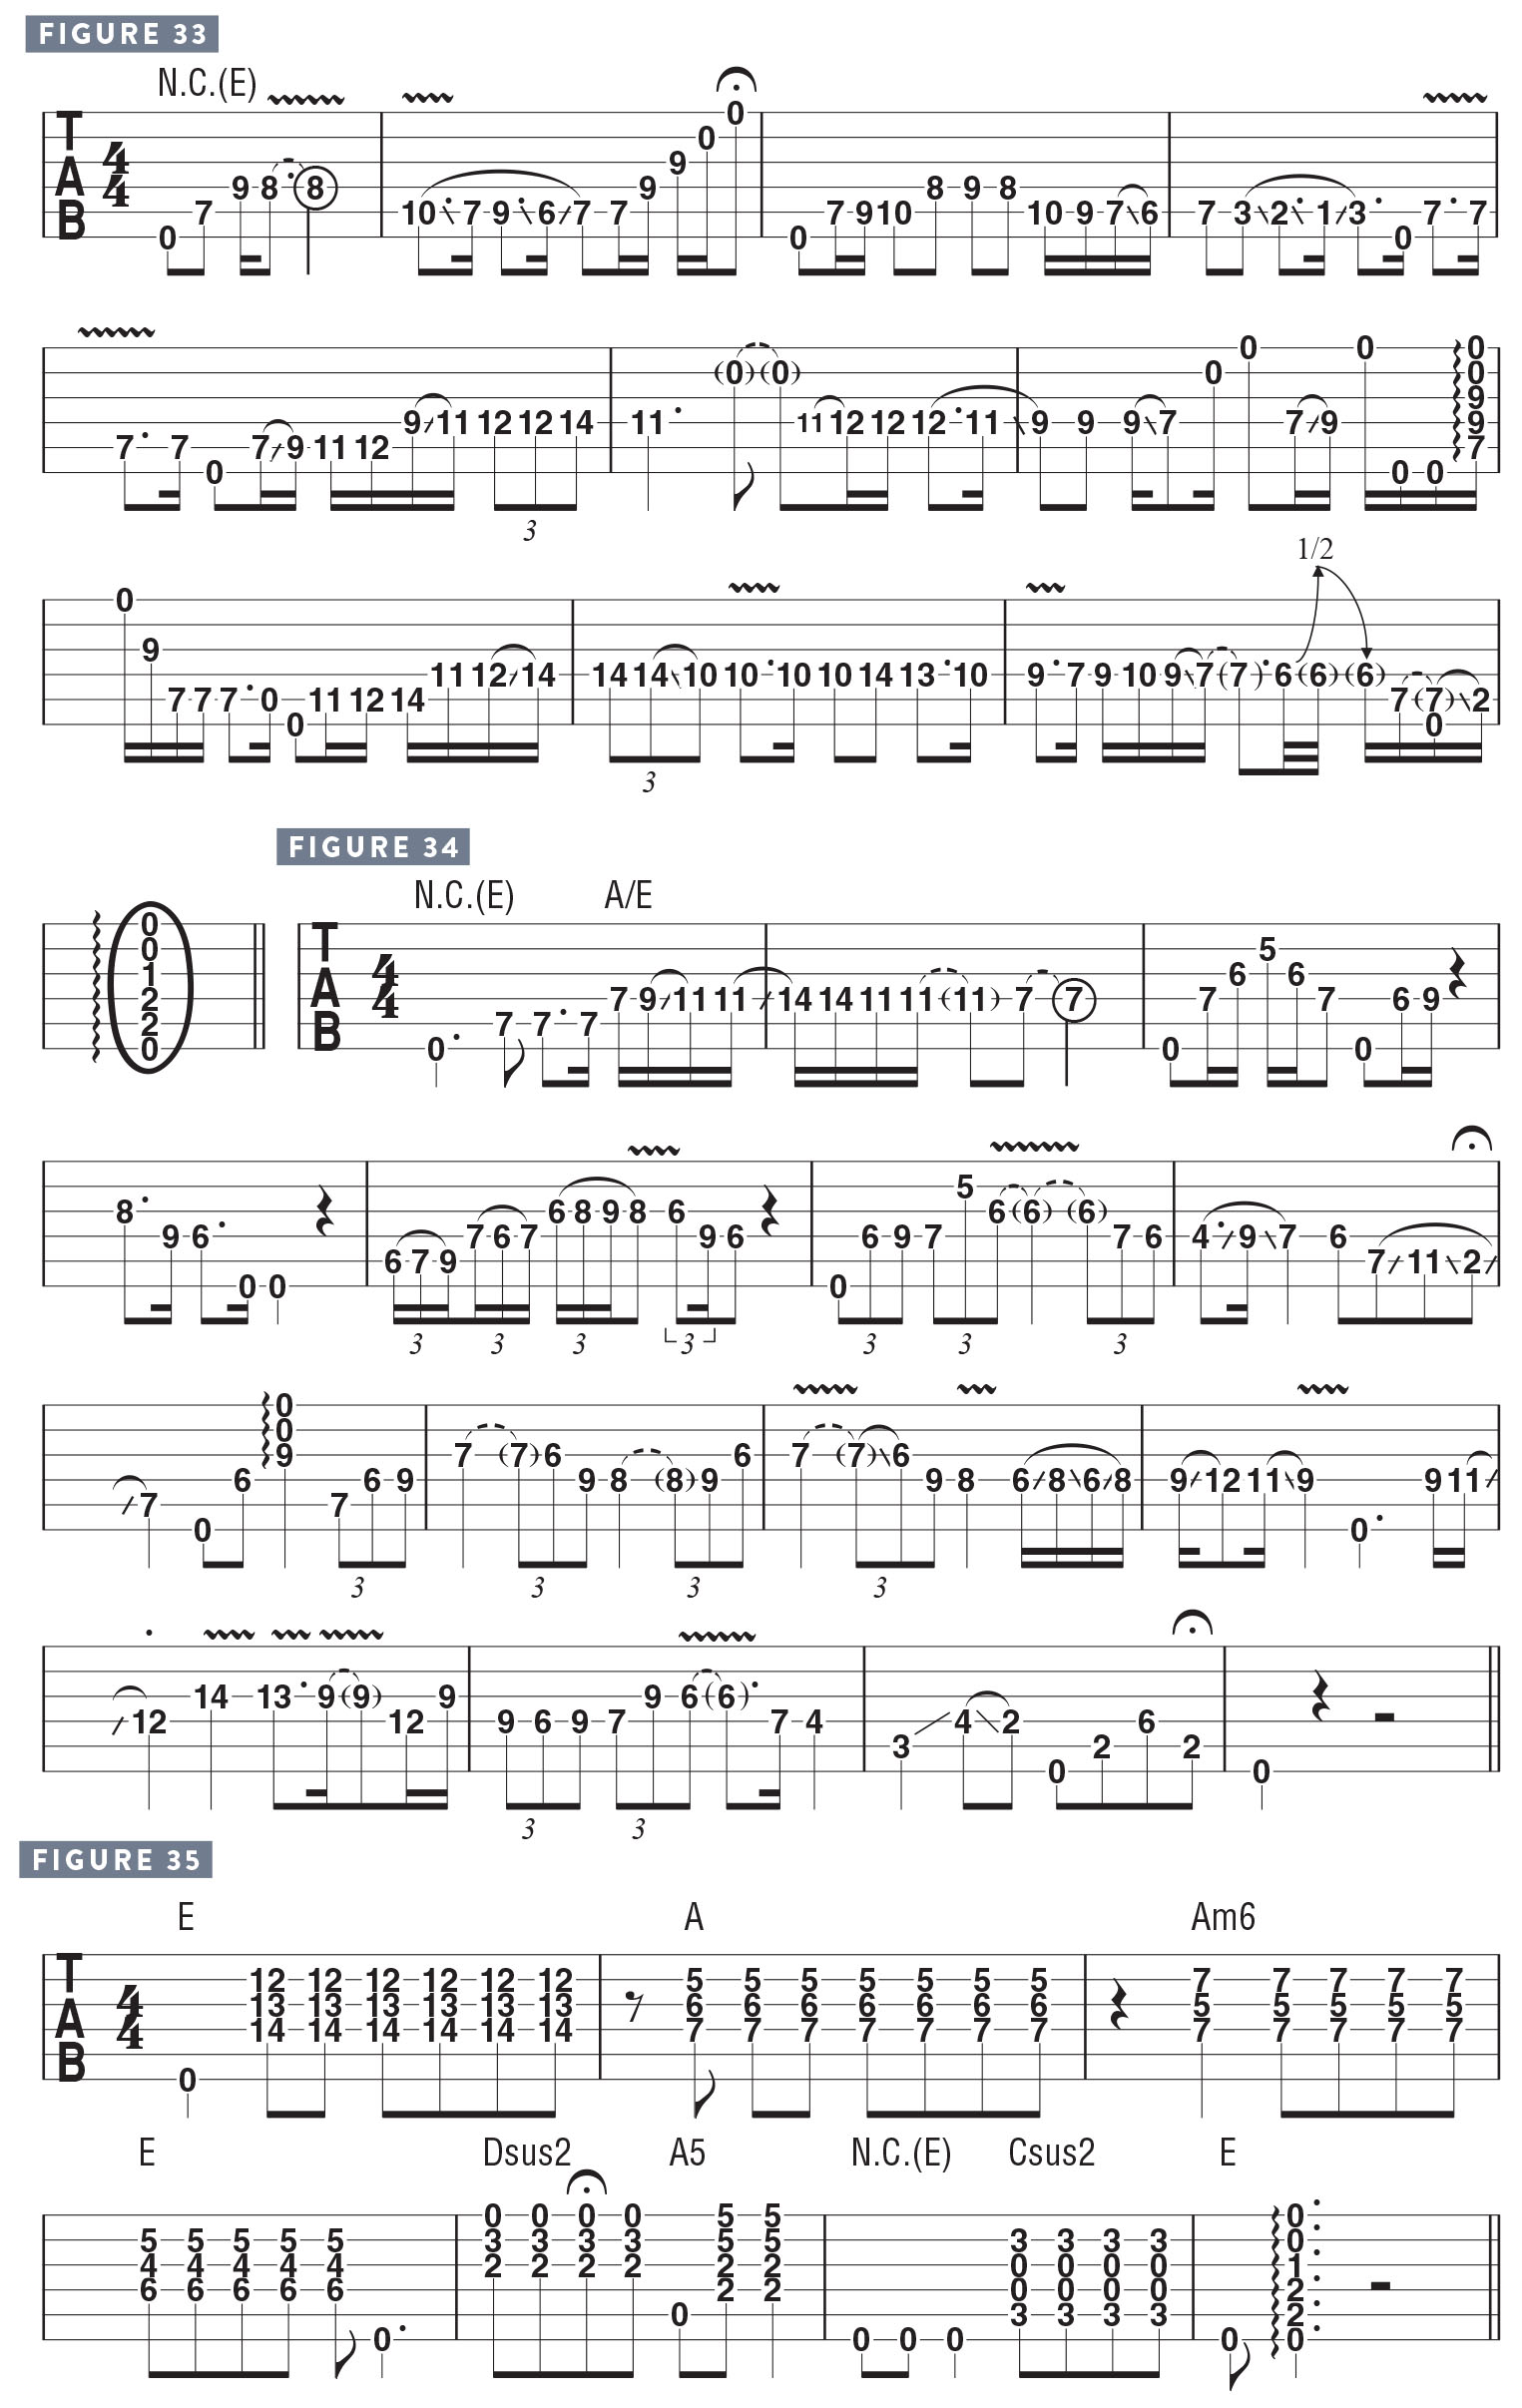
There are songs of mine in which the band will hold a drone, and I’ll move through seven different modes in the melody, sort of imagining a chord progression that’s not really there (FIGURE 35). It sounds a bit corny just playing the chords, but it can sound majestic when translated in a single-note melody that’s articulated with finger slides, hammer-ons, pull-offs and whatnot. It’s like looking up at the stars, and suddenly you go, “oh, there’s Orion’s Belt!” You’re just hitting on the particular notes you need to tell a harmonic story. This type of thing made me realize that I was going to work my hardest on developing opinions about these modes, so that, eventually, if I wanted to write a song wherein the harmony kept changing with every chord (FIGURE 36), I could find a melodic thread to connect the whole thing.
TECHNIQUE AND MUSIC ALITY
At the G4 clinics, a lot of times I like to start with an E drone, and I’ll tell everyone that this is the way I like to warm up, when I’ve become so bored with finger and scale exercises, and I just solo very slowly for quite a while, making sure I can still play the guitar. I’ll explore everything we’ve just gone over, everywhere on the guitar.
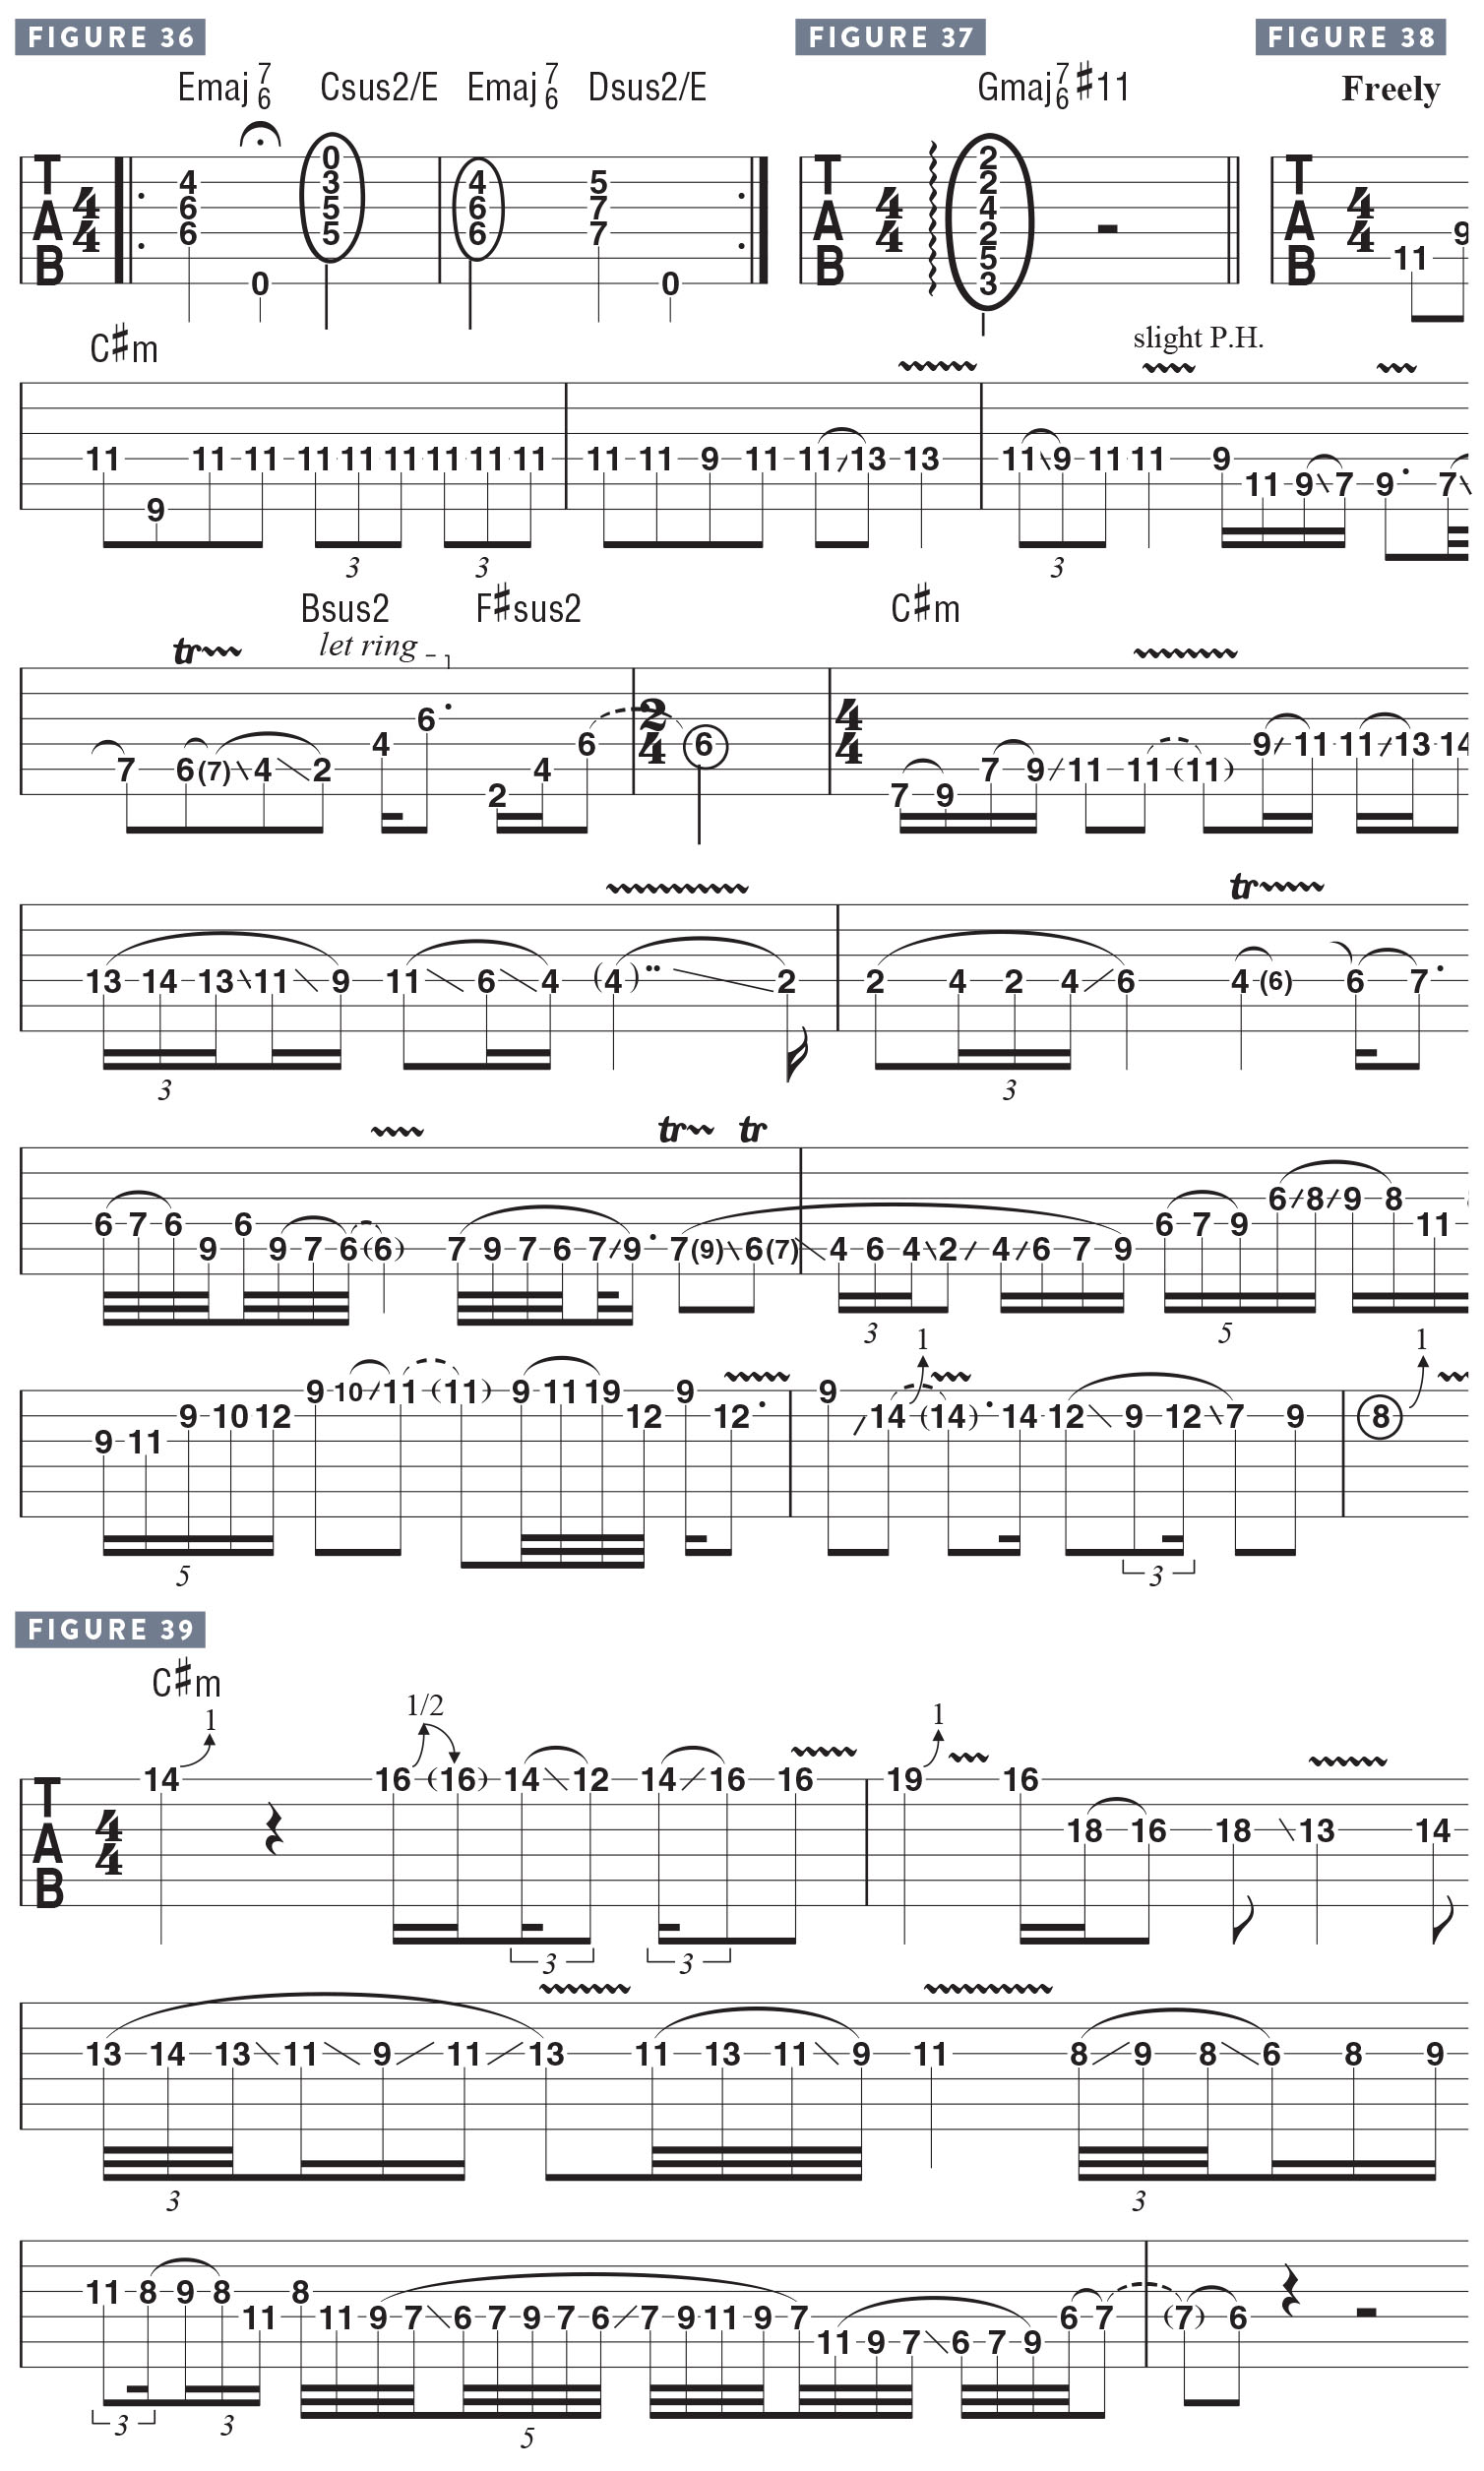
In order to be able to express yourself freely, you at least need to be familiar with scales and chords and intervallic relationships. I don’t think you really need to know the names of everything. Students have asked me, “Why do I need to learn music theory?” and I’d say, “You don’t.” Then I’d play Gmaj7/6#11 (FIGURE 37) and they’d say, “What’s that?!”
I will often pick up my guitar, plug in and just wander about (FIGURES 38 and 39), and a lot of little technique things will grab my attention and I’ll work on them. My guitar, and the sound I like, enables all of this legato playing, which wouldn’t work on a Tele through a ’59 Fender Champ.
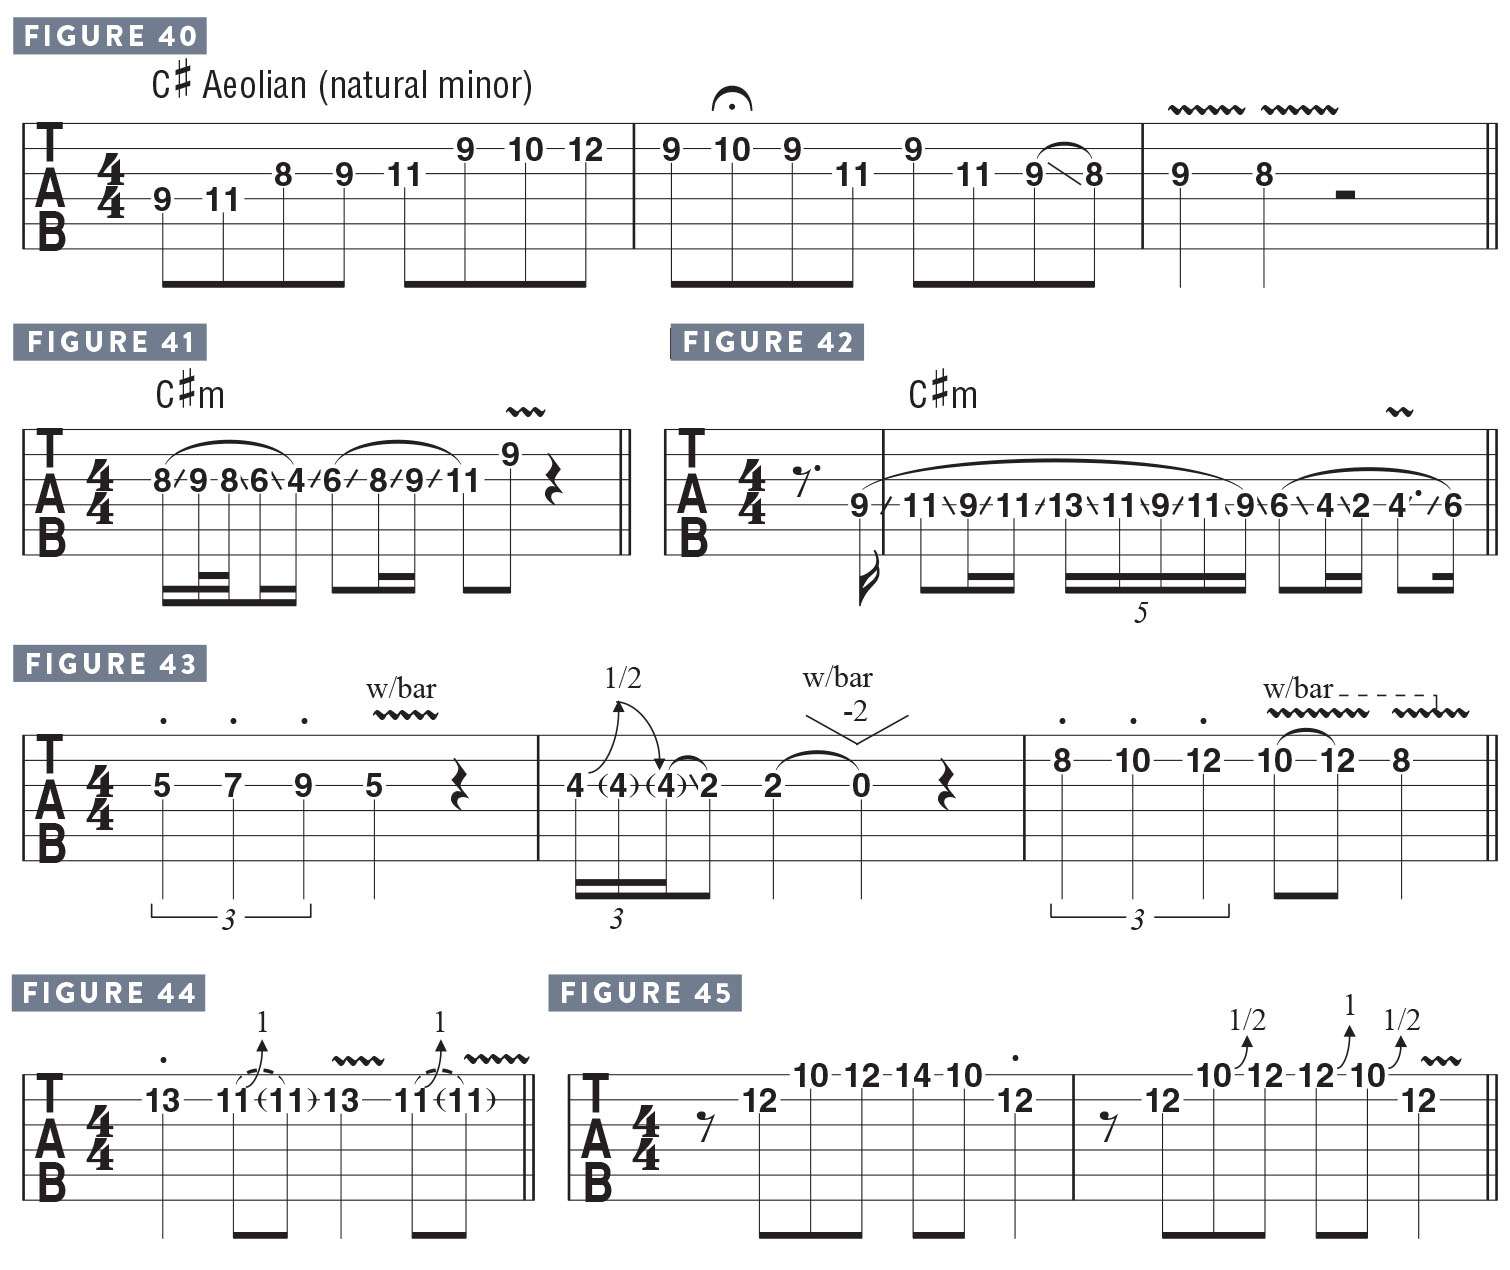
Part of what has turned into my language on the electric guitar in terms of playing melodies and solos has been dependent upon techniques that go from Chuck Berry to Allan Holdsworth, and all of the “gain” stuff that Hendrix used to tell his story. I’m playing scales (FIGURES 40 and 41) using vibrato, sounding notes and then bringing the vibrato in afterward. Vibrato is really part of the melodic information, so it shouldn’t just be poured on like hot sauce!
A great, sneaky technique is this sliding thing (FIGURE 42), which yields its own specific results, in terms of presenting a melodic idea.
VIBRATO AND MELODY
When I’m putting instrumental music together, I pore over the melodies like crazy. It’s insane how deep I get into it. I’ll investigate 600 slightly different ways to play the same melodic phrase. There’s a song on my latest album with a lot of Jeff Beck–style bar vibrato (FIGURE 43). I was thinking about singers in Eastern music, from Japan to Eastern Europe, and their use of vibrato is quite different from what we’re accustomed to with Western music. The idea is that the type of vibrato is determined by what is best for the flavor of the song, and not just to shake a note for the sake of shaking a note.
A great way to develop a good finger vibrato technique is to bend up to a note and then add vibrato (FIGURE 44), trying different types of vibratos, from slightly flat to right on to slightly sharp. So, you could bend up to a vibrato at least three different ways. If you had to play a specific melodic line along with other instruments, you might play it completely straight (FIGURE 45), but if you played it on your own, you’re free to add bends and vibratos as you see fit.
All of us have only a certain amount of time to practice. As a teacher, I try to imagine the best way within each player’s musical life for him or her to apply the many different techniques being learned, in order to gain the most from working on these things. If you can work on them within a song or real-world musical application, you’re killing two birds with one stone. It might just take that one gig, where you utilize a technique on a particular song in a performance to make that essential realization, and it didn’t take 16 hours of sitting in a room practicing vibratos. It’s very difficult not to gain insight from those musical lessons learned when performing with a band in front of an audience.
