How To Replace Your Guitar's Volume and Tone Pots
Upgrade worn-out and noisy controls to keep your tone tip-top

I recently bought a mid-level electric guitar and changed out a few things, and now I’m thinking of upgrading the wiring, including the volume and tone pots, the switch and the jack socket. Is this job worth doing? I’m pretty competent with a soldering iron, so I think I’m up to the job. —Ian Wagner
Upgrading the components in your guitar’s control cavity should give you significant improvements in tone and component life. If your guitar has single-coil pickups, buy 250K pots. If it’s packing ’buckers, go for the 500K jobs. If your ax has humbuckers and single-coils, I recommend 500K pots. This could make your single-coils sound a bit brighter than normal, but it will unlock your humbuckers’ full potential. For this job you’ll also need a soldering iron, solder, safety goggles, wire cutters, and a camera, to help you keep track of your original wiring connections (your cellphone will work just fine for this).

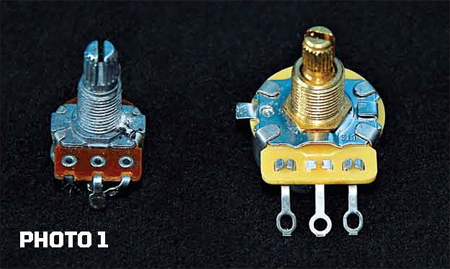
1. Here’s why we’re doing this: Compare the original “import” potentiometer (left) with the U.S.-made CTS pot on the right (PHOTO 1). It’s not just the size that matters here; the CTS pot will last longer, too.
2. Before you do anything else, take a photo, or several, of your guitar’s wiring. This will help you return each wire to its appropriate component when it comes time to solder everything together. If a camera isn’t handy, grab a pencil and paper and sketch out the diagram, being careful to note the color of each wire.
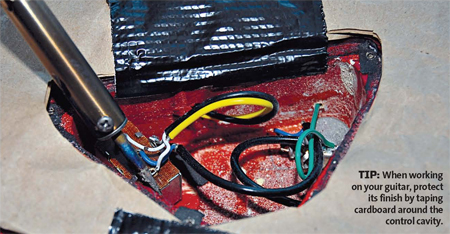
3. Turn on your soldering iron and let it heat up fully. Hot solder will damage your guitar’s finish, so protect your instrument with a towel or sheets of newspaper. When it comes time to use the iron, be sure to wear safety goggles, as well as a pocket protector to give you the complete “electronic nerd” look.
4. Carefully de-solder each pickup wire and the ground wire. Once the pickups are disconnected, you can remove the controls and remaining wiring in one piece. Unbolt the pots, switch and jack socket and pull them free of the guitar.

5. Test fit the new pots, switch and jack socket. If they are a little larger than the old components, you may need to enlarge the cavity slightly. Carefully open up the holes with a round file. You shouldn’t have to open them too much, so file away a little at a time, being careful not to chip the guitar’s finish.
6. It will be easier to build your new wiring loom away from the guitar, in an area where you’ll have plenty of space in which to work. Do a mock up with all your new components using your wiring diagram as a reference.
7. Prepare your controls for soldering. Begin by scratching the casing of each pot with a file. This cuts through the protective coating on the pot, allowing the solder to adhere to the metal.
8. Prepare your new switch by soldering the two center tabs together. You must also file the metal on the ground tab to allow the solder to adhere to it properly. Preparation is everything here.

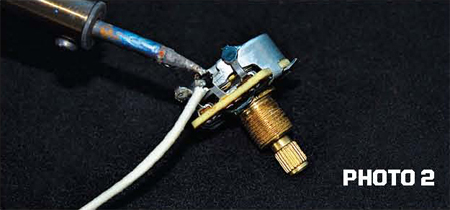
9. Apply solder to each tab on the new pots, switch and jack socket. Take care to solder one of the tabs on the volume pot as shown in PHOTO 2. Also, apply solder to each pot’s casings for the ground wires.
10. Strip the end of your new wire and solder the tip. Solder the wires in place on each pot, the switch and the jack socket, paying close attention to your diagram. Try to make each wire the same length as the original.
11. When you’re soldering the capacitor onto the tone pot, don’t let it get too hot, because excessive heat can damage it. To protect your fingers from the heat, use a pair of long-nose pliers.
12. Once your wiring loom is complete, install it in the guitar, and reattach the pickup and ground wires. Test the guitar through your amp and make sure everything is working. If it is, congratulate yourself on a job well done. If it’s not, check that you’ve wired everything together properly. Also, check your solder joints and redo any that aren’t shiny or look a little iffy.
Can I use furniture polish to clean my guitar? I know there are specialist polishes available, but I’m suspicious that it’s just a marketing ploy. —Jim Barrett
I wouldn’t, as furniture polish contains silicates that can dull your guitar’s finish over time. Keep off the Lemon Pledge—always use dedicated guitar polish.
Get The Pick Newsletter
All the latest guitar news, interviews, lessons, reviews, deals and more, direct to your inbox!
Ed Mitchell was Reviews Editor on Total Guitar magazine from 2003, and his guitar-modding column, Ed’s Shed, appeared in print on both sides of the Atlantic (in both Total Guitar and Guitar World magazines). He was the Editor of The Blues Magazine from 2012-16, and a contributor to Guitarist, Classic Rock and Louder. He died in October 2022, aged 52. Between them, the websites Guitar World, Louder and MusicRadar host over 400 of his articles – among them interviews with Billy Gibbons, Paul Weller, Brian Setzer, profiles on Roy Buchanan, Duane Allman and Peter Green, a joint interview with Jimmy Page and Jack White, and dozens of guitar reviews – and that’s just the ones that made it online.
“There are so many sounds to be discovered when you get away from using a pick”: Jared James Nichols shows you how to add “snap, crackle and pop” to your playing with banjo rolls and string snaps
Don't let chord inversions bamboozle you. It's simply the case of shuffling the notes around


![Joe Bonamassa [left] wears a deep blue suit and polka-dotted shirt and plays his green refin Strat; the late Irish blues legend Rory Gallagher [right] screams and inflicts some punishment on his heavily worn number one Stratocaster.](https://cdn.mos.cms.futurecdn.net/cw28h7UBcTVfTLs7p7eiLe.jpg)


