Guitar Chalk Sessions: Methods for Targeting Problem Areas in Your Guitar Solos
Be willing to critique yourself and to put in the boring practice time fixing the areas where you’re falling short.

I’ve noticed something about my soloing in the last couple of weeks.
First, I’m not what you would consider a “lead guitarist.” I can hang, sure. But it’s not my area and I’ve never really been comfortable playing at higher speeds.
That’s OK, because I make my musical living on the rhythm and layering side of the business. But I also noticed I had some consistent problem areas as I moved across the fretboard. I was messing up in the same spots over and over again.
What are “problem areas?”
For me, these were spots where I'd consistently fail to mute other strings, incur excess buzzing or make other noisy mistakes that took away the integrity of my solos. I could tell because I would hear a note that wasn’t supposed to be played or I would play a note that didn’t ring out like it should.
Take this simple, three-note run.
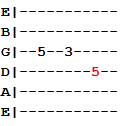
I noticed that frequently, the last note in this sequence (highlighted in red) would ring out only partially when I played this run quickly — although it only happened when the run occurred on the third and fourth strings. I would pull off the fifth fret, ring out the note at the third fret and then hammer the fifth fret (G) on the fourth string. That last G just wasn’t ringing, for some reason. With this happening over and over again, a “problem area” I needed to work on was made evident.
How I Fixed the Problem Areas
I needed to target the specific movement on those strings and simply practice different ways of playing it, being careful to do the following three things:
01. Make sure every note rang out like it should.
I found this was usually a matter of playing too fast. If the goal is to get every note to come out clean, slowing down until that’s happening is a necessary first step before you start the next two.
02. Use different picking and playing tactics to play through the sequence.
As I've already mentioned, my approach was to use a pull-off and hammer-on. I continued to practice that, but I also practiced alternate picking every note, picking the first and last note and sliding through the sequence. I found that playing the run with pull-offs and hammer-ons wasn’t always the most optimal approach.
03. Come up with exercises to promote the movement.
For a pattern so simple, anything that involved moving a whole step between the third and fourth string could be considered an exercise. You can always come up with your own, but a good standard is to be sure that whatever you’re playing as an “exercise” is more difficult than playing the riff itself.
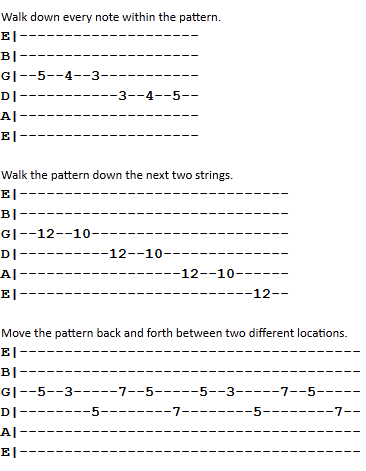
The exercises don’t have to be complex or vastly different from the movement itself. The point is to come up with a way to practice whatever you’re having trouble with and up the difficulty so that the original tab gets easier to handle.
If you isolate the problem down to just a few notes, the exercises get pretty basic.
Let’s try another example.
Another transition that gave me trouble was getting to and from the four-note interval on the second string, to the three-note interval (major second) on the third string.
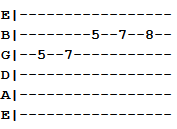
I approached the problem similarly by slowing down, picking each note and experimenting with a few different ways of playing the pattern.
Once I got a little more comfortable with it, I ran through a few exercises to help strengthen the movement.
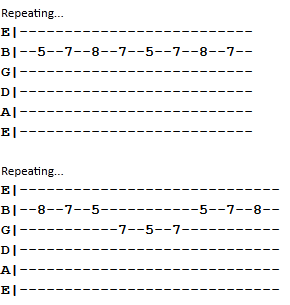
Once again, the solution and exercises are painfully simple, but the real key is being able to identify where you’re making the most mistakes and improving those areas.
Recycling the Method
Perhaps you’ve got other areas that you want to work on that the examples don’t address. The process is the same, no matter what part of the fretboard or what kind of movement you’re trying to improve.
Here’s how to practically approach the method:
01. Practice soloing for a while and pay attention to where you’re making mistakes.
02. Jot down the tabs of those areas, isolating the problem to five or so notes.
03. Practice that movement using different techniques and picking styles.
04. Come up with exercises that allow you to intentionally strengthen that movement.
If you give practice time to even just a few different spots where your solos are falling short, you should notice significant improvement in your lead playing after a week or two. It’s no different than the way an athlete works on different aspects and parts of his or her game.
Be willing to critique yourself and to put in the boring practice time fixing the areas where you’re falling short. Getting good at the guitar (particularly soloing) means spending time working on mundane movement. There’s just no way around it.
Robert Kittleberger is the founder and editor of Guitar Chalk and Guitar Bargain. You can get in touch with him here, or via Twitter, Facebook and Google Plus.
Get The Pick Newsletter
All the latest guitar news, interviews, lessons, reviews, deals and more, direct to your inbox!
Bobby is the founder of Guitar Chalk, and responsible for developing most of its content. He has worked with leading guitar industry companies including Sweetwater, Ultimate Guitar, Seymour Duncan, PRS, and many others.
“There are so many sounds to be discovered when you get away from using a pick”: Jared James Nichols shows you how to add “snap, crackle and pop” to your playing with banjo rolls and string snaps
Don't let chord inversions bamboozle you. It's simply the case of shuffling the notes around



![Joe Bonamassa [left] wears a deep blue suit and polka-dotted shirt and plays his green refin Strat; the late Irish blues legend Rory Gallagher [right] screams and inflicts some punishment on his heavily worn number one Stratocaster.](https://cdn.mos.cms.futurecdn.net/cw28h7UBcTVfTLs7p7eiLe.jpg)


