Jamming Arpeggios with the C Major Triad
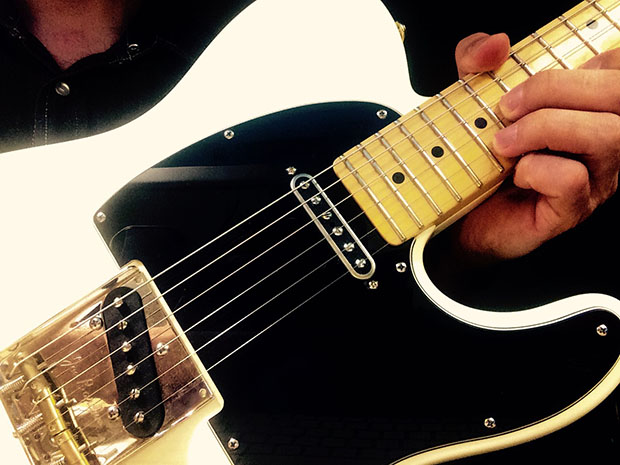
In this lesson, we’re going to focus on two things.
First, we’re going to learn the C major triad on our guitar (there are several different forms and variations of it) and both succeeding inversions.
You might already know how to play all this. If you do, feel free to skip ahead to the tab sheets or keep reading for a little review.
Second, we’re going to use those triads to come up with a few original, melodic arpeggios, as the title would suggest.
So our path will look like this:
Theory - Practice - Application
We’ll learn the theoretical concept, practice what is concrete and then apply it to do a little jamming of our own. Let’s begin by defining a triad.
What is a triad?
Simply put, a triad is a set of three notes that are stacked in thirds (third intervals). Therefore a triad will have the following three components:
1. Root Note
2. Third Scale Degree Note
3. Fifth Scale Degree Note
This is one of the most important building blocks a guitar player has at his/her disposal.
Since we’re focusing on C major, those notes will be derived from the major scale, which is made up of the following notes:

This means our root note is C, and we’ll take the third and fifth degree of the C major scale, which simply means we take the third and fifth notes in that sequence.

That leaves us with the following three notes for our triad: C - E - G
We can now tab this out:
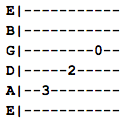
As you can see we’ve tabbed C, E and G in a short arpeggio. This is called our triad’s root position.
It’s the root position because the C is the lowest note in the chord, falling on the fifth string at the third fret. If you know your fretboard notes, you’ll recognize quickly that this is C.
Let’s move onto the inversions.
To “invert” a triad you basically rearrange the notes so that C is no longer the lowest note in the chord or pattern.
At this point, the low root C is assumed though not actually played. This is why an electric guitar player can often neglect these lower notes when a bassist or rhythm guitar player are present.
The easiest way to come up with an inversion is to simply start with the next highest note—in this case E on the second fret—and find the other two notes from our original triad.
So if we already have an E, we need to find C and G.
Here’s your first inversion:
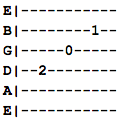
Once again we have a segment of a full C major chord. Our E was the next highest note, so from there we can easily take the open G and then add our C back in on the second string at the first fret.
To get our second inversion, we simply repeat the process.
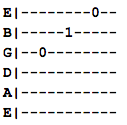
You can see that we’ve got our E from the open first string (which is the high E in standard tuning) and our C stays at the first fret on the second string.
The open G is now the lowest note, giving us the technical requirements for a second inversion.
Jamming Arpeggios
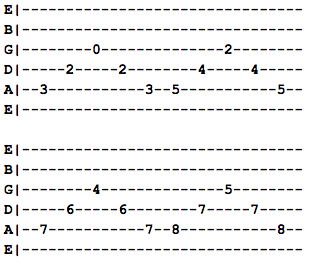
Now that we’ve got the music theory behind us, we can look at a few different ways to jam on this triad and do a little bit of our own application. We’ll use two different forms of the C major triad—the one we went over while explaining the music theory and another form that’s anchored at the root C on the eighth fret.
First, let’s talk a little bit about your options when it comes to using these shapes.
Using Triads and Ideal Technique
There are basically three different ways you can use any particular triad or inversion.
1. In its open form.
2. Transposing the shape.
3. With a capo.
This prevents us from being limited to one particular key.
Instead, we can learn the shape in a given key and then either transpose or use a capo to migrate that shape to whatever key we might be playing in. For the most part we’ll stay in the key of C for convenience, but keep these tactics in mind for your own playing situations.
Further, we should recognize what kind of techniques and playing styles are best suited to make use of arpeggiated triads.
Here are just a few that we’ll focus on:
1. Light, acoustic finger-picking.
2. Lead, electric fills.
3. Repetitive arpeggiated patterns.
It should be known that triads find their way into nearly every aspect of the guitar, but are particularly applicable in these three contexts.
Let’s start with an open root position. We’ll employ a light, finger-picking technique while we move the shape to form a few different chords.
Now let’s lean into something closer to what we’d call a “lead guitar fill.”
We can go back to the root position and add some technique to come up with something more melodic and musical, ideal for lead electric guitar fills.
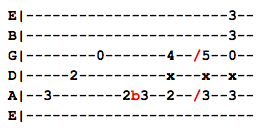
I’ve used a quick bend at the second fret before sliding up to the dyad on the third fret and finishing with the full open C chord variation.
Another similar example:
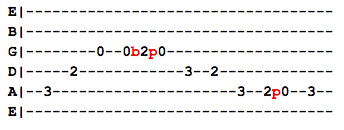
Here I’m adding major and minor second intervals to all three notes of the original triad - extremely easy.
Again, keep in mind that these same patterns can be transposed and repeated on other frets.
Let’s try one more lead fill.

This one is lengthier, but loosely follows the tone of the major scale, which means it will sound predictable and will be easy to memorize.
Following Up
Triads (as a whole) are not a short topic to cover.
In fact, you could spend a lot of time on them as an individual topic of study. I find that it’s easier to cover them in short bursts, because it allows me to memorize more effectively and retain more patterns and chord shapes that I might see.
The best way to continue learning is to repeat this process of examining a pattern and then coming up with your own melodic creation, based on that pattern.
You can also just look at some other triadic chord shapes.
Here are a few worth covering:

Once you memorize triads like this, you can repeat the process we outlined above, simply by adding your own creative ideas to these shapes.
Need something more concrete?
Try these steps:
1. Memorize the triadic pattern.
2. Transpose or move the pattern (if you need to change keys).
3. Add intervals (additional notes) to the chord(s).
4. Incorporate technique like bends, vibrator, legato and others to add definition to your notes.
This is how you improvise triads on the guitar.
It’s the structure upon which your creative work can be built.
My advice, as always, is to know the structure and then know the tools you have to work with. The more you can break these patterns in, the more useful they’ll be to you in the future as you continue to learn and memorize musical concepts.
Robert Kittleberger is a staff writer at Guitar Tricks. You can get in touch with him here or via Twitter.
Get The Pick Newsletter
All the latest guitar news, interviews, lessons, reviews, deals and more, direct to your inbox!
Bobby is the founder of Guitar Chalk, and responsible for developing most of its content. He has worked with leading guitar industry companies including Sweetwater, Ultimate Guitar, Seymour Duncan, PRS, and many others.
“There are so many sounds to be discovered when you get away from using a pick”: Jared James Nichols shows you how to add “snap, crackle and pop” to your playing with banjo rolls and string snaps
Don't let chord inversions bamboozle you. It's simply the case of shuffling the notes around


![Joe Bonamassa [left] wears a deep blue suit and polka-dotted shirt and plays his green refin Strat; the late Irish blues legend Rory Gallagher [right] screams and inflicts some punishment on his heavily worn number one Stratocaster.](https://cdn.mos.cms.futurecdn.net/cw28h7UBcTVfTLs7p7eiLe.jpg)


