Guitar intervals: everything you need to know about the building blocks of music theory
A comprehensive primer on the topic of intervals, designed to give guitarists from any stylistic background a solid grasp on one of the foundational cornerstones of music.

In music theory, the term interval is used to measure the distance between two notes, like an inch, mile or light year with objects. Our entire system of harmony in Western music is based on intervals and a standard calibration of them that was devised a few hundred years ago.
Known as equal temperament, the system uniformly divides an octave, which is two pitches, one being twice the radio frequency of the other (for example, A440 Hertz and A220Hz), into 12 evenly spaced notes, each of which is a semitone, or half step (the equivalent of one fret on the guitar), above and below the next higher and lower note. In this lesson, I offer a comprehensive primer on the topic of intervals, designed to give beginner- and intermediate-level guitarists from any stylistic background a solid grasp on one of the foundational cornerstones of music, acquire a practical working knowledge and vocabulary of intervals and become a more informed and enlightened player, composer/arranger, improviser and teacher.
Major scale intervals
The term diatonic means scale-based, so diatonic intervals are intervals that live within, or are native to, a scale. Due to its simplicity and user-friendliness, we’ll use the C major scale (C D E F G A B), which is made up of seven different “natural” notes (no sharps or flats), as a starting point in our study of intervals.
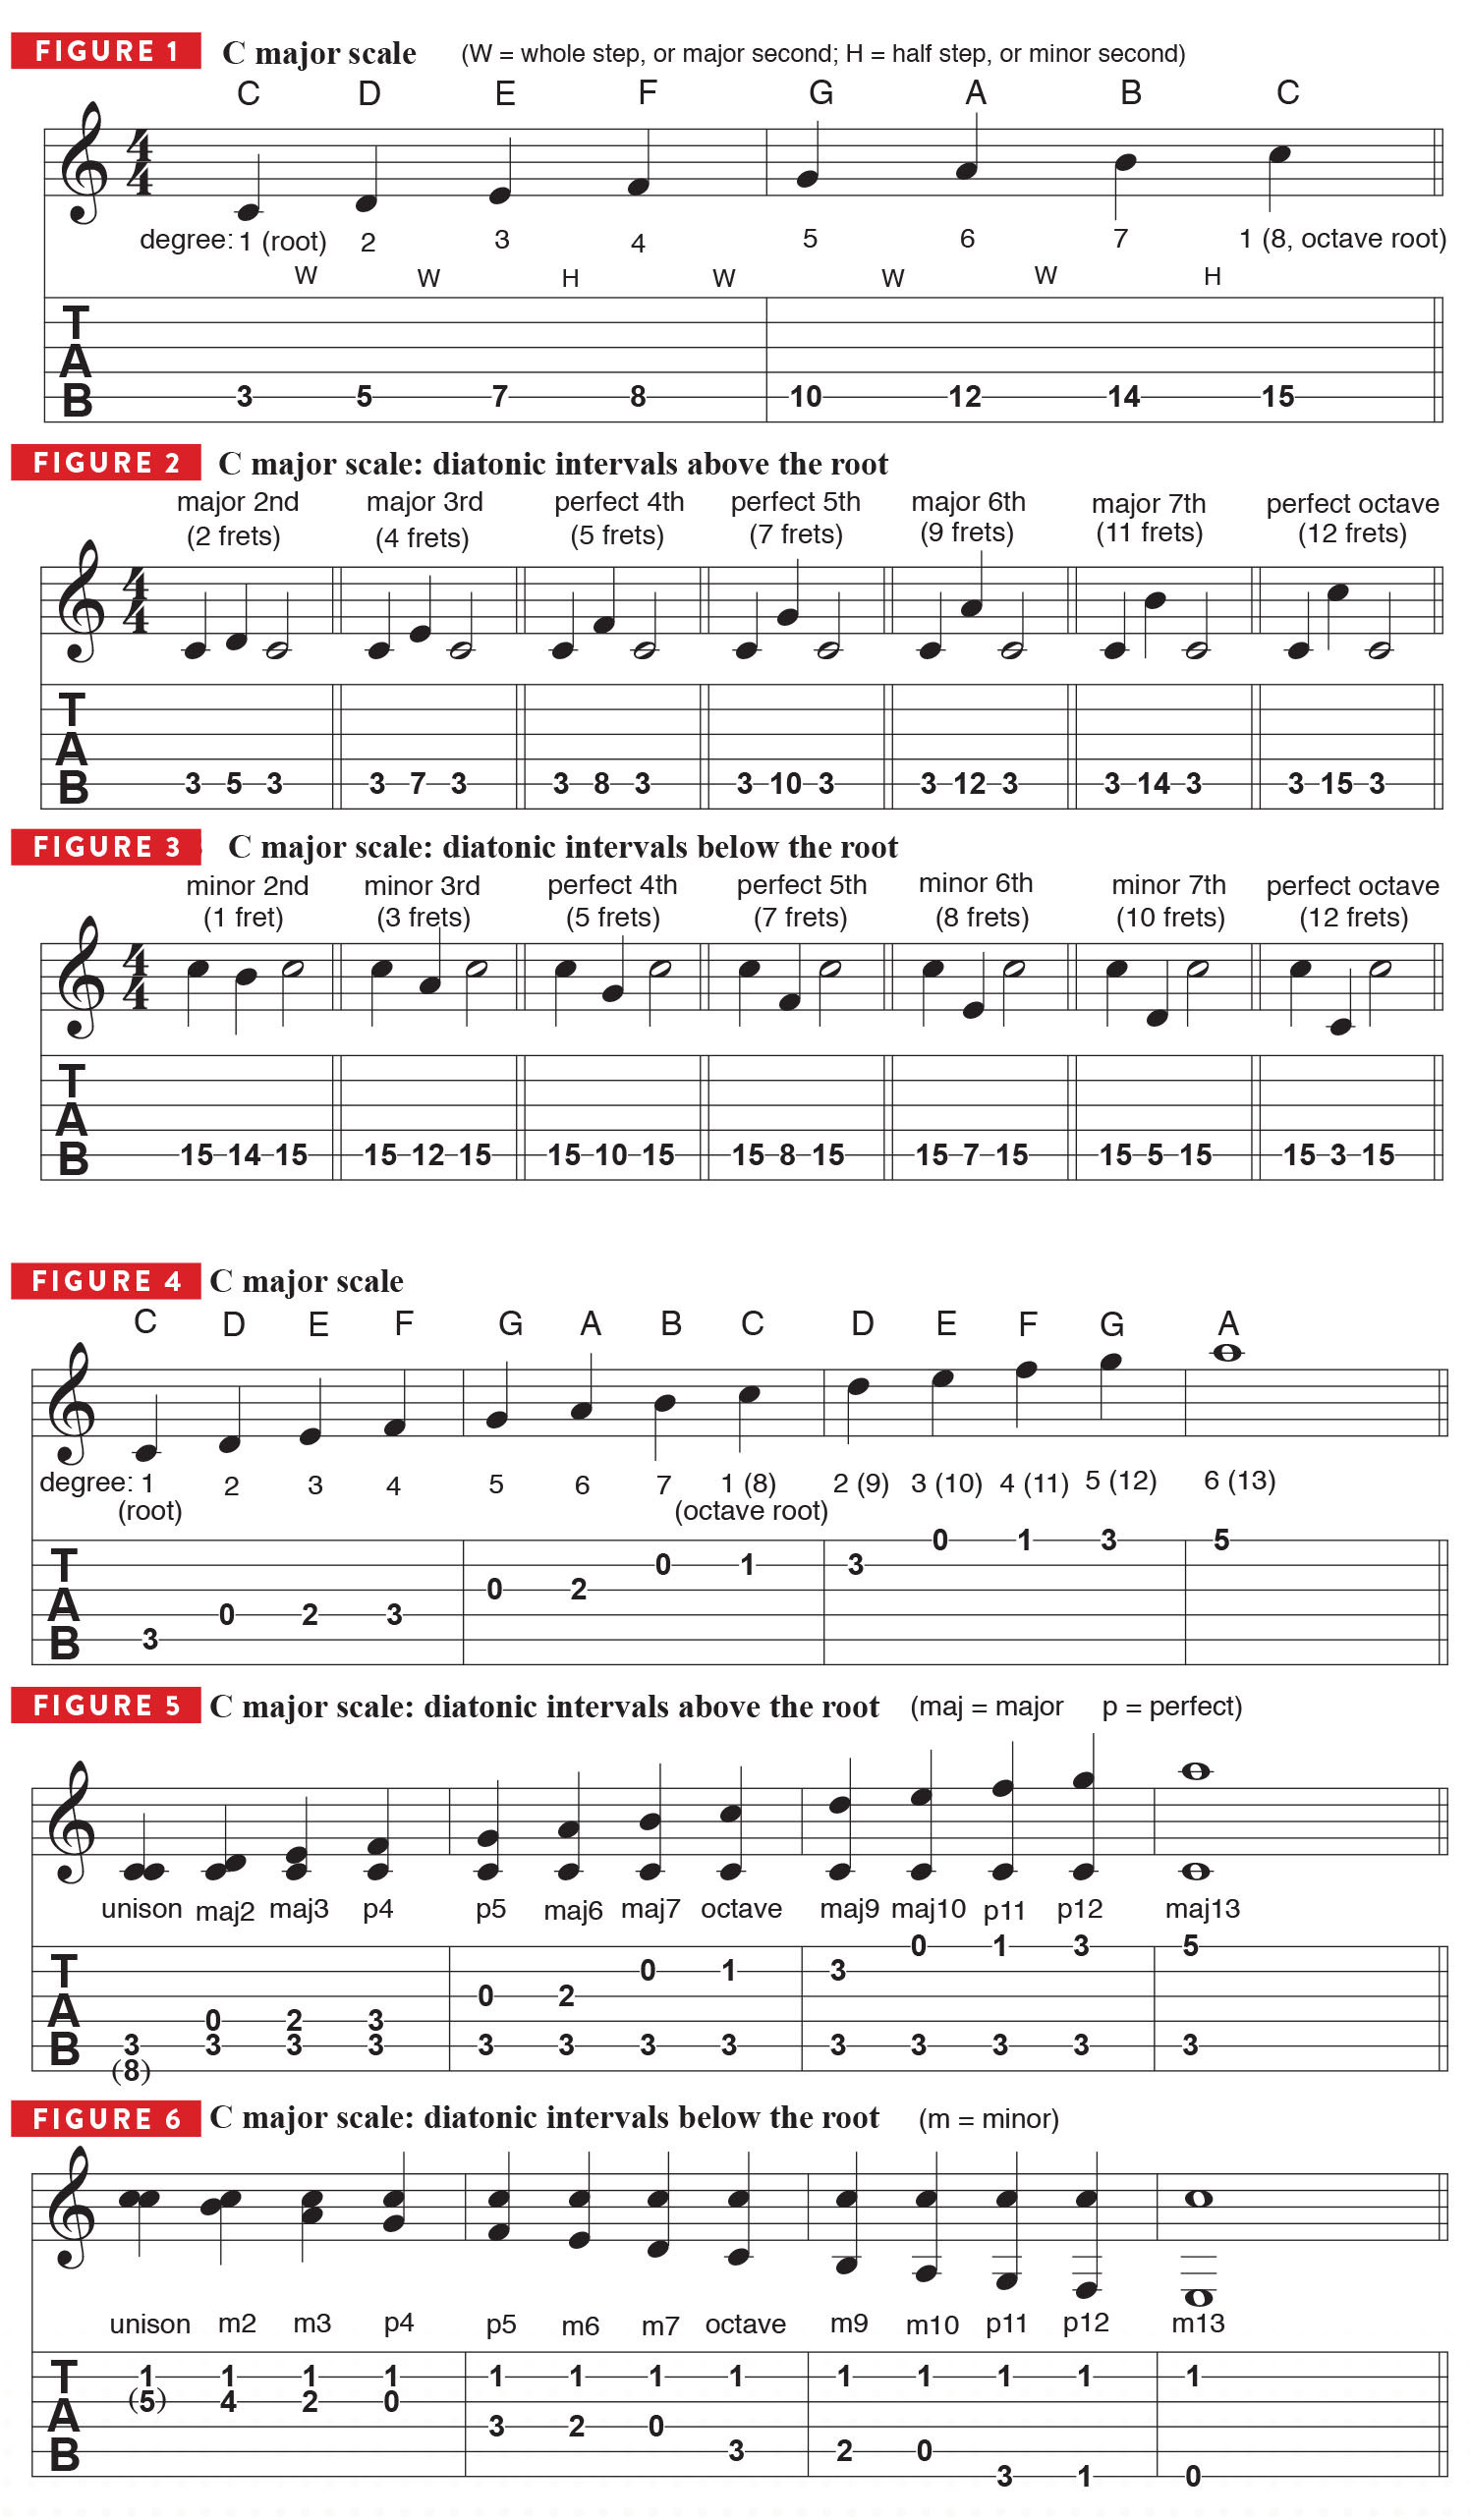
FIGURE 1 shows the scale played entirely on one string, the A string, which offers a good “number line” view and perspective to begin our study, just like learning math in grade school.
As you play through the example, notice that every note is identified and associated with a scale degree, 1 through 8, 8 being the same note as 1, or the root note, played one octave higher.
Also notice that every note is a whole step (W), or two frets, apart from the next higher or lower note, except for the pairs E and F, and B and C, or scale degrees 3 and 4, and 7 and 8, which are only a half step (H), or one fret, apart.
The standard method of identifying intervals is based on the major scale and its degrees, even when applied to other, different scales, for which certain degrees and intervals are altered, and it works the same way in any key. Your job, as a student of music and the guitar, is to take the information presented here and work on transposing and relating it to other useful keys, especially the important, common guitar keys of G, D, A, E, F and B.
All the latest guitar news, interviews, lessons, reviews, deals and more, direct to your inbox!
FIGURE 2 depicts the notes of the C major scale once again, played at the same frets on the A string, but here we’re indicating each note’s individual relationship to the C root, expressed as an interval, which would be a major 2nd, 3rd, 6th or 7th, or a perfect 4th, 5th or octave. Make a mental note of how many frets comprise each interval on the same string, as this knowledge will prove very helpful later on.
So this is how intervals are reckoned above a root note, which is rather straightforward, as it perfectly coincides with the ascending scale degrees. Identifying intervals below a note is a little more mentally challenging, as we shall see.
FIGURE 3 shows the C major scale again, with each note’s relationship to the C root indicated, but here we’re “counting down” from the high C, or “8,” which is a bit trickier to do than counting up, as we’re now moving in the opposite direction while increasing the size of the intervals (interval expansion).
Notice here the use of the labels minor 2nd, 3rd, 6th and 7th. This is important, useful information, so be sure to memorize every detail of this example, and all the others too.
FIGURES 4 to 6 illustrate the C major scale and its diatonic intervals again, but now we’re staying down in first position and utilizing all six strings so that we can hear the two notes that comprise each interval – the C root and some other note – sounded together, as a harmonic interval, as opposed to the melodic intervals in the previous examples.
Notice that we’re now going above the number 8, all the way up to 13. These are “octave-plus” intervals that are used for building what’s known as upper-structure harmony and all those fancy-sounding jazz chords, like C9, Am11 and F13.
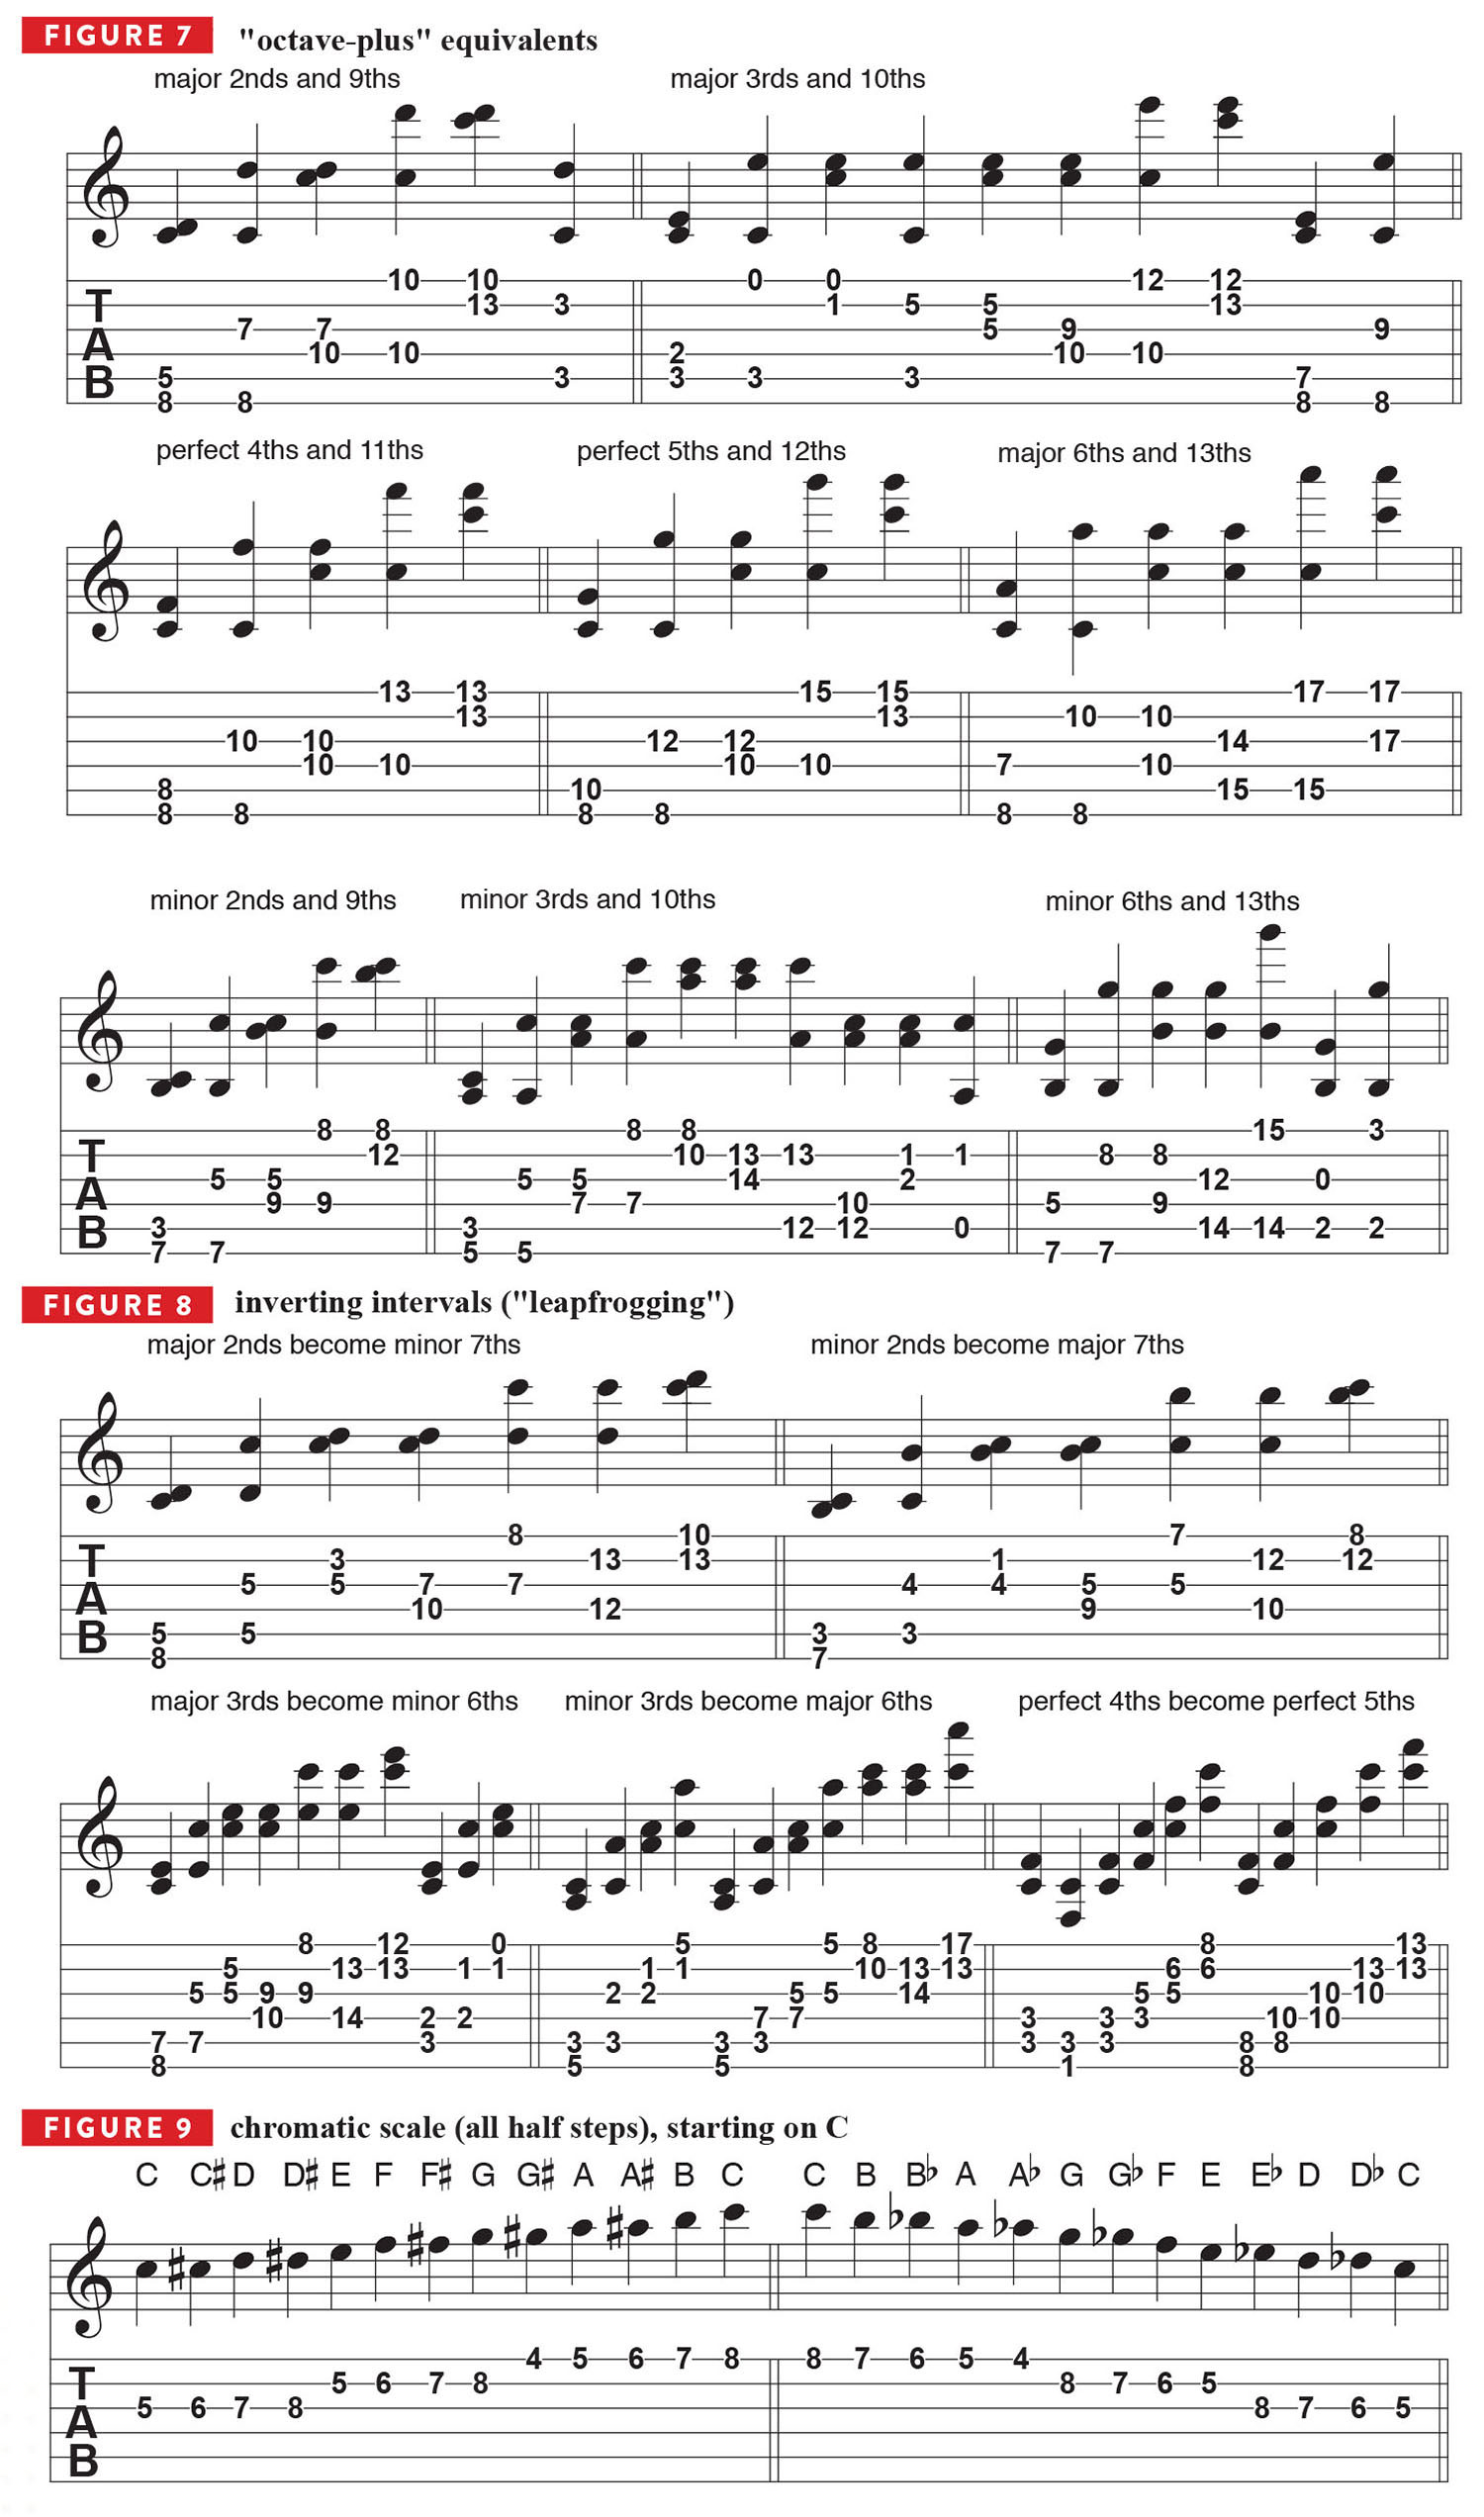
FIGURE 7 illustrates the octave-plus equivalents of various diatonic intervals in a way designed to help you make the mental and aural (ear-training) connection between the smaller intervals that reside within an octave and their “+7” counterparts – 2nds become 9ths, 3rds become 10ths, 4ths become 11ths, 5ths become 12ths and 6ths become 13ths.
In each measure, we’re taking the same two notes and moving the higher one up an octave, or moving the lower one down an octave, using various fretboard locations and string pairs.
Inversions
This is where things start to get a little tricky. Inverting an interval means either 1) taking the lower of the two notes and raising it an octave, so that it crosses over what was formerly the higher note, in terms of pitch, and now becomes the top note, or 2) taking the higher note and dropping it down an octave, so that it now becomes the lower note of the interval.
FIGURE 8 illustrates what happens when you invert intervals (to create inversions). I like to call this process “leapfrogging” because one note leaps over the other, so to speak.
Memorize this important information: When inverted, a major 2nd becomes minor 7th, and a minor 2nd becomes a major 7th, a major 3rd becomes minor 6th, and a minor 3rd become a major 6th, a perfect 4th becomes a perfect 5th, and vice versa.
Chromatic intervals
Just as there are more notes within an octave than those seven that make up the major scale – those, plus the other five “in between” notes – there are additional intervals that play an important role in music.
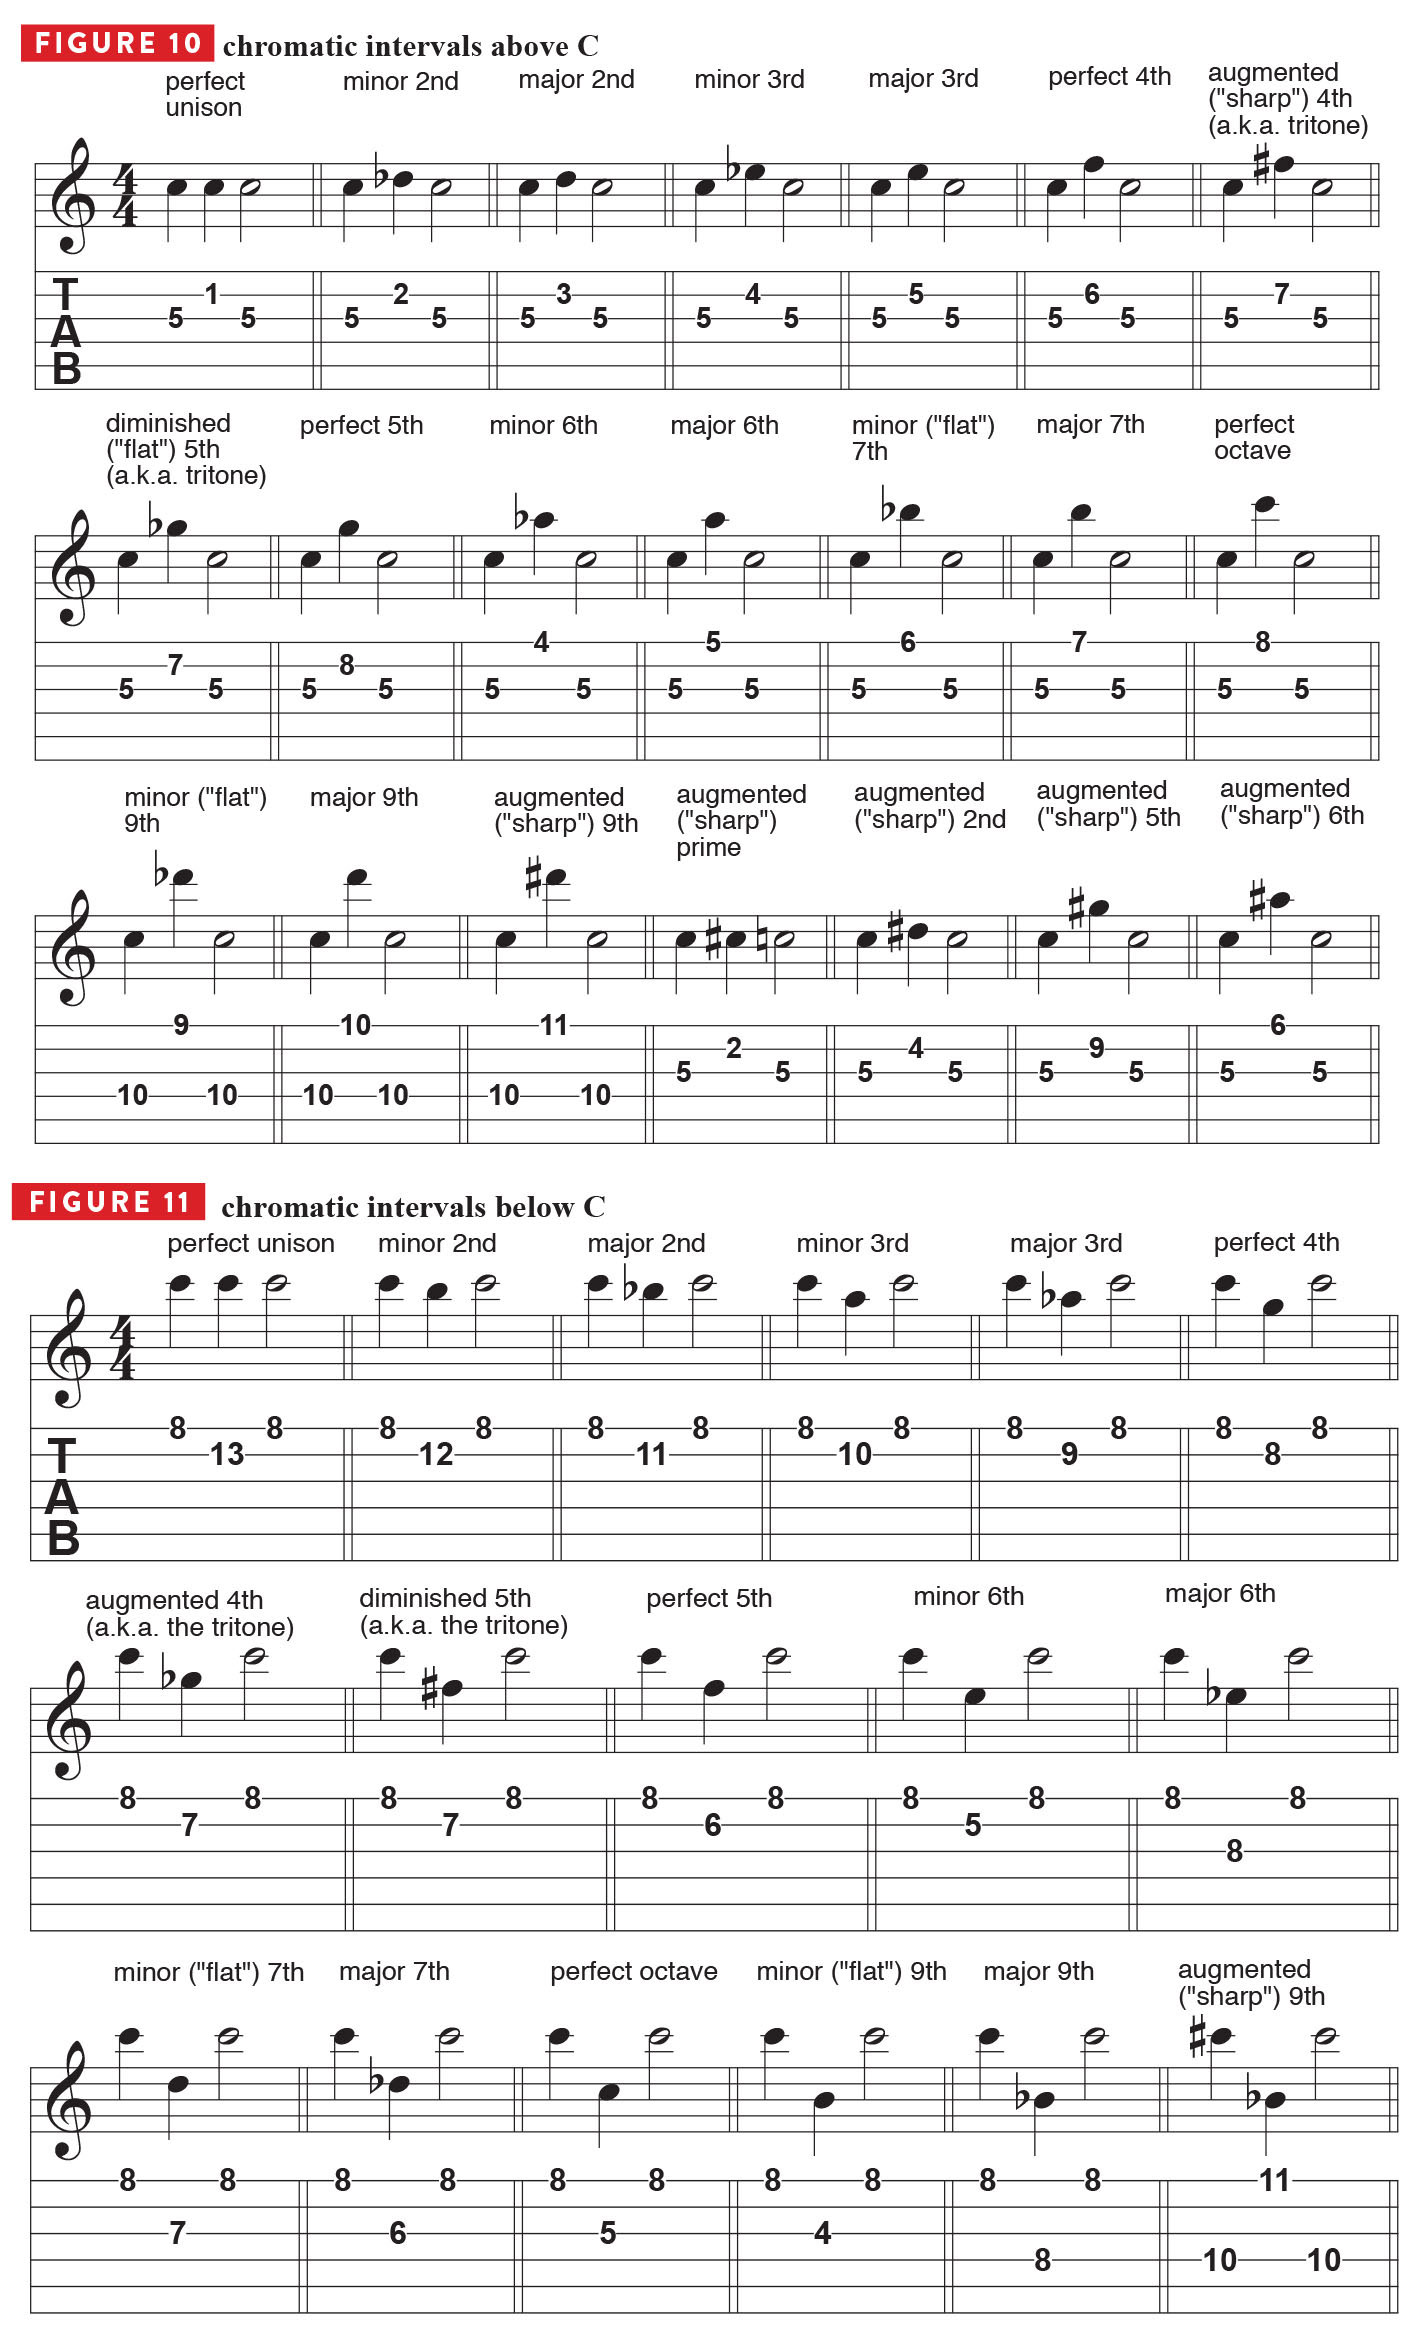
FIGURE 9 shows the 12-tone chromatic scale, which includes every semitone (or half step, or minor second interval) with an octave, starting on C.
FIGURE 10 illustrates all the one-octave chromatic intervals played above the starting note, on pairs of strings, so that you can hear the two notes played in succession, melodically, but also let them ring together, so that you can hear them harmonically.
FIGURE 11 presents the same approach but “counting down” from the high C note.
Notice in both examples that certain intervals have an “augmented” counterpart that sounds identical. This happens with the following pairs: the minor 2nd and augmented prime, the minor 3rd and augmented 2nd, the diminished 5th and augmented 4th, the minor 6th and augmented 5th, and the minor 7th and augmented 6th.
These synonymous note pairs and intervals are identified differently only because of the theoretical context in which they occur, meaning in terms of what key and scale you happen to be playing in, in the same way you would alternatively refer to D# as Eb if you were in the key of Eb or Eb minor. These “alias” notes and interval names are known as enharmonic equivalents.
The augmented 4th and diminished 5th intervals are both also identified more generically and universally as the tritone, which means “three (whole) tones.” The tritone is the midpoint of an octave and is thus symmetrical, so when you invert it, it remains a tritone (does not expand or contract like all the other intervals), even though “on paper” you’re changing an augmented 4th to a diminished 5th, or vice versa.
Consonance and dissonance
The term consonance means pleasing and stable, and dissonance means displeasing and unstable. Tritones (augmented 4ths and diminished 5ths) are considered dissonant intervals, as are major and minor 2nds, 7ths and 9ths, the minor ones being the most dissonant and jarring to the ear.
All other intervals are consonant: unisons and octaves (obviously), perfect 4ths, 5ths, 11ths and 12ths, and major and minor 3rds, 6ths, 10ths and 13ths. It is the creative, artistic application and combined use of consonant and dissonant intervals in a piece of music, and the feeling of “tension and release” that this can create, that makes it sound appealing, compelling and satisfying.
Intervals with open strings
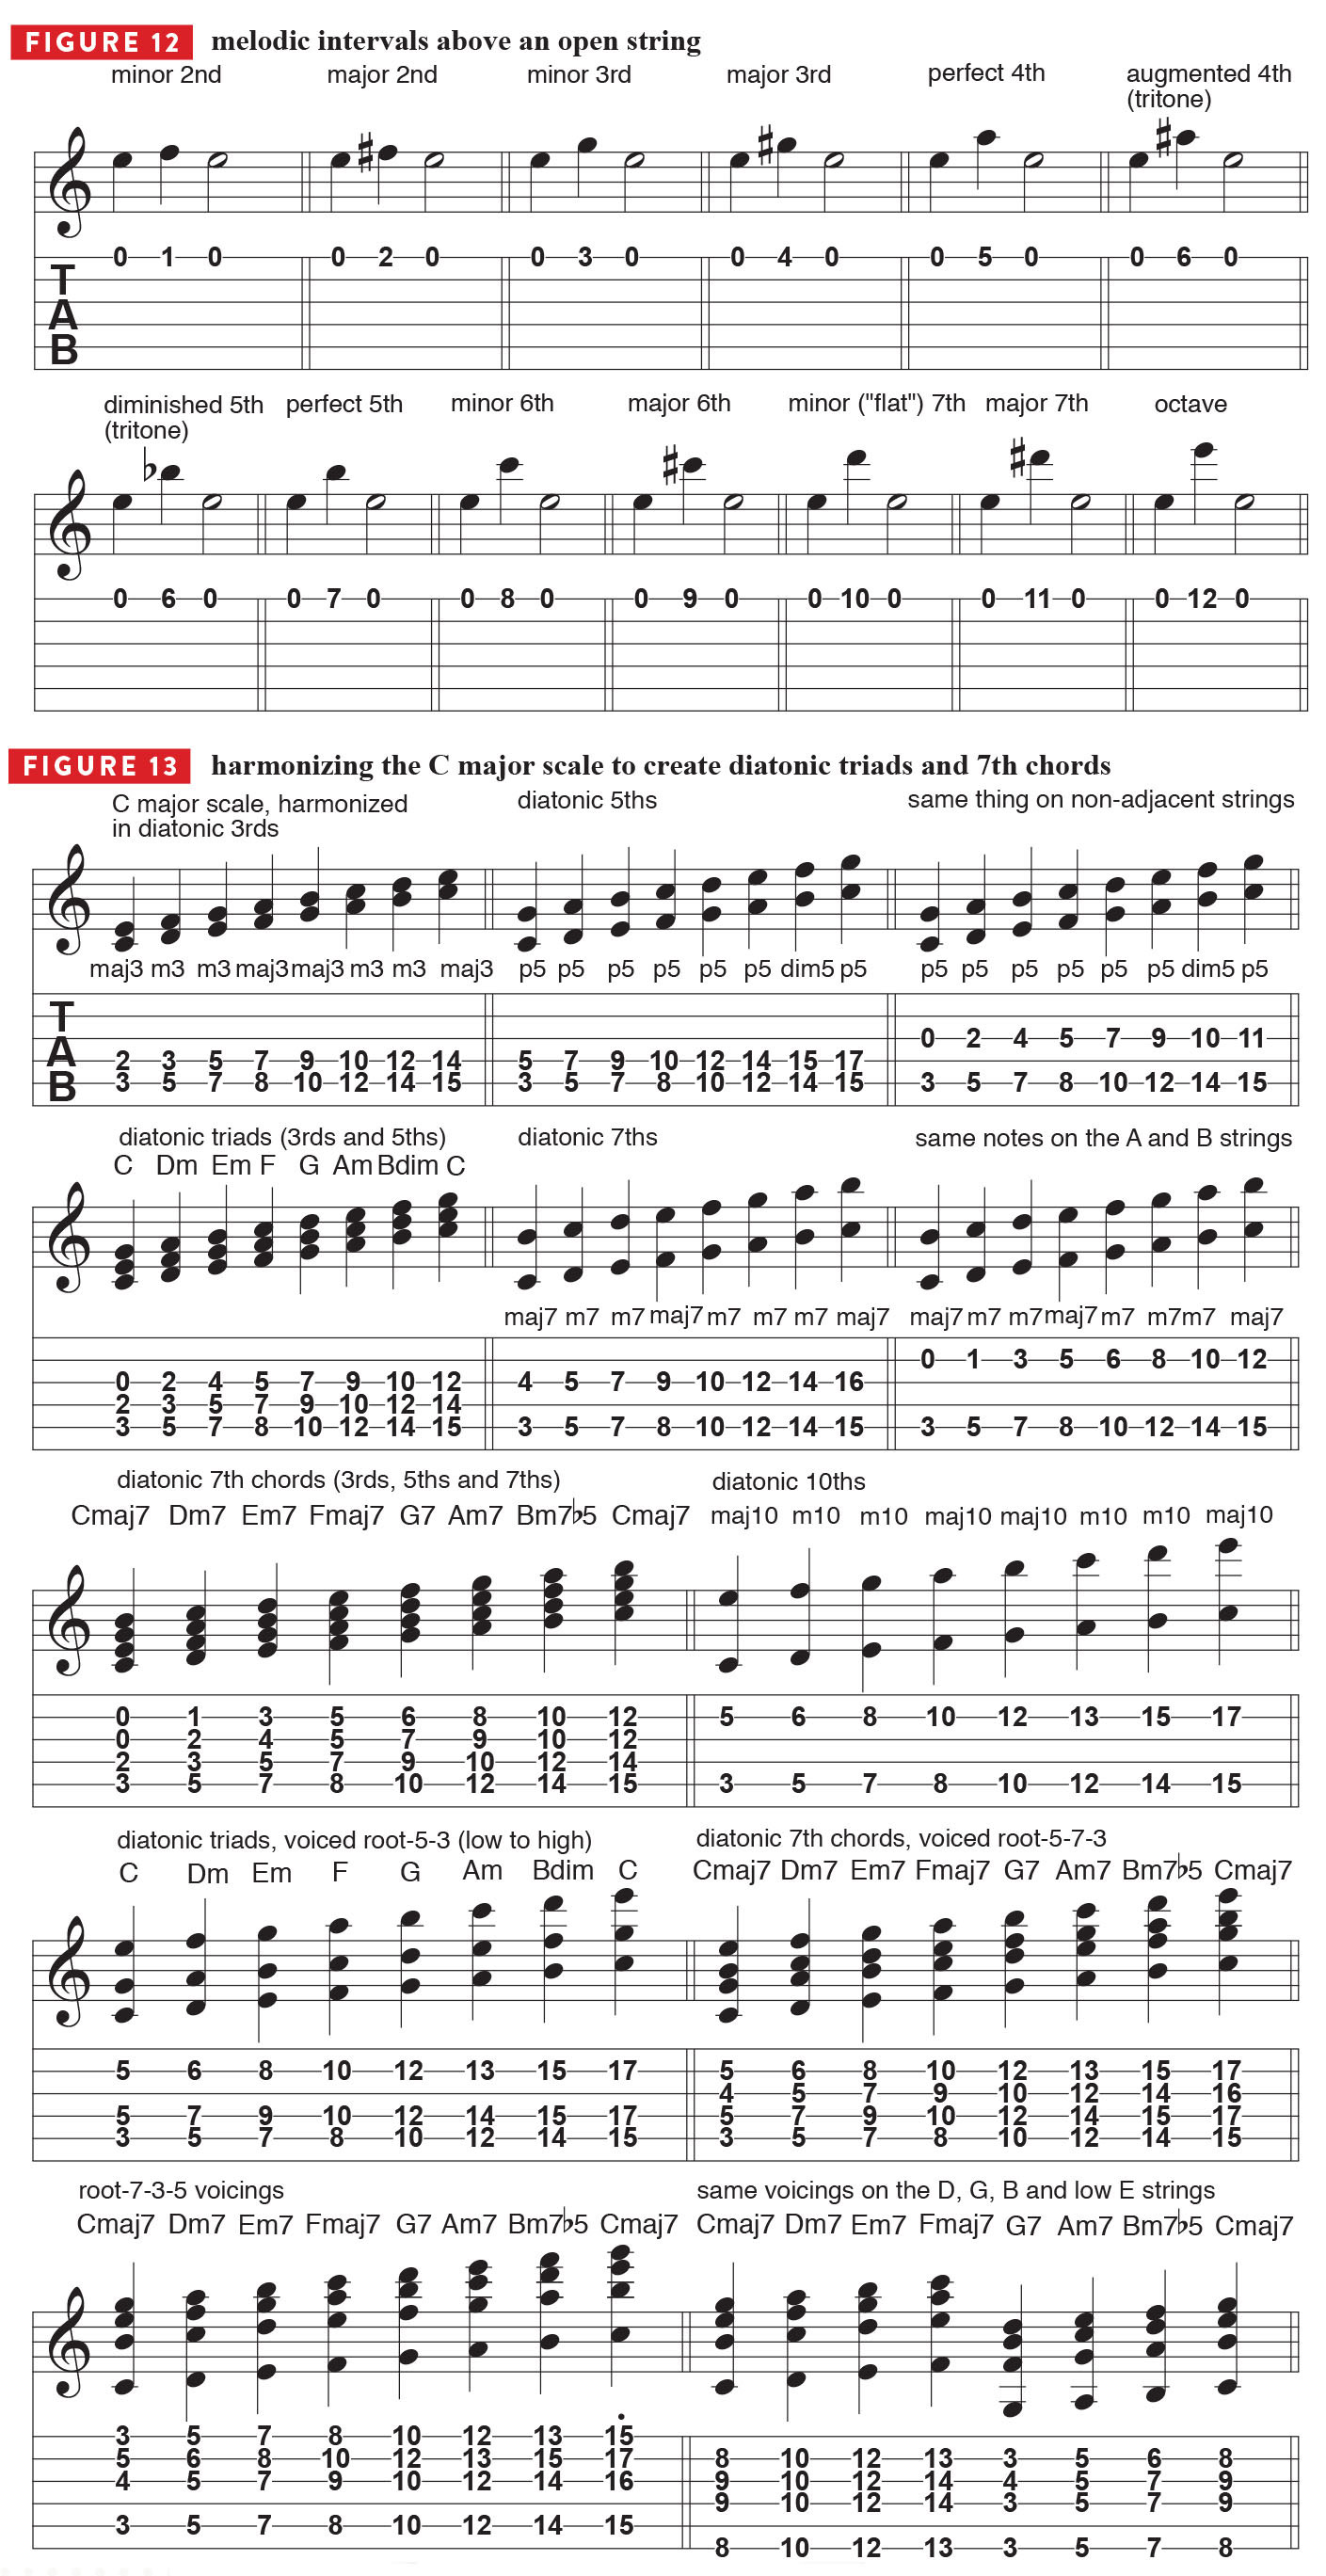
An easy, effective way to learn intervals on guitar (or bass) is to play all your chromatic intervals from an open string, starting at the first fret and working your way up to the 12th, as demonstrated on the high E string in FIGURE 12.
What’s nice about this is that it’s easy to count the number of frets associated with each interval, since you’re starting from zero. Do the same thing on the other five strings and, for “extra credit,” try going past the 12th fret, to review your 9ths through 13ths.
Building harmony and chords
As I stated at the beginning of this lesson, our entire system of harmony in Western music is based on intervals and the major scale.
FIGURE 13 shows how, by “walking up” the fretboard through the C major scale on a group of strings, using various interval stacks, in what are known as diatonic 3rds, 5ths, 7ths and/or 10ths, you can generate various sets of three- or four-note chords. Combining 3rds and 5ths generates a set of diatonic triads, and adding a 7th to each triad transforms it into a diatonic 7th chord.
And, as shown here, you can get different, and more appealing, chord voicings by moving the 3rd or 5th up an octave. (See this lesson’s accompanying video above for a detailed analysis of each measure of this example.) These are but a few of the many interval-stack options that are available for voicing chords!
Sweet 6ths
In music, oftentimes less is more. Many situations arise in which, for whatever reason, a guitarist prefers not to play full chords because they just sound too thick for the moment. A lot of times it sounds best to rather imply chords with a light two-note texture, using intervals, and diatonic 6ths are ideal for doing this.
Like 3rds, 6ths have a sweet, harmonious sound, but where 3rds sound “tight,” due to the close proximity of the notes, 6ths sound “open,” due to the wider spacing between the notes, and you can hear and appreciate each individual “voice” more distinctly.
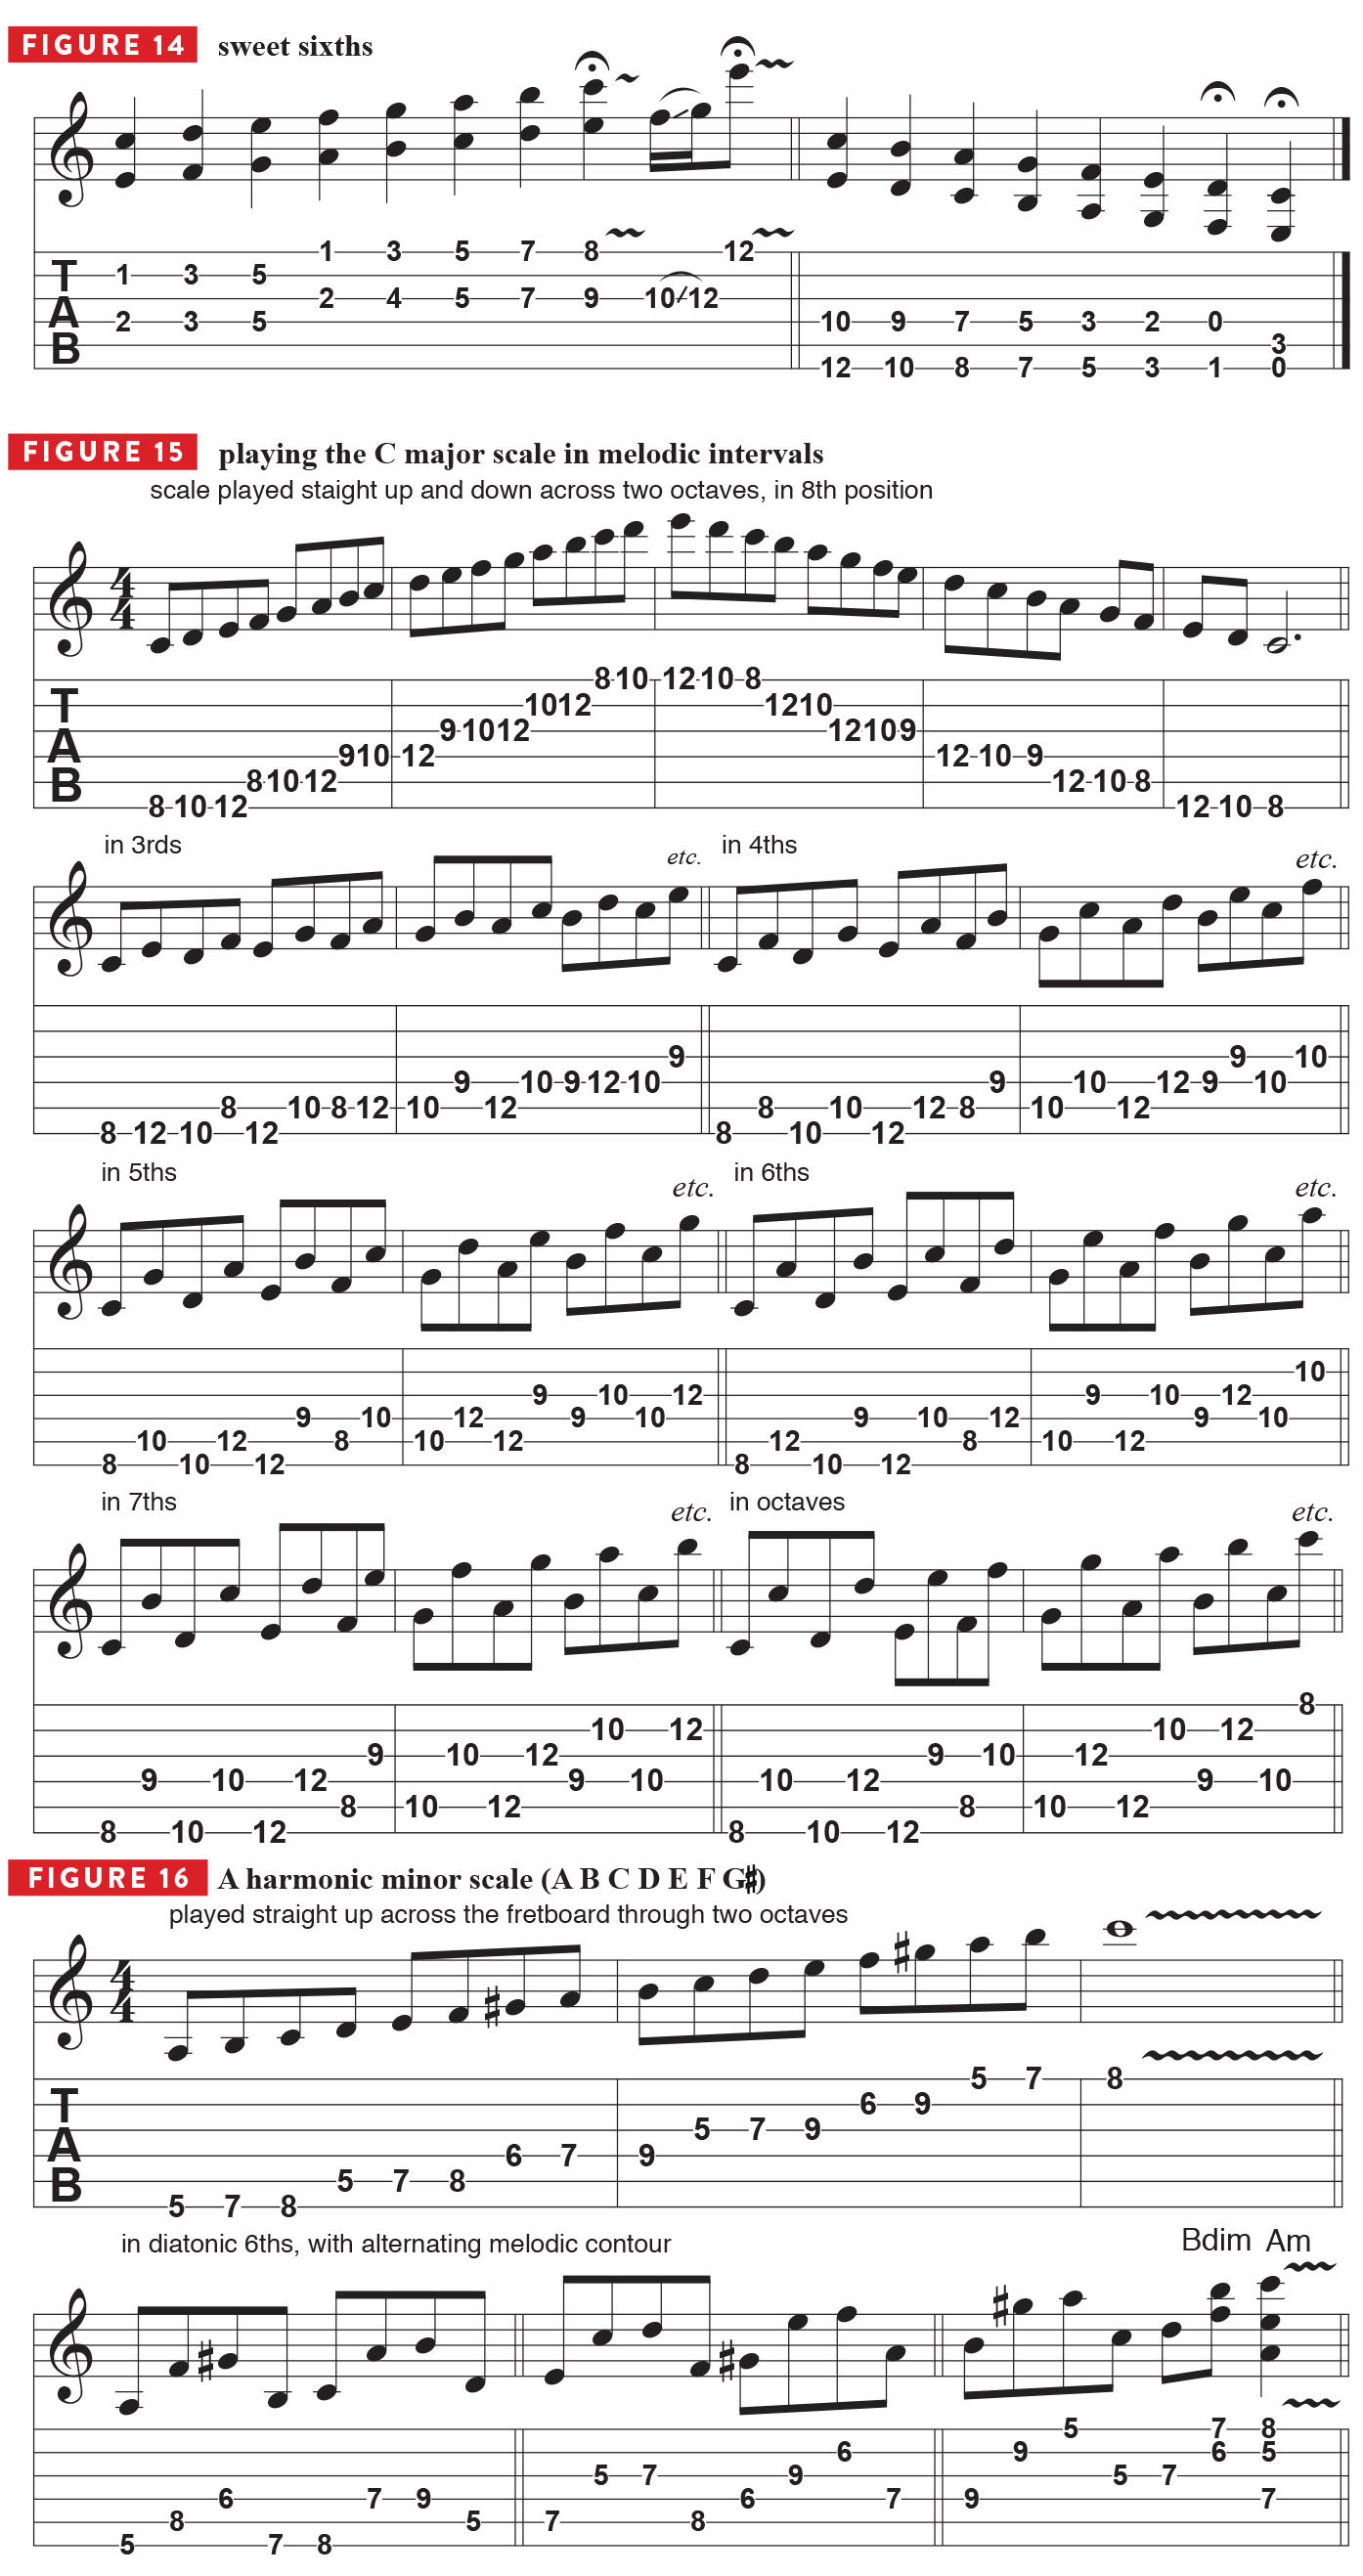
FIGURE 14 demonstrates a couple of nice ways to play diatonic 6ths in the key of C major, either strumming with the pick (and muting the unused string between the notes with the fret hand, as you would when playing a strummed octave), or fingerstyle, or using hybrid picking (pick-and-fingers technique).
Melodic intervals
In addition to being used to build chords, intervals also provide many options for creating melodies that feature skips, meaning they break away from the linear, straight-up-anddown step-wise motion of a scale (half steps and whole steps only).
FIGURE 15 shows our familiar C major scale played one last time, here in 8th position, across all six strings in two octaves, followed by the same notes played in diatonic 3rds, 4ths, 5ths, 6ths, 7ths and finally octaves. This example makes for a great alternate picking exercise (down, up, down, up, etc.).
I highly encourage you to shift this same fingering pattern of melodic intervals up and down the fretboard to other positions and key centers, and to also try applying it to other two-octave scale patterns you’ve learned, such as for various modes.
This lesson presents the tip of the musical iceberg, as far as the many ways that one can explore, study and apply intervals. For example, all the chord voicings shown herein are demonstrated in root position only and may alternatively be played in various inversions, which is the topic of another lesson.
And you also can apply everything you’ve learned here to other scales, such as melodic minor and harmonic minor, starting with the keys that you’re most familiar with and play in most often.
As a final example, to point you in a clear direction with this advisement, I offer FIGURE 16, which shows the A harmonic minor scale (A B C D E F G#), first played linearly – straight up, across two octaves – then in an interesting interval pattern of diatonic 6ths. As an added twist, notice that the melodic contour reverses and alternates with each successive pair of notes, which creates a sort of conversational “call-and-response” effect between two voices (two high notes “answered” by two low notes, and vice versa).
Over the past 30 years, Jimmy Brown has built a reputation as one of the world's finest music educators, through his work as a transcriber and Senior Music Editor for Guitar World magazine and Lessons Editor for its sister publication, Guitar Player. In addition to these roles, Jimmy is also a busy working musician, performing regularly in the greater New York City area. Jimmy earned a Bachelor of Music degree in Jazz Studies and Performance and Music Management from William Paterson University in 1989. He is also an experienced private guitar teacher and an accomplished writer.
