Getting Your Chops in Tip-Top Shape
Nita Strauss shares her preferred warm-up and practice methods and demonstrates some effective exercises for developing fret-hand dexterity and finger independence.
A question I’m often asked is, “What’s the best way to warm up before trying to shred?” This month, I’d like to share my preferred warm-up and practice methods and also demonstrate some effective exercises for developing fret-hand dexterity and finger independence.
Let’s start with an exercise that I think every guitar player should do even before picking up the guitar, and that is properly stretching your hands and arms. To my mind, the best way to stretch before playing is to work out the whole arms, as well as the hands and wrists. Start by putting your fret hand in front of you with your palm flat, as in a “stop” motion, and with your arm straight out, then rotate your hand up and down. Next, point the arm out to the side with the palm in the same position, and turn your head away from your palm. If you do this correctly, you should feel the stretch all the way up through your entire arm. Turn your head away and gently rotate your hand in circles, stretching out all of the tendons in your fingers and wrist. Repeat with the other arm.
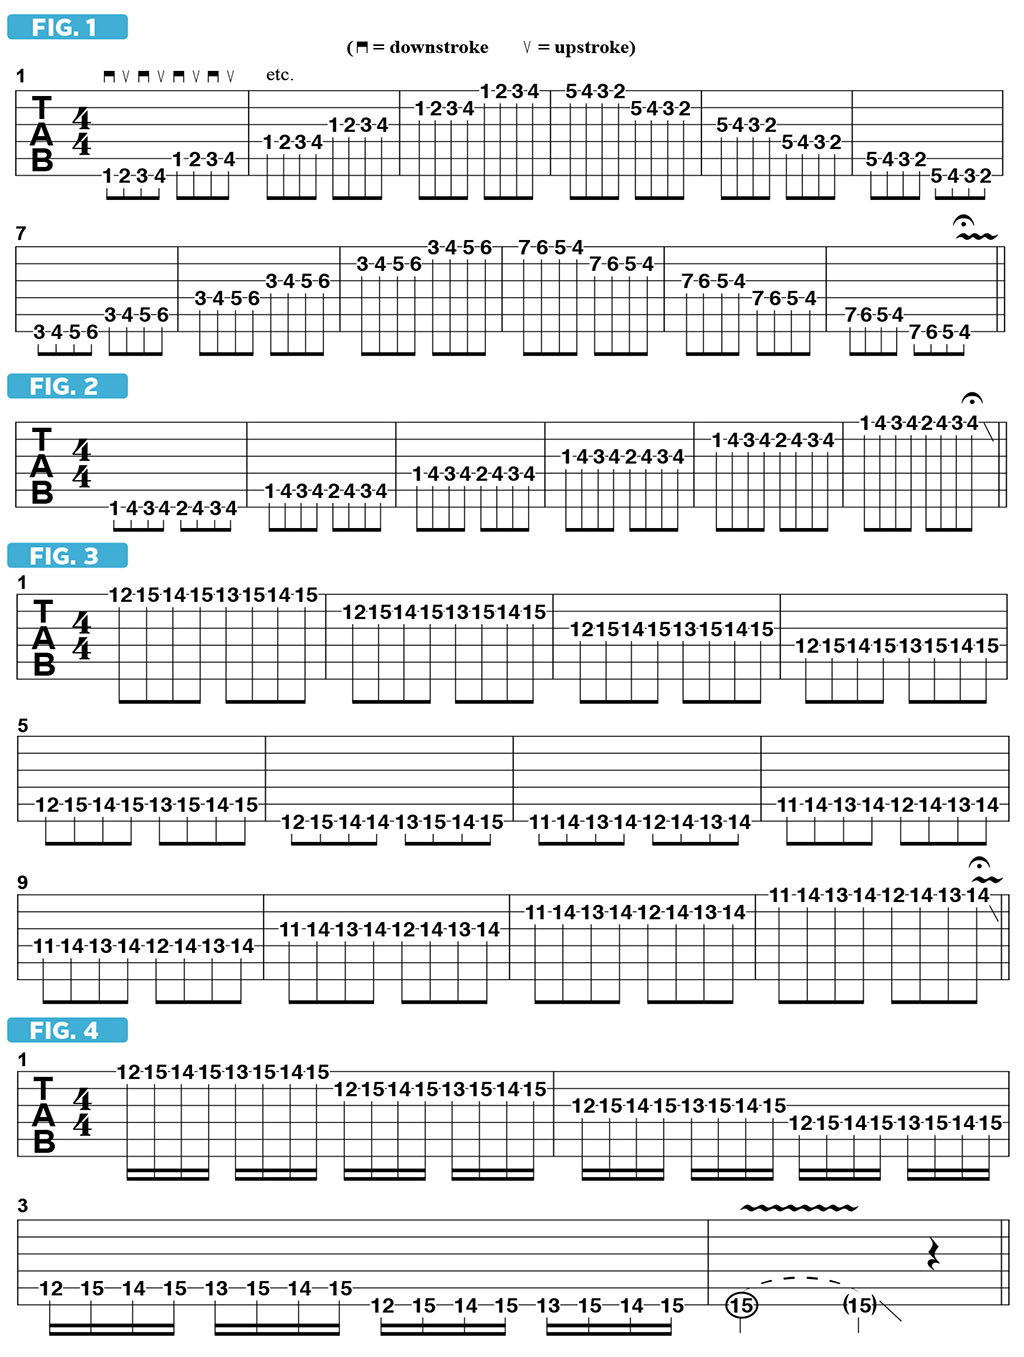
Now that we’re limbered up, let’s perform the most basic exercise of all: chromatic notes played on adjacent strings in ascending and descending manner. This time-honored practice drill helps to building fret-hand finger independence, strengthens the pinkie and gets all fingers working in syncronization.
As shown in FIGURE 1, I begin by playing the notes on the first four frets of the low E string — F F# G G# — with fingers 1, 2, 3 and 4. The pattern then moves up to each higher string. Be sure to use alternate (down-up) picking throughout. After playing the highest note on the high E string, G#, I move up one fret and then descend in the opposite manner — 4 3 2 1 — and then repeat the entire routine across all of the strings in a descending manner. When playing through this exercise, be sure to fret every note properly and pick it cleanly, so you will be practicing proper technique and articulation.

A great twist on this chromatic exercise is to change the note pattern slightly, as demonstrated in FIGURE 2. Here, the fingering and fretting pattern is index-pinkie, ring-pinkie, middle-pinkie and ring-pinkie, starting on the low E string. As in FIGURE 1, the pattern then moves across to all of the other strings. You can shift this sequence up chromatically and continue up the entire fretboard, or start in a higher position, as shown in FIGURE 3, where I begin up at the 12th fret. At the end of bar 6, I shift down one fret and begin the pattern again, this time from the low E string and move back up across the strings. FIGURE 4 illustrates the same concept but played in double-time, as 16th notes.
This is my last column for now. I hope you’ve enjoyed the lessons we’ve covered and look forward to seeing you on the road!
Nita Strauss tours regularly with Alice Cooper and has her own all-female band, We Start Wars. Visit nitastrauss.com for more information.
Get The Pick Newsletter
All the latest guitar news, interviews, lessons, reviews, deals and more, direct to your inbox!
“There are so many sounds to be discovered when you get away from using a pick”: Jared James Nichols shows you how to add “snap, crackle and pop” to your playing with banjo rolls and string snaps
Don't let chord inversions bamboozle you. It's simply the case of shuffling the notes around


![Joe Bonamassa [left] wears a deep blue suit and polka-dotted shirt and plays his green refin Strat; the late Irish blues legend Rory Gallagher [right] screams and inflicts some punishment on his heavily worn number one Stratocaster.](https://cdn.mos.cms.futurecdn.net/cw28h7UBcTVfTLs7p7eiLe.jpg)


