Eerie Arpeggios, Part 3: Describing the Haunting 7#9 Sound Melodically

In our previous two lessons (August and September 2017 issues), I demonstrated ways to melodically describe a 7#9 sound, commonly referred to as the Jimi Hendrix “Purple Haze” chord, by playing either a major addb2 or a major 6b2 arpeggio, rooted a minor third above a given tonal center—for example, playing Caddb2 (C Db E G) or C6b2 (C Db A C) over an A bass note.
Continuing with that topic, I’d now like to show you another cool and effective way to convey that bluesy and somewhat haunting and eerie 7#9 sound with single notes, and that is by playing a 7#9 arpeggio as a four-note cell, which lends itself well to 16th-note phrasing.
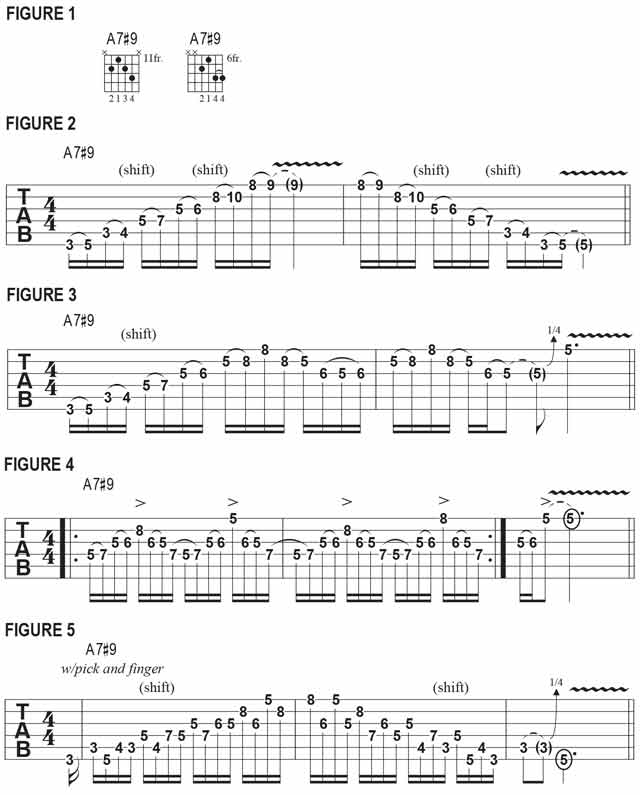
As a chordal reference, FIGURE 1 illustrates the most commonly used voicing and “grip” for A7#9 on the middle four strings, which Hendrix had employed, five frets lower, in “Purple Haze” for E7#9. Also shown here is another standard, useful A7#9 grip, which is the same four notes played on the top four strings, five frets lower.
Formally referred to as “dominant seven sharp-nine,” the 7#9 chord is theoretically spelled 1 3 5 b7 #9, the #9 being synonymous, for all intents and purposes, with the minor third, or “b3,” played an octave higher. In the key of A, these notes are, in order, A, C#, E, G and B#, respectively, B# being the enharmonic equivalent, or the same note, as C. (Likewise for C# and Db.) Notice in both chord grips that we’re not including the fifth, E, which is both impractical to finger and harmonically unnecessary to convey the chord’s signature quality.
FIGURE 2 shows a four-note A7#9 melodic cell, comprising the notes G, A, C and C#, moving diagonally across the fretboard through three octaves and back. Notice that we’re starting on G, the b7, in each octave and, when descending in bar 2, continuing the upward contour on each string by hammering on from C to C# and from G to A, as opposed to pulling off. In this case, it just sounded better to me to resolve up to the root and up to the major third from below, although you could certainly reverse the melodic contour to suit your own preference or mood.
FIGURES 3 and 4 demonstrate a couple of examples of some neat phrasing things you can do with this A7#9 cell, such as using it in conjunction with the Caddb2 and C6b2 shapes from the previous lesson (on the top three strings) and some pull-offs and string skipping, to create rolling, “yodel-y” licks.
FIGURE 5 has you using hybrid picking to perform a twisted, zig-zagging line. Notice how we’re pairing the notes G and C, then A and C#, then inverting the notes in each pair as we ascend and descend across the strings moving through two octaves. Also notice that I begin this example with a 16th-note pickup, playing the first note before the downbeat of “one.” I find that this creates a more musically punchy phrasing scheme than does beginning the pattern right on “one,” as the higher note in each pair now “pops” better rhythmically, on the eighth notes.
Have fun with these shapes and try transposing them to other keys, such as E and D, and using them in your own solos. You can employ just a small fragment of any of these longer patterns, such as playing the 7#9 shape in only one octave across two or three strings, which will make it easier to integrate the 7#9 sound into your own improvisations on the fly.

Get The Pick Newsletter
All the latest guitar news, interviews, lessons, reviews, deals and more, direct to your inbox!
Over the past 30 years, Jimmy Brown has built a reputation as one of the world's finest music educators, through his work as a transcriber and Senior Music Editor for Guitar World magazine and Lessons Editor for its sister publication, Guitar Player. In addition to these roles, Jimmy is also a busy working musician, performing regularly in the greater New York City area. Jimmy earned a Bachelor of Music degree in Jazz Studies and Performance and Music Management from William Paterson University in 1989. He is also an experienced private guitar teacher and an accomplished writer.
“There are so many sounds to be discovered when you get away from using a pick”: Jared James Nichols shows you how to add “snap, crackle and pop” to your playing with banjo rolls and string snaps
Don't let chord inversions bamboozle you. It's simply the case of shuffling the notes around


![Joe Bonamassa [left] wears a deep blue suit and polka-dotted shirt and plays his green refin Strat; the late Irish blues legend Rory Gallagher [right] screams and inflicts some punishment on his heavily worn number one Stratocaster.](https://cdn.mos.cms.futurecdn.net/cw28h7UBcTVfTLs7p7eiLe.jpg)


