How to Create Independent Polyrhythms

Back in my October 2016 column, I detailed some of the concepts I utilize in the song “The Impossible,” from my album What Just Happened.
It’s a deceptively complex song and one that I’m often asked about during my clinics. To review, the prefix “poly” means “more than one,” and the term polyrhythm is used to describe a musical idea in which more than one rhythmic pattern is happening simultaneously.
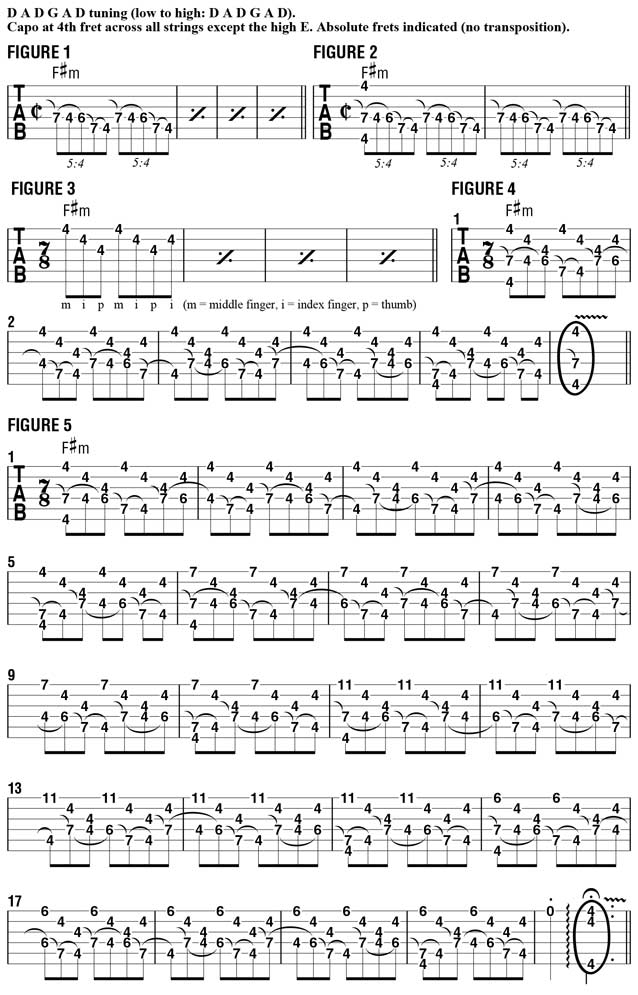
“The Impossible” is performed in DADGAD tuning (low to high: D A D G A D) with a capo at the fourth fret; the twist is that the capo covers the bottom five strings only, so the first string, tuned to a high D, remains un-capo-ed. The resultant pitches that are sounded when picking across the “open,” or unfretted, strings are, from low to high, F# C# F# B C# D, yielding a somewhat ominous sounding F#sus4b6 chord. For the tablature in this column, any note indicated at the fourth fret is sounded as an open string.
Previously, we looked at the tune’s bridge section, wherein a repeating pattern of 12 notes are hammered with the fret hand while a five-note pattern is picked with the pick hand. In this lesson, we’ll skip forward to the tune’s outro section, which is built from a repeating pattern of five notes sounded with the fret hand and a pattern of seven notes sounded with the pick hand.
Let’s first look at each part individually. Keep in mind that, as a rhythm of five notes and a rhythm of seven notes overlap and happen simultaneously, you would need a mathematical multiple of both numbers for the phrase to line up at the start again; in other words, the pattern of five notes has to happen seven times, and the seven-note has to happen five times (35 notes in either case), before the figure is repeated verbatim.
FIGURE 1 illustrates the fret-hand part. All of these notes are sounded as either a hammer-on or a pull-off, beginning with a “hammer-on from nowhere” to get the line started. I begin by bringing the middle finger down onto the actual seventh fret of the fourth string (three frets above the capo) and pull off to the “open” string, tabbed at the fourth fret, and then hammer back onto the sixth fret. Afterward, I hammer-on to the seventh fret of the fifth string and pull off to the “open” string. At the start of each phrase in this tune, I pick the sixth and first strings along with the first hammered note, as shown in FIGURE 2.
FIGURE 3 illustrates the pick-hand pattern: I pick the top three strings in descending order twice, then pick the second string again, using m-i-p-m-i-p-i (middle-index-thumb-middle-index-thumb-index). FIGURE 4 combines the two hands and parts, with the sixth and first strings also picked at the beginning of bars 1 and 5.
Get The Pick Newsletter
All the latest guitar news, interviews, lessons, reviews, deals and more, direct to your inbox!
FIGURE 5 represents the entire outro, and the only variation is that the high melody note sounded on the first string is changed at the end of each five-bar pattern. Play through each bar slowly and carefully so be sure the two hands are properly synchronized.
"Upgrading from your entry-level acoustic opens the door to an entirely new world of tonewoods, body shapes, and brands": 6 signs it's time to upgrade from your first acoustic guitar
"I'm past my prime": 5 common excuses for not learning the guitar – and 5 body and mind-boosting reasons you should
![[from left] George Harrison with his Gretsch Country Gentleman, Norman Harris of Norman's Rare Guitars holds a gold-top Les Paul, John Fogerty with his legendary 1969 Rickenbacker](https://cdn.mos.cms.futurecdn.net/TuH3nuhn9etqjdn5sy4ntW.jpg)

